
Welcome to the Screen Story Guide!

Imagine spending an hour preparing a product demonstration, carefully arranging every window, rehearsing every click, and making sure your presentation looks just right.
Then you press record, only to discover that your final video feels flat, the cursor moves awkwardly, and viewers struggle to follow what you’re showing. A little frustrating, isn’t it?
This is where Screen Story comes into the picture.
Creating a good screen recording is no longer just about capturing whatever happens on your desktop. Entrepreneurs, designers, educators, marketers, and content creators need videos that explain ideas clearly, demonstrate products beautifully, and keep viewers interested.
A basic screen capture might show the process, but a polished recording can actually tell a story.
The Screen Story App brings screen recording and video editing together in a workflow designed for Mac users.
Instead of relying entirely on complicated editing software, you can record your screen, adjust the visual presentation, customize cursor behavior, introduce zoom effects, and prepare videos for sharing.
Whether you’re creating software tutorials, product demonstrations, educational presentations, or engaging social media content, understanding the features of Screen Story can make your video creation process considerably easier.
Let’s explore how it works, what its features mean, and how you can use them to create more professional screen recordings.
What Is Screen Story and Why Does It Matter?
Screen Story is a Mac-focused screen recording application designed to help users turn ordinary desktop activity into visually engaging videos.
It combines screen capture with editing features, allowing creators to refine their recordings without building an unnecessarily complicated production workflow.
Think about a software tutorial. You might need to demonstrate how to open an application, navigate its settings, change a particular option, and save the result.
A standard recording captures every movement, including the unnecessary pauses and moments when the viewer might not know where to look.
A professional screen recording app for Mac should make those important moments easier to understand.
Screen Story focuses on features such as:
- Recording desktop screens and application windows.
- Editing recordings through a visual timeline.
- Cropping unnecessary areas from videos.
- Trimming unwanted portions of a recording.
- Customizing video backgrounds and spacing.
- Adjusting cursor appearance and visibility.
- Adding automatic and manual zoom effects.
- Exporting finished videos with suitable quality settings.
The real value is not simply capturing more footage. It’s making the footage worth watching.
Who Can Benefit From the Screen Story App?
Different people create screen recordings for different reasons. A designer may want to demonstrate a new interface, while an educator might need to explain a complicated process to beginners. Their goals aren’t identical, but they share one thing: the need to communicate visually.
Entrepreneurs and Business Owners
Business owners can use professional screen recording to explain digital products, demonstrate software features, and introduce services to potential customers.
For example, an entrepreneur launching a new online platform could record a walkthrough showing how customers register, explore the dashboard, and use the main features.
A clear demonstration can answer questions before customers even ask them.
Designers and Product Teams
Designers frequently need to present prototypes, interface changes, and creative workflows. Screen recordings make it easier to show how a design behaves rather than simply displaying a static screenshot.
With thoughtful cropping, zoom effects, and cursor customization, a product demonstration can look much more intentional.
Educators and Tutorial Creators
Teachers, trainers, and online instructors can create instructional videos that guide viewers through software, websites, and digital processes.
Instead of explaining every step verbally, they can show the exact actions on screen. This is particularly useful when creating educational presentations or beginner-friendly software tutorials.
Marketers and Social Media Managers
Marketing teams can create product videos, short demonstrations, and visual content for social platforms.
A carefully edited screen recording can communicate a product’s benefits without requiring an elaborate filming setup.
Getting Started With Screen Story on Mac
Before recording your first video, it’s worth checking whether your Mac meets the application’s requirements. Compatibility matters because screen capture, video editing, and rendering all depend on your computer’s operating system and hardware.
The supplied Screen Story guide lists the following compatibility details:
- Operating system: macOS 12 or later.
- Processor: Apple M1 or later, with Intel-based Mac support also listed.
- Memory: 8GB RAM minimum.
- MacBook Pro: 2018 or later.
- MacBook Air: 2020 or later.
These are the specifications provided in the supplied guide; check the current application’s official compatibility information before installing.
Download and Install the Application
Start by obtaining Screen Story from its official distribution source. Follow the installation instructions provided with the application, then open it from your Mac.
It’s a good idea to close unnecessary applications before recording, particularly if you plan to capture a lengthy software demonstration.
A tidy desktop also makes a difference. Nobody needs to see fifteen unrelated windows while you’re explaining one simple feature!
Understand macOS Screen Recording Permissions
One important part of the setup process is granting the necessary system permissions.
macOS protects screen content and certain forms of user interaction through privacy controls. Depending on the application’s functionality, you may need to enable:
- Screen Recording Permission: Allows the application to capture your screen or supported application windows.
- Accessibility Permission: Allows supported accessibility-related interactions and cursor or control functionality.
You can review these permissions in your Mac’s System Settings under Privacy & Security.
If recording doesn’t work as expected, check whether the appropriate permissions have been granted. Some permission changes may require restarting the application.
Remember, granting permissions should always be a deliberate decision. Only authorize applications you trust.
How to Record Your Screen on Mac Using Screen Story
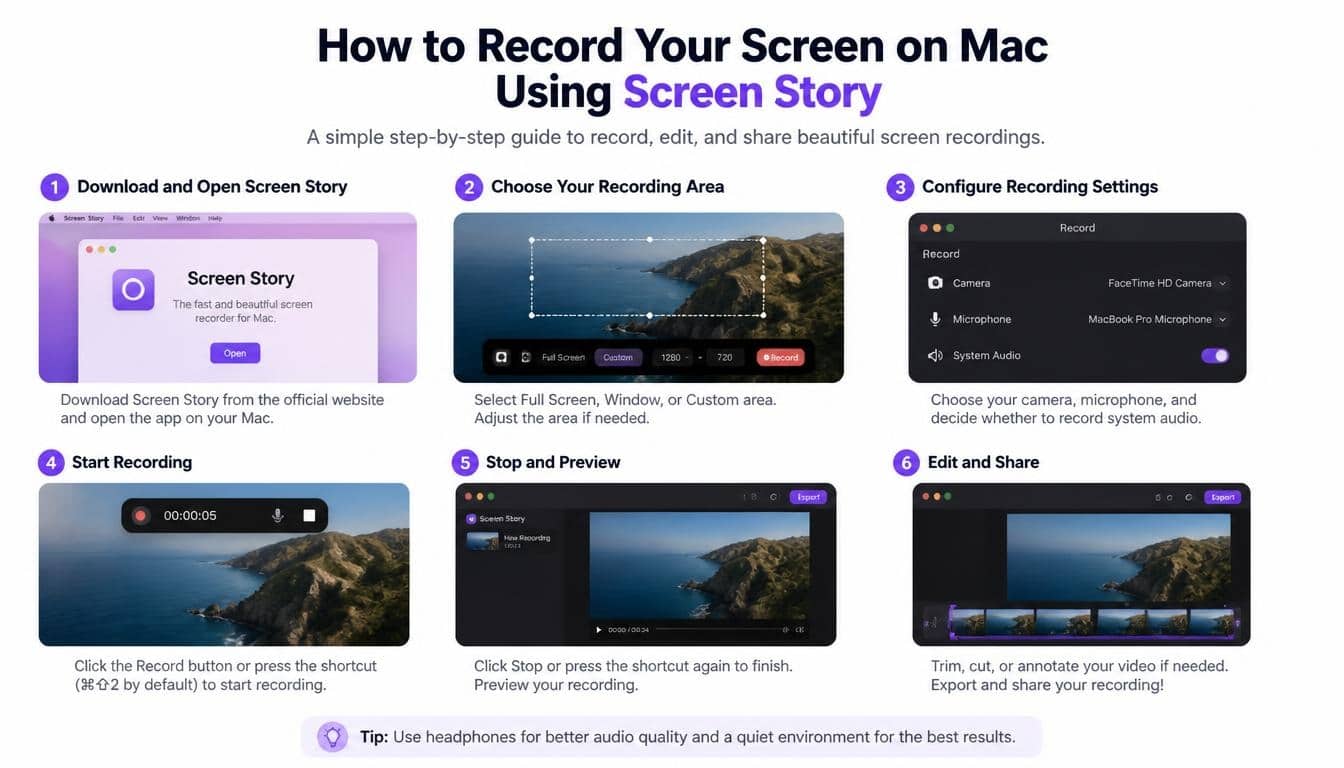
Recording your screen is the starting point of the entire creative process. However, a little preparation before pressing the record button can save quite a bit of editing later.
Choose What You Want to Record
Start by deciding whether you need to capture your entire desktop or a particular application window.
Recording a specific window is useful for focused demonstrations because it reduces unnecessary visual distractions. Desktop recording, on the other hand, can be better when your tutorial involves switching between multiple applications.
Think about the person watching your video. What exactly do they need to see?
Prepare Your Recording Environment
Before starting, close unrelated windows, organize your desktop, and make sure the relevant application is ready.
If you’re recording a tutorial, prepare the steps in advance. You don’t need to memorize every movement, but knowing what comes next makes the recording feel more natural.
Start Capturing Your Screen
Open Screen Story and use its recording interface to select the desired recording area or application window.
Check your settings before beginning. Once everything looks right, start the recording and perform the actions you want to demonstrate.
Try to move your cursor deliberately. Small, controlled movements generally make instructional videos easier to follow.
Review the Recording
After capturing your footage, take a moment to review it.
Look for unnecessary pauses, accidental clicks, confusing movements, or sections that don’t contribute to the explanation.
This is where the combination of screen recording and video editing becomes especially useful.
Video Editing: Turn Ordinary Recordings Into Professional Videos
A raw recording is only the beginning. The editing stage is where you shape the viewing experience.
Screen Story’s editing features include video cropping, trimming, background customization, cursor settings, and zoom adjustments.
Each feature serves a different purpose, and using them thoughtfully can make a noticeable difference.
Video Cropping: Keep the Important Details in Focus
Sometimes your original recording includes more information than viewers actually need.
Perhaps there’s an unnecessary sidebar, an empty desktop area, or a distracting section around the application window.
Video cropping helps remove those unwanted areas and create a cleaner composition.
When learning how to crop a screen recording video, consider the following:
- Keep the important application interface visible.
- Remove unnecessary empty space.
- Avoid cutting off buttons, menus, or important text.
- Maintain a consistent composition throughout the video.
- Check the final dimensions before exporting.
Cropping is especially valuable for product demonstrations, where the goal is to show specific interface details without distracting viewers.
Video Trimming: Remove Unnecessary Moments
A tutorial doesn’t become better simply because it’s longer.
You may have recorded several seconds before starting the demonstration, paused while looking for a setting, or repeated an action unnecessarily.
Video trimming helps remove unwanted portions and create a more focused presentation.
When editing recorded screen videos, pay attention to:
- Long pauses between actions.
- Accidental movements.
- Repeated explanations.
- Unnecessary opening and closing footage.
- Sections that interrupt the flow of the demonstration.
A useful trick is to watch the recording as if you were seeing it for the first time. If a particular moment makes you wonder why it’s there, it probably deserves another look.
Background Customization and Border Radius
The appearance of a screen recording matters more than many beginners realize.
Two videos can contain exactly the same information, yet one may look considerably more polished because of its visual presentation.
Customize Your Screen Recording Background
Background customization allows creators to adjust the visual space surrounding their recorded content, where supported by the editor.
Instead of presenting a recording as a plain rectangular capture, you can create a more designed composition.
A suitable background can help your video feel consistent with your brand, website, or presentation style.
Consider these ideas:
- Choose background colors that complement your product.
- Keep sufficient spacing around the recording.
- Avoid colors that compete with important interface elements.
- Maintain consistency across multiple tutorial videos.
- Use simple backgrounds for educational content.
Learning how to customize screen recording backgrounds can be particularly helpful when creating product videos for marketing campaigns.
Add Rounded Corners With Border Radius
Border radius refers to the roundness applied to the corners of a visual element.
Rounded corners can give screen recordings a softer, more contemporary appearance. They’re commonly used in product presentations, software demonstrations, and social media videos.
However, moderation is important. Excessively rounded frames may reduce the available viewing area or make certain layouts feel awkward.
Choose a corner radius that complements the overall design rather than drawing attention away from the actual demonstration.
Cursor Settings: Make Every Click Easier to Follow
The mouse cursor might look like a small detail, but it plays a surprisingly important role in instructional videos.
When viewers watch a software tutorial, they often follow the cursor to understand where an action is taking place.
A cursor that moves too quickly or disappears among interface elements can make an otherwise excellent explanation confusing.
Customize Cursor Appearance
Cursor customization gives creators more control over how the pointer appears in supported recordings.
Depending on the available options, you may be able to adjust cursor size, visibility, or appearance.
This is particularly useful when creating tutorials for beginners, who may not immediately recognize which interface element is being selected.
Adjust Cursor Size
Learning how to change cursor size in screen recording videos can improve accessibility and visibility.
A slightly larger cursor may make small buttons and menu selections easier to follow, especially when viewers are watching on smaller screens.
Don’t make it unnecessarily large, though. The cursor should guide attention rather than become the main attraction.
Hide the Cursor When Necessary
There are moments when the cursor doesn’t contribute anything to the visual explanation.
For example, a finished product interface or a static demonstration might look cleaner without a visible pointer.
Understanding how to hide the cursor in screen recording videos gives you another way to control the final presentation.
Choose Between Cursor Styles
Some recording workflows distinguish between a traditional macOS pointer and a touch-style cursor.
The right choice depends on the content. A conventional cursor generally makes sense for desktop software tutorials, while an alternative pointer appearance may suit certain instructional or presentation styles.
Screen Recording With Zoom Effects
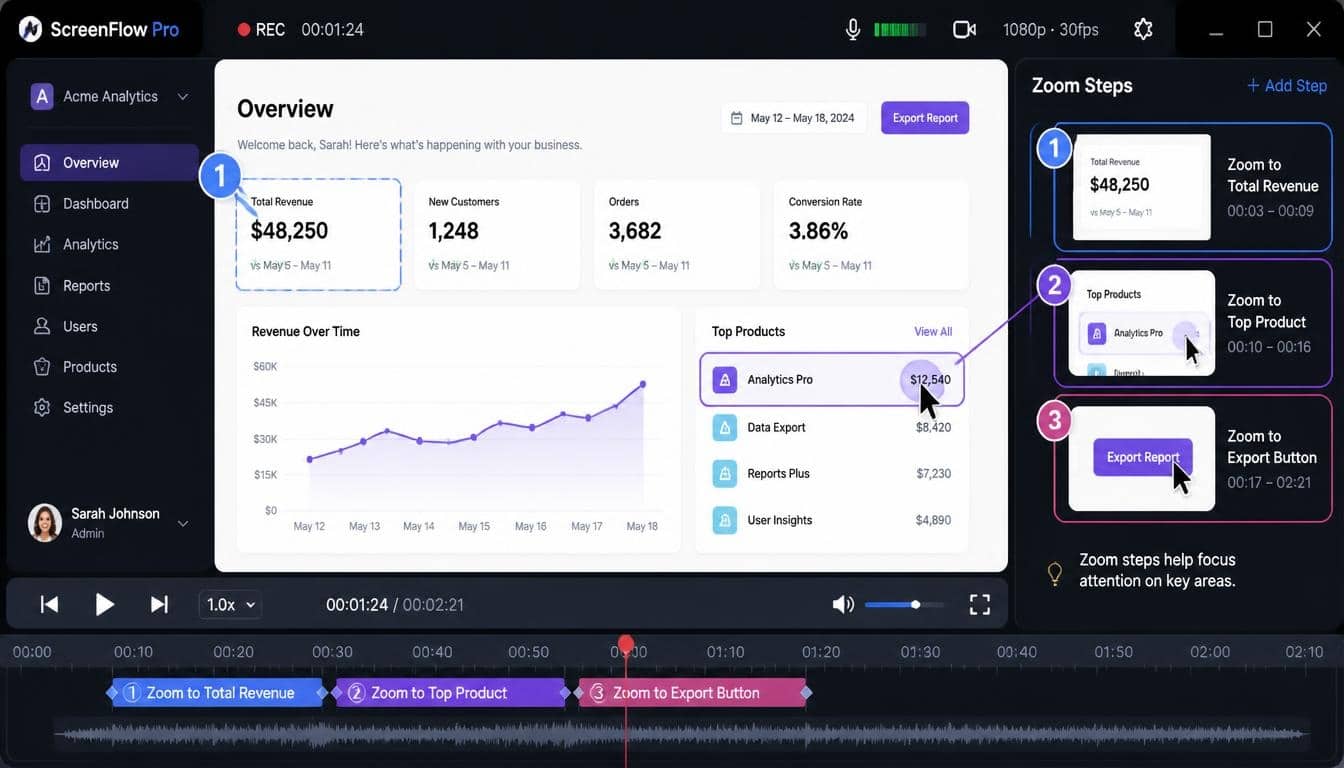
One of the most useful ways to make screen recordings more engaging is to guide viewers toward important details.
Imagine watching a tutorial where someone clicks a tiny settings icon. If the entire screen remains visible, you may struggle to notice exactly where the action happens.
Zoom effects solve this problem by directing attention toward specific areas.
Screen Story’s supplied feature information includes both automatic and manual zoom functionality.
Automatic Zoom for Screen Recordings
Auto zoom is designed to make important interactions easier to see by introducing zoom effects around relevant screen activity.
In the described workflow, mouse clicks can act as zoom triggers, helping direct attention toward the area where an interaction takes place.
This can be useful for:
- Software tutorials.
- Product demonstrations.
- Interface walkthroughs.
- Educational presentations.
- Instructional videos.
Learning how to add automatic zoom effects to screen recordings can help make complex demonstrations more understandable.
Still, not every click needs a zoom animation. If the camera keeps moving unnecessarily, viewers may find the experience distracting.
The goal is to highlight important interactions, not turn the entire recording into a collection of visual surprises.
Manual Zoom: Control the Focus Yourself
Automatic zoom is convenient, but sometimes the creator knows exactly which area deserves attention.
That’s where manual zoom becomes useful.
Manual zoom gives creators a more deliberate approach to selecting focus areas and controlling the visual emphasis of a recording, where supported by the editing workflow.
For example, you might want to highlight a particular dashboard component before demonstrating how it works.
Instead of relying on automatic interaction detection, you can choose the moment and area that deserve attention.
Adjust Zoom Levels and Magnification
The zoom level determines how much of the original screen content is enlarged.
A higher magnification can make small interface elements easier to see, but excessive zoom may hide important surrounding information.
When adjusting zoom levels, consider:
- Whether the text remains readable.
- Whether important interface elements stay visible.
- How smoothly the camera movement transitions.
- Whether the zoom duration feels natural.
- Whether the selected focus area makes sense to viewers.
The best zoom effect is often the one people barely notice because it feels like a natural part of the explanation.
Zoom Duration and Camera Movement
Zoom duration influences how quickly the visual focus changes.
A sudden movement may work for a quick highlight, while a slower transition can feel more comfortable during a detailed explanation.
Camera movement and mouse tracking also influence how viewers experience an animated screen recording.
Try to keep transitions smooth and purposeful. A tutorial should feel like someone guiding you through a process, not like a camera trying to catch up with a racing mouse!
Creating Animated Screen Recordings and Product Videos
An ordinary recording shows what happened on your screen. An animated screen recording can make the same information feel more engaging.
This distinction is particularly important for businesses that rely on digital products.
Create Product Demonstration Videos
Product videos allow potential customers to see how software works before making a decision.
A good demonstration usually focuses on a few important features rather than attempting to show everything.
For example, a productivity application demonstration might include:
- Opening the dashboard.
- Creating a new project.
- Adding a task.
- Changing project settings.
- Showing the finished result.
With screen recording with zoom effects, cursor customization, and careful editing, these actions can become a clear and professional product demonstration.
Create Software Tutorials
Software tutorials are most effective when each step builds naturally on the previous one.
Start with a brief introduction, demonstrate the process, and finish by showing the completed result.
Use cropping to remove distractions, trimming to eliminate unnecessary pauses, and zoom effects to highlight important interface elements.
This approach works well for educational videos, training materials, and customer support resources.
Make Content for Social Media
Short screen recordings can also be useful for social media managers and content creators.
A quick feature demonstration, product update, or interface walkthrough may communicate more than a long promotional description.
Consider creating multiple versions of the same recording for different audiences. A detailed tutorial might suit an educational channel, while a shorter demonstration could work better for a social media story.
Exporting High-Quality Screen Recordings
After recording and editing, the final stage is video export.
This is where your editing decisions are converted into a finished video file.
Export settings influence how your video looks, how smoothly it plays, and how large the resulting file becomes.
Choose the Appropriate Export Format
The ideal export format depends on where the recording will be used.
For example, a product demonstration intended for a website may have different delivery requirements from an instructional video intended for a social media platform.
Check the supported export formats and the requirements of your destination before finalizing the recording.
Understand FPS and Video Quality
FPS, or frames per second, describes how many individual frames appear every second.
A higher frame rate can make movement look smoother, particularly when demonstrating animations or rapidly changing interfaces.
However, higher FPS can also increase file size and processing requirements.
For most instructional recordings, clarity and readability are more important than choosing the highest possible frame rate.
Video quality also depends on resolution, encoding, and the visual complexity of the footage.
When choosing export settings, think about the audience’s viewing experience rather than simply selecting the largest available numbers.
Video Rendering and Processing Speed
Video rendering is the process of producing the finished video from your recording and editing adjustments.
Rendering performance can depend on your Mac’s processor, available memory, video complexity, and selected export settings.
Large recordings with multiple visual effects may take longer to process than shorter, simpler videos.
A few sensible habits can help:
- Close unnecessary applications.
- Keep sufficient storage space available.
- Avoid exporting several large projects simultaneously.
- Review the final export settings.
- Allow rendering to finish before moving or deleting project files.
Review the Finished Video
Never assume that an export is perfect simply because the rendering process completed successfully.
Watch the finished file from beginning to end.
Check whether the cursor is visible when necessary, zoom transitions feel natural, and important interface elements remain readable.
Also verify the audio, if your recording includes narration or other sound.
A short final review can save you from sharing a video that contains an easily avoidable mistake.
Practical Tips for Better Screen Recording Results
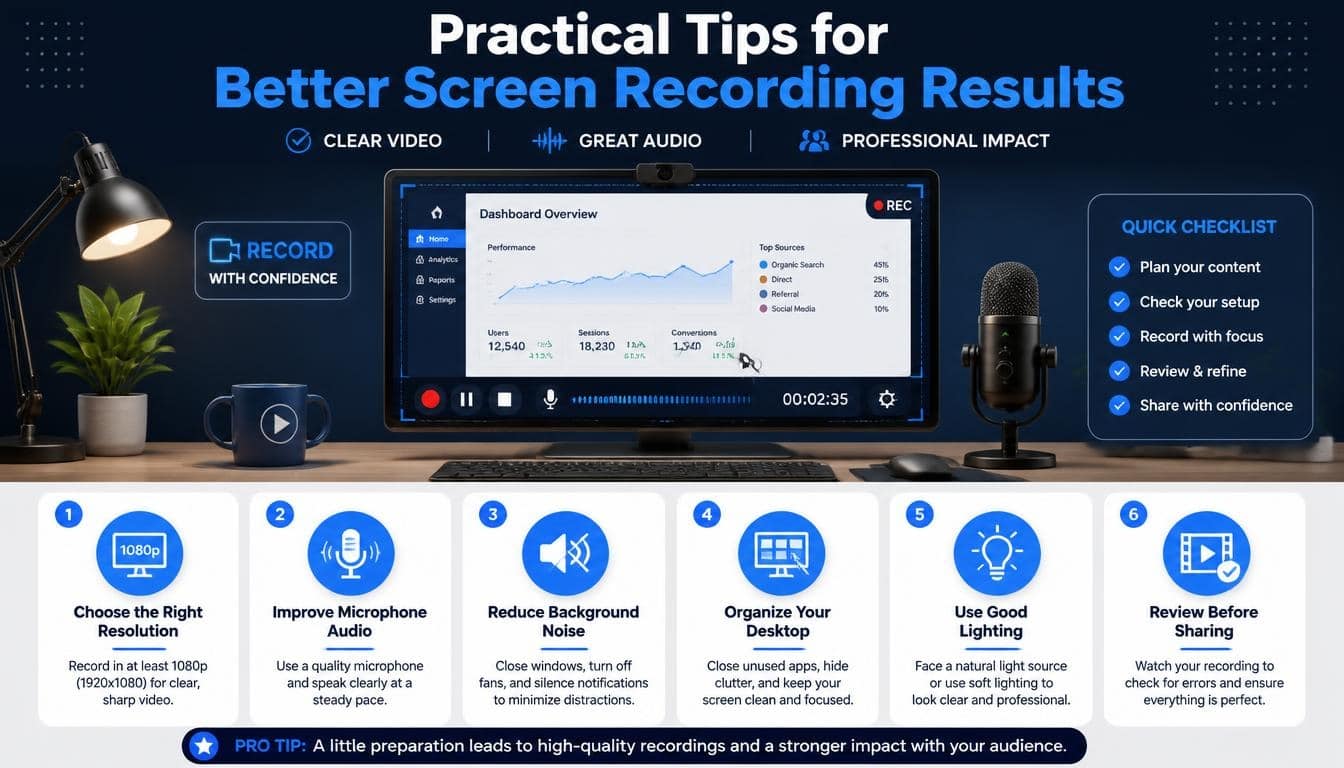
Knowing the features is one thing. Using them well is something else entirely.
A polished recording usually comes from thoughtful preparation rather than applying every available effect.
Here are some practical suggestions worth keeping in mind.
Plan the Story Before You Record
Even a short product demonstration should have a beginning, middle, and ending.
Start by introducing the problem or feature. Then show the relevant actions and finish with the result.
This structure makes your content easier to understand and prevents unnecessary screen activity.
Keep Your Desktop Clean
A cluttered desktop can distract viewers from the actual demonstration.
Close unrelated windows, remove unnecessary notifications, and prepare the application before starting.
It sounds like a tiny thing, but a clean recording environment makes a difference.
Use Zoom Effects With Purpose
Automatic zoom and manual zoom are helpful tools, but they shouldn’t be used continuously.
Highlight important actions, settings, and interface elements. Allow the viewer to see the complete application whenever context matters.
Pay Attention to Accessibility
Make sure interface text remains readable and cursor movements are easy to follow.
Avoid relying entirely on color to communicate important information. Where appropriate, include clear narration or explanatory captions.
The aim is to create instructional videos that people with different levels of experience can comfortably understand.
Maintain Consistent Visual Branding
If you’re producing several videos for a business, consider using consistent backgrounds, spacing, and framing.
A recognizable visual style makes your content feel connected, particularly when viewers encounter multiple product demonstrations across your website or social media channels.
Common Screen Recording Problems and Their Solutions
Even a well-designed workflow can encounter occasional problems. Fortunately, many recording issues have straightforward explanations.
Screen Story cannot capture the display: Check macOS Screen Recording Permission and confirm that the application has been authorized.
Cursor information is missing: Review the cursor visibility settings and confirm that the recording configuration supports the intended behavior.
The video looks cluttered: Consider cropping the recording, simplifying the background, or trimming unnecessary footage.
Zoom effects feel distracting: Reduce unnecessary zoom movements and review the timing of automatic or manual transitions.
The exported video looks blurry: Check the resolution, export quality, and destination platform’s recommended video specifications.
Rendering takes longer than expected: Consider the recording’s length, the number of visual effects, available memory, and the export settings.
If an issue continues, consult the application’s official documentation or support resources for version-specific troubleshooting.
Is Screen Story a Good Choice for Mac Users?
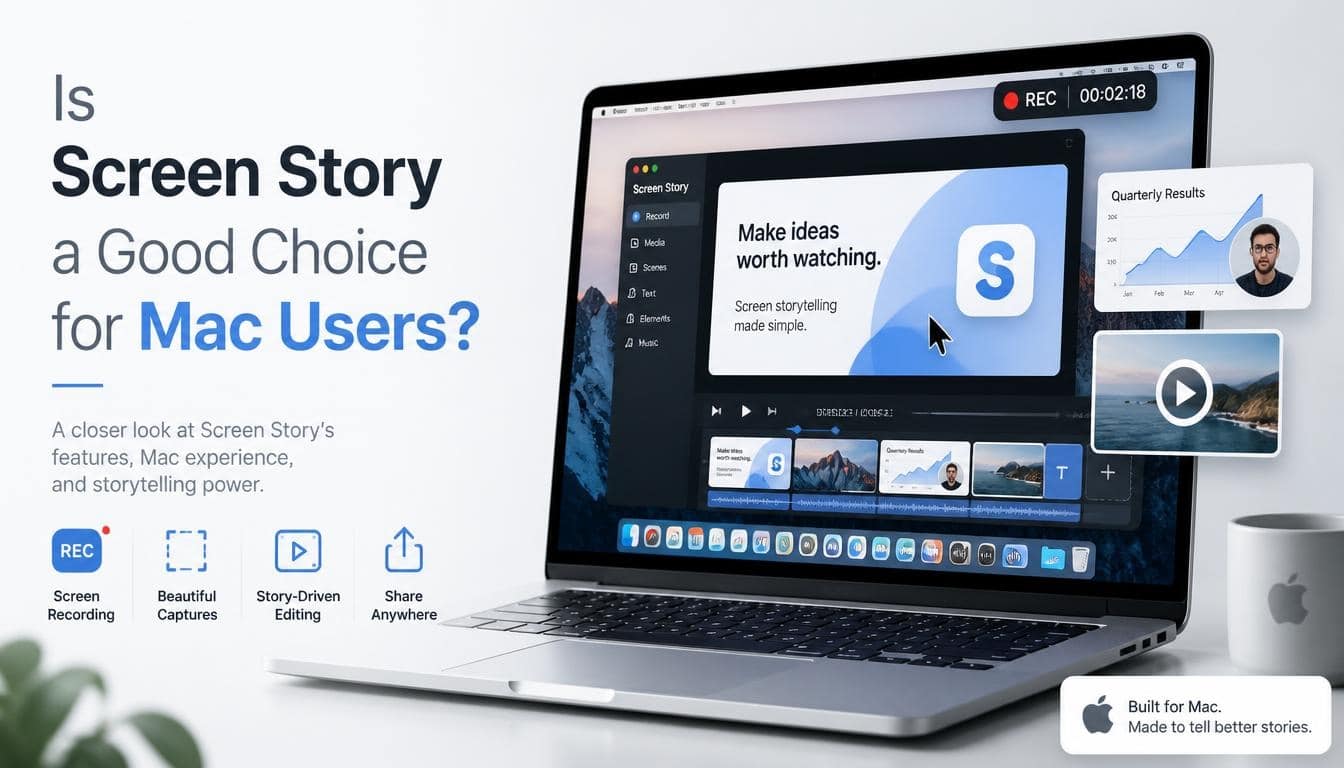
Choosing a Mac screen recording software solution depends on what you want to create.
Some users only need a basic screen capture tool. Others need a more complete workflow that includes editing, visual customization, and export controls.
Screen Story’s described combination of recording and editing features makes it relevant to creators who want more control over the appearance of their screen recordings.
It may be particularly interesting for:
- Entrepreneurs creating product demonstrations.
- Educators preparing software tutorials.
- Designers presenting digital experiences.
- Marketers producing promotional videos.
- Content creators making instructional material.
- Business teams preparing training resources.
Before choosing any professional screen recording software, compare its compatibility, available features, export options, pricing, and licensing terms.
The best application isn’t necessarily the one with the most effects. It’s the one that helps you communicate your ideas clearly without making the production process unnecessarily complicated.
Frequently Asked Questions About Screen Story
What is Screen Story used for?
Screen Story is a Mac-focused screen recording application intended to help users capture desktop activity and create polished videos using editing and customization features.
Is Screen Story a screen recording app for Mac?
Yes. The supplied guide describes it as a macOS application for recording screens and editing captured videos.
Can I record an individual application window?
The described recording workflow includes selecting an application window or recording area. Check the current application version for its supported capture options.
Does Screen Story support automatic zoom?
The supplied feature information describes automatic zoom functionality, including click-based zoom behavior intended to highlight important interactions.
What is the difference between auto zoom and manual zoom?
Auto zoom uses supported interaction-based behavior to highlight relevant screen activity. Manual zoom gives the creator more direct control over the areas and moments to emphasize.
Can I customize the cursor?
The guide identifies cursor customization features, including cursor appearance and visibility options. The exact controls depend on the application’s current version.
Can I crop and trim screen recordings?
Yes. Video cropping and trimming are among the editing capabilities described in the supplied Screen Story guide.
Why does Screen Story need macOS permissions?
macOS uses privacy permissions to control access to screen content and accessibility-related functionality. The required permissions depend on the features being used.
Does FPS affect video quality?
FPS affects how smoothly movement appears. However, resolution, encoding, and other export settings also influence the final result.
Can I use screen recordings for product demonstrations?
Absolutely. Screen recordings are useful for showing software interfaces, explaining product features, and demonstrating digital workflows to potential customers.
Read More: https://gracethemes.com/what-is-docker/
How to Make Your Screen Story Videos More Memorable
A good screen recording doesn’t have to be complicated. In fact, some of the most useful videos are surprisingly simple.
What matters is understanding what your audience needs to see and making that experience as clear as possible.
Before recording, identify the main message. During editing, remove distractions and highlight important actions. When exporting, choose settings that suit your intended platform.
Most importantly, don’t confuse visual effects with good communication. A beautiful background cannot rescue a confusing tutorial, and a dramatic zoom effect won’t make an unclear explanation suddenly understandable.
Use Screen Story as part of a thoughtful video creation workflow, bringing together screen recording, video editing, cursor customization, zoom effects, and high-quality export.
Whether you’re an entrepreneur explaining a new product, a teacher creating an educational presentation, or a designer showing off a creative interface, your screen recordings can become much more than simple captures of desktop activity.
They can become little visual stories that help people understand, learn, and discover something new.
And that’s really the beauty of screen recording: you don’t just show people what happens on your screen. You help them see why it matters.
