

How to Update Motherboard BIOS: A Complete Step-by-Step Guide
A computer has its own quiet way of telling us when something isn’t quite right. Perhaps a newly installed processor refuses to cooperate,
the system struggles to recognize a memory kit, or the machine suddenly behaves like it has forgotten something important.
Sometimes, the answer lies deep within the motherboard, in the small but essential firmware that helps the computer wake up and get to work.
Learning How to Update Motherboard BIOS can feel intimidating at first, especially when a single mistake seems capable of turning a perfectly working computer into an expensive paperweight.
But with the correct files, a little patience, and a few sensible precautions, the process is manageable for most users.
A Motherboard BIOS Update can improve hardware compatibility, resolve firmware bugs, strengthen security, and sometimes make a newer processor work with an existing
motherboard. Still, updating isn’t something you should do simply because a newer version exists.
The real trick is knowing when an update is useful and how to install it without creating unnecessary problems.
This motherboard BIOS update guide walks through the process, from checking your current firmware version to preparing a USB drive, flashing the firmware, and recovering from common problems.
Whether you’re using an ASUS, MSI, Gigabyte, or ASRock motherboard, you’ll learn the essential steps while keeping your computer’s safety firmly in mind.
What Is a Motherboard BIOS?
The BIOS (Basic Input/Output System) is firmware stored on a chip on the motherboard. It initializes essential hardware when the computer starts, checks components during the Power-On Self-Test (POST), and begins the boot process that eventually loads your operating system.
Think of it as the computer’s first conversation with its own hardware. Before Windows or Linux can begin doing their work, the firmware needs to recognize the CPU, initialize RAM, and prepare the system to start correctly.
Modern computers commonly use UEFI (Unified Extensible Firmware Interface) instead of the traditional BIOS. People still use the word BIOS for both, and motherboard manufacturers often use familiar BIOS terminology even when their products run UEFI firmware.
The Motherboard Firmware contains instructions that help the hardware operate together. It also provides the BIOS Setup interface, where you can adjust settings such as boot order, memory profiles, virtualization, Secure Boot, and other system options.
Because this firmware sits so close to the hardware, updating it requires more care than installing an ordinary application. A browser update can usually be tried again if something goes wrong; a failed firmware installation may prevent the computer from starting.
Why Update Motherboard BIOS?
Not every computer needs a firmware update. If your machine starts reliably, supports all your components, and has no relevant security or compatibility problems, leaving the firmware alone may be perfectly reasonable.
However, a BIOS Update can be valuable in several situations.
- CPU compatibility: A motherboard may need a newer BIOS version before it can recognize a recently released processor. This is especially important when upgrading an older system.
- Memory compatibility: Firmware updates sometimes improve RAM detection, memory training, or support for particular memory kits and capacities.
- System stability: A manufacturer may correct problems involving unexpected restarts, freezing, or hardware initialization.
- Security improvements: Certain updates address firmware vulnerabilities or improve security-related behavior.
- Hardware support: A new firmware release can improve compatibility with storage devices, graphics cards, expansion cards, or other components.
- Bug fixes: Release notes may document corrections for boot failures, POST errors, or unusual behavior in BIOS settings.
Can a BIOS update improve performance? Sometimes, but don’t expect miracles. Some releases improve memory performance or processor behavior, while others simply fix a problem you may never encounter.
The best reason to update is a clearly documented benefit that applies to your particular system, not the hope that a newer version will magically make every task faster.
When Should You Update BIOS?
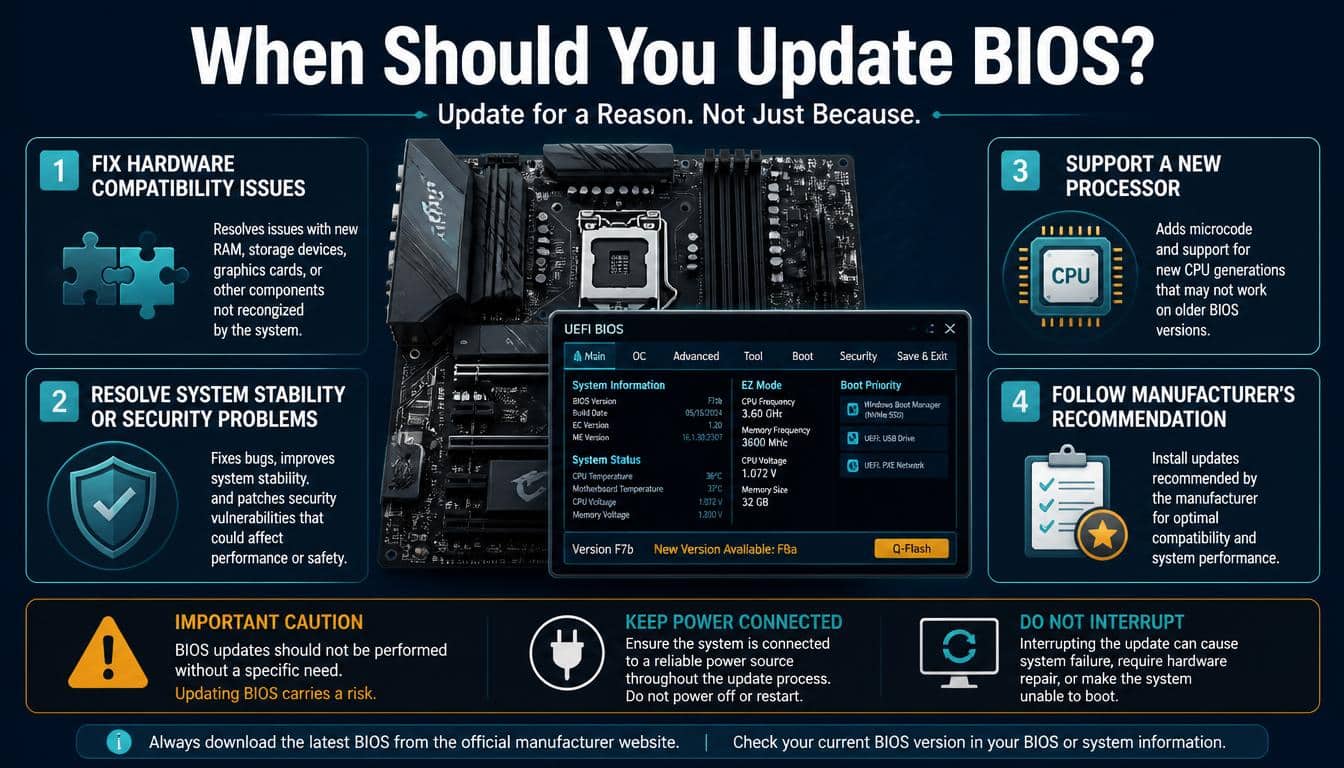
The right time to update depends on your computer and the reason you’re considering the change. A firmware update deserves more attention when it solves a specific problem than when it merely adds a higher version number.
Consider updating when the manufacturer recommends a release for your processor, addresses a security vulnerability affecting your system, or documents a fix for a problem you’re experiencing.
On the other hand, avoid unnecessary updates when the computer is working perfectly and the release notes offer no relevant benefit. A firmware update also isn’t the first solution for every crash or blue screen; faulty RAM, overheating, drivers, and failing storage can cause similar symptoms.
Before proceeding, read the release notes carefully. Some updates require an intermediate BIOS version, while others change voltage behavior, memory training, or firmware security settings. Certain releases may also prevent downgrading to an older version.
A little research now can save a surprisingly long afternoon later.
How to Check Your Current BIOS Version in Windows
Before downloading anything, find out which firmware version your computer currently uses. This helps you determine whether an update is necessary and whether you’ve selected the correct release.
Method 1: Use System Information
- Press Windows + R to open the Run dialog.
- Type msinfo32 and press Enter.
- Find the entries labeled BIOS Version/Date and BaseBoard Product or related motherboard information.
- Record the BIOS version and motherboard model, if displayed.
The motherboard information may be incomplete on some prebuilt computers. If so, consult the computer manufacturer’s support page or the motherboard’s documentation.
Method 2: Use Command Prompt
Open Command Prompt and enter:
wmic bios get smbiosbiosversion
On systems where WMIC is unavailable, use PowerShell instead:
Get-CimInstance Win32_BIOS | Select-Object SMBIOSBIOSVersion, Manufacturer, ReleaseDate
These commands can help you identify the installed firmware. They don’t replace checking the exact motherboard model and hardware revision.
Method 3: Check BIOS Setup
Restart the computer and press the appropriate setup key during startup. Common keys include Delete, F2, and occasionally F10 or Esc, depending on the manufacturer and computer.
The firmware interface typically displays the installed BIOS version on its main page. Avoid changing settings while you’re there unless you understand what they do.
How to Download the Latest Motherboard BIOS
Downloading the correct file is one of the most important parts of the entire process. A firmware file for a similar-looking motherboard may still be incompatible, even when both boards come from the same manufacturer.
Identify the Exact Motherboard Model
Check the motherboard’s printed model name, product box, documentation, or system information. If you built the PC yourself, the model is often printed directly on the board.
Also check the hardware revision when applicable. Some Gigabyte motherboards, for example, have different revisions with separate support pages or firmware requirements.
For a branded desktop or laptop, use the computer manufacturer’s support page unless the manufacturer explicitly directs you elsewhere. Prebuilt systems can use customized firmware that differs from retail motherboard versions.
Visit the Official Manufacturer Website
Find the motherboard’s official support page and open its BIOS or firmware download section. The names vary, but the general process is much the same across brands.
Look for the Latest BIOS Version, then read its description and release notes. Confirm that it supports your exact model and that any required intermediate updates are installed first.
Download only from a trustworthy official source. Unofficial firmware archives and third-party BIOS update software can introduce unnecessary risks, particularly when the source or file authenticity is unclear.
Extract the BIOS File
Many downloads arrive as ZIP archives. Extract the contents to a folder rather than placing the compressed archive directly on your USB drive.
Depending on the motherboard, you may see a firmware file, a text document, a renaming utility, or other supporting files. Read the manufacturer’s instructions before renaming anything.
Some boards require a specific filename for USB BIOS Flashback, while their in-firmware update utilities can recognize the original filename. Don’t assume that one method’s requirements apply to another.
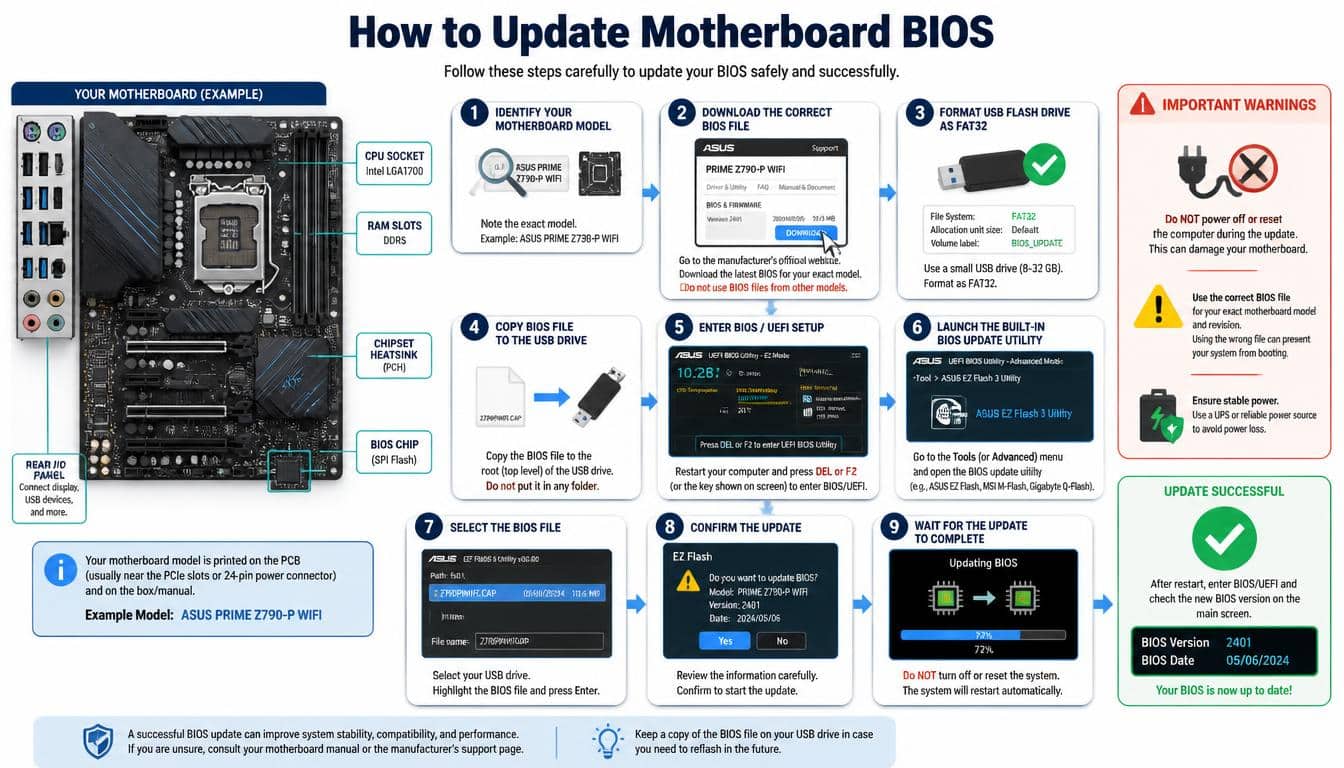
How to Update Motherboard BIOS Step by Step
There are several ways to perform a Motherboard BIOS Update, but using the motherboard’s built-in firmware utility is generally a sensible option when the computer can start normally.
Before beginning, make sure the update addresses a real need, confirm the exact motherboard model, and prepare for the possibility that the process may reset your settings.
Step 1: Read the BIOS Update Precautions
First, check the release notes and installation instructions. Some motherboard manufacturers specify a minimum version, a required update sequence, or special preparation steps.
If the update is required to support a new CPU, verify that your exact processor appears on the manufacturer’s CPU support list and note the minimum BIOS version required.
Also check whether the update changes Secure Boot behavior, encryption-related settings, or other firmware options.
If Windows uses BitLocker or Device Encryption, save your recovery key somewhere accessible outside the computer and follow Microsoft’s guidance about suspending protection before firmware changes when necessary.
Step 2: Prepare a USB Flash Drive
A USB Flash Drive is often the easiest way to transfer firmware to the motherboard.
- Use a reliable USB drive with enough free space for the firmware file.
- Back up any important files already stored on the drive.
- Format it as FAT32 if the motherboard manual specifies that format.
- Copy the extracted BIOS file to the location required by the manufacturer’s instructions.
Formatting erases existing data on the selected drive, so double-check the drive before proceeding. Some newer firmware utilities support other file systems, but FAT32 remains a common requirement for USB-based BIOS updates.
Step 3: Enter BIOS Setup
Restart the computer and repeatedly press the motherboard’s designated setup key. Delete and F2 are common choices, although the manual is the final authority.
Once inside BIOS Setup, locate the built-in firmware update utility. It may be listed under Advanced, Tools, Utilities, or a similarly named menu.
Don’t confuse the BIOS Setup interface with the BIOS boot menu. The boot menu chooses a device for startup, whereas the setup interface provides access to firmware settings and update tools.
Step 4: Launch the BIOS Update Utility
Insert the prepared USB drive into a suitable USB port. Follow the manufacturer’s instructions for choosing the drive and locating the firmware file.
The utility may verify the file’s integrity and compatibility before allowing the installation to continue. If it reports that the file is invalid or intended for another motherboard, stop and investigate rather than trying to force the update.
Once you’ve confirmed the correct file and version, approve the update as directed.
Step 5: Allow BIOS Flashing to Finish
During BIOS Flashing, the motherboard writes the new firmware to its onboard storage. You may see a progress indicator, temporary black screens, automatic restarts, or changes in fan behavior.
Do not switch off the computer, disconnect its power, or press reset during the installation. Interrupting the process can corrupt the firmware and prevent normal startup.
The process often takes several minutes, although the exact duration varies by motherboard and update method. Follow the manufacturer’s instructions rather than relying on a fixed time estimate.
Step 6: Verify the New BIOS Version
After the computer restarts, enter BIOS Setup again and check the installed version. Compare it with the version you intended to install.
The first startup may take longer than usual because the motherboard is initializing hardware or retraining memory. Allow it time to complete, especially if the manufacturer documents this behavior.
Once the system boots successfully, confirm that the CPU, RAM, storage devices, and other important components are detected correctly.
Step 7: Review Your BIOS Settings
A firmware update may restore default settings. Check the boot order, UEFI boot mode, Secure Boot, virtualization, fan curves, and memory profiles as appropriate.
Don’t blindly restore every previous setting. If the new firmware changes how an option works, the old value may no longer be suitable.
If Windows requests a BitLocker recovery key after the update, use the key you saved before starting. Avoid clearing the TPM or changing security settings randomly in an attempt to get around the prompt.
Updating BIOS on ASUS, MSI, Gigabyte, and ASRock Motherboards
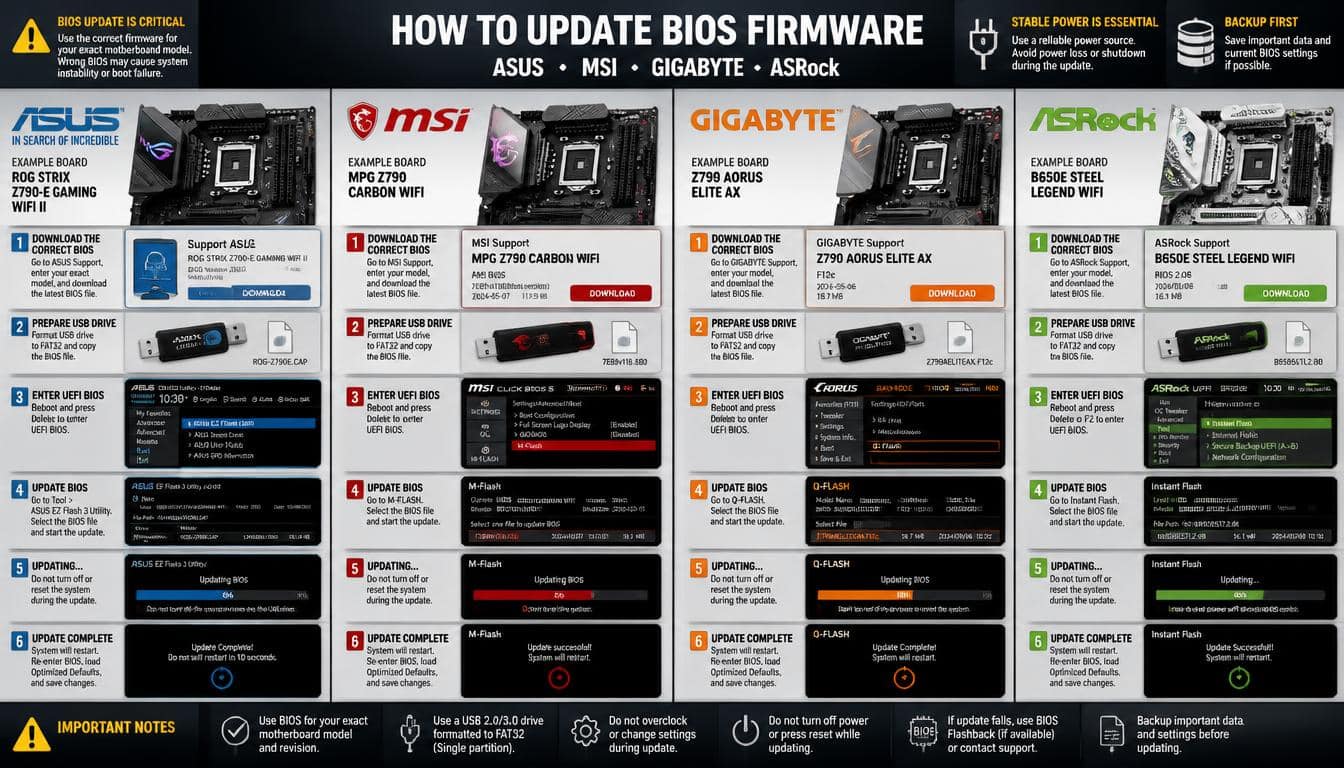
The basic method is similar across manufacturers, but the utility names and preparation requirements differ. Always follow the instructions for your exact model.
How to Update BIOS on an ASUS Motherboard
Many ASUS motherboards include EZ Flash, which lets you select a compatible BIOS file from a supported storage device within the firmware interface.
Download the correct file from the official ASUS support page, extract it, and follow the instructions for your model. Some ASUS boards also support USB BIOS Flashback, which can update firmware without entering the usual setup interface.
How to Update BIOS on an MSI Motherboard
Many MSI motherboards provide M-Flash in BIOS Setup. The utility typically allows you to select a compatible firmware file from a USB drive.
Use the firmware listed for the exact MSI motherboard model, and check the support page for any required preparation or intermediate versions.
How to Update BIOS on a Gigabyte Motherboard
Gigabyte commonly provides Q-Flash, an in-firmware utility for installing BIOS updates. Certain models also offer a Q-Flash Plus feature, which may allow firmware flashing without a supported CPU or normal system startup.
Confirm the motherboard revision and read the appropriate instructions, since firmware files and procedures can differ between revisions.
How to Update BIOS on an ASRock Motherboard
ASRock motherboards may provide Instant Flash, which searches supported storage devices for compatible firmware files.
Download the correct BIOS from the relevant ASRock support page and follow the instructions for your specific board. Some models have special update sequences or restrictions involving older firmware versions.
These utilities perform similar jobs, but they aren’t interchangeable. Never use an ASUS firmware file with an MSI motherboard, for example, simply because both boards use the same CPU socket.
How to Update BIOS Using a USB Flash Drive Without Entering Windows
Updating firmware through the motherboard’s built-in utility is useful because it avoids depending on a running operating system. If Windows is unstable or won’t load, you may still be able to update the BIOS if the computer can enter firmware setup.
Prepare the correct USB drive, enter the firmware interface, open the update utility, and select the compatible file. Follow the manufacturer’s steps until the process finishes.
This method is often preferable to running an update program inside Windows when a built-in utility is available. It also reduces reliance on background applications that could interfere with the process.
However, it doesn’t solve every startup problem. If the motherboard cannot reach BIOS Setup because the firmware is corrupted, you may need a dedicated recovery feature instead.
Can You Update BIOS Without a CPU?
Yes, on certain motherboards. Features such as USB BIOS Flashback or similar CPU-less flashing functions allow firmware updates without a fully functioning processor, and some can work without installed RAM or a graphics card.
The exact requirements depend on the board. You may need to connect specific power cables, use a particular USB port, rename the firmware file, and press a dedicated Flashback button.
Follow the manual carefully and watch the indicator light. The light’s behavior can communicate whether the update is progressing or whether the board has rejected the file.
Not every motherboard supports this feature, so don’t assume that a missing CPU is never a problem. If your motherboard lacks CPU-less flashing and requires a supported processor to enter its update utility, you’ll need another supported method.
Is Updating BIOS Safe? Important Risks to Understand
A properly prepared firmware update is routine for many computer enthusiasts and technicians, but it isn’t completely risk-free. The consequences of a mistake can be more serious than with an ordinary software installation.
The most important precautions are straightforward:
- Confirm compatibility: Match the firmware to the exact motherboard model and hardware revision.
- Maintain stable power: Use a reliable power source and avoid updating during storms or when power interruptions are likely. A suitable UPS can help protect against outages.
- Read the instructions: Some updates require an intermediate version or specific preparation steps.
- Back up important files: A normal BIOS update generally doesn’t erase your personal files, but backups are still essential before system maintenance.
- Record important settings: Save details about boot configuration, memory profiles, fan settings, and other custom options.
- Protect encryption recovery access: Keep your BitLocker recovery key available before changing firmware.
- Avoid unnecessary interruptions: Never power off or reset the system while flashing is in progress.
Does updating BIOS delete data? Usually, no. The firmware is stored separately from the data on your SSD or hard drive. However, a settings reset can affect how the system boots, and an unsuccessful update may require repair or recovery.
What happens if the power goes out during a BIOS update? The firmware may become corrupted, leaving the motherboard unable to complete its normal startup. A recovery mechanism or backup BIOS may help, but recovery isn’t guaranteed on every board.
BIOS Update Troubleshooting: What If Something Goes Wrong?
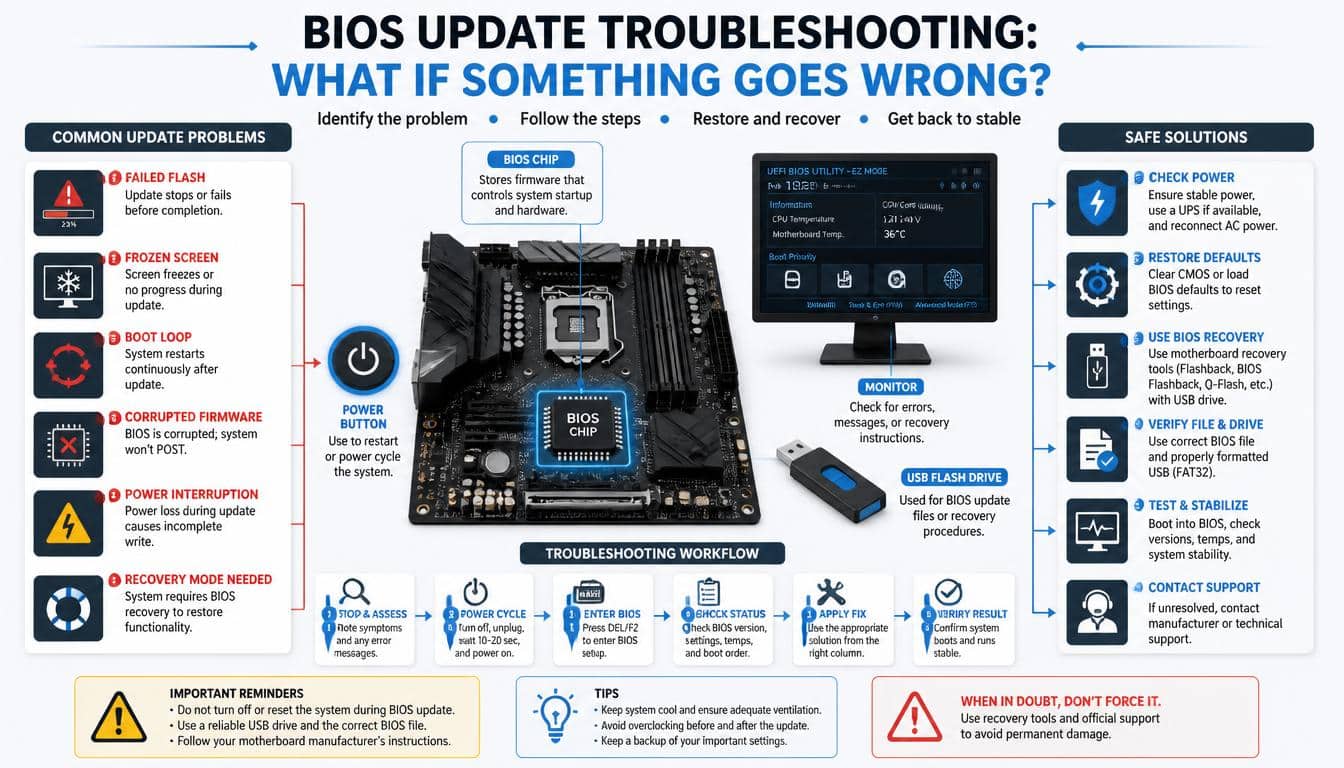
Even when you follow the correct steps, firmware updates can sometimes produce unexpected results. The key is to avoid making several changes at once when you aren’t sure what caused the problem.
The BIOS Update File Is Not Recognized
Check the motherboard model, hardware revision, file extraction, and required filename. Confirm that the USB drive uses a supported file system and that the file is stored in the correct location.
If the utility still refuses the file, consult the manufacturer’s instructions. Don’t attempt to bypass a compatibility warning without understanding why it appeared.
The Computer Takes Too Long to Start
After an update, some motherboards repeat memory training or restart several times while initializing hardware. This can be normal, especially after changes to memory-related firmware.
Give the system the time recommended by the manufacturer. If the machine remains stuck, check the diagnostic LEDs, beep codes, or display messages before deciding on the next step.
The Computer Won’t Boot After a BIOS Update
First, check whether the system is actually completing POST. Look for diagnostic lights indicating a CPU, DRAM, VGA, or boot-device problem.
If the manual recommends it, power down the computer and perform a CMOS reset using the documented procedure. A reset may clear incompatible settings, but it does not normally reinstall corrupted firmware.
After clearing CMOS, you may need to restore the correct boot settings. If the motherboard still fails to start, consult its recovery instructions or contact the manufacturer.
The BIOS Update Failed or Was Interrupted
Some motherboards include BIOS recovery, a backup BIOS, or Dual BIOS functionality. Others provide a dedicated Flashback feature that can reinstall firmware without normal startup.
Check the exact recovery instructions before trying anything else. Avoid repeatedly powering the machine on and off or attempting random firmware files, as these actions can complicate diagnosis.
If the board has no usable recovery feature, professional repair may be necessary. In some cases, firmware can be restored using specialized programming equipment, but this isn’t a suitable first step for most users.
Frequently Asked Questions About Motherboard BIOS Updates
How long does a BIOS update take?
Many updates take several minutes, but the duration varies by motherboard, firmware size, and update method. Initial startup afterward can take longer because of memory training or hardware initialization.
Do I need to install every BIOS version between my current version and the latest one?
Not necessarily. Some manufacturers allow direct updates to a newer release, while others require intermediate versions or special preparation. Follow the instructions for your exact model rather than assuming either approach is always correct.
Can a BIOS update fix system crashes?
It can fix crashes caused by firmware bugs or hardware compatibility problems. However, crashes can also come from drivers, overheating, unstable memory settings, power delivery issues, or failing components, so an update isn’t a universal cure.
Can I downgrade to an older BIOS version?
Sometimes, but not always. Certain firmware releases restrict downgrading because of security changes, processor support, or other technical limitations. Check the manufacturer’s documentation before attempting a rollback.
Should I update BIOS before installing a new CPU?
If the new processor requires a newer firmware version, yes. Check the CPU support list and minimum BIOS requirement first. If your motherboard supports CPU-less flashing, you may be able to install the required firmware before fitting the new processor.
Is BIOS update software necessary?
Usually not if your motherboard provides a built-in utility such as EZ Flash, M-Flash, Q-Flash, or Instant Flash. These tools are designed for firmware installation, while separate operating-system utilities vary by manufacturer and model.
What is the difference between BIOS and UEFI?
BIOS traditionally refers to the older firmware design, while UEFI is the modern interface and specification used by most current motherboards. In everyday conversation, people often use BIOS to describe both.
Does a BIOS update improve gaming performance?
It may improve compatibility or resolve a firmware issue affecting system behavior, and some updates alter memory or processor performance. But a BIOS update alone isn’t guaranteed to increase frame rates or improve every game.
Update bios
Updating your BIOS can improve system stability, fix hardware compatibility issues, and add support for newer processors. Before starting, check your motherboard manufacturer’s website for the latest compatible BIOS version.
AMD BIOS update
An AMD BIOS update can improve compatibility with Ryzen processors, enhance system stability, and address known firmware issues. Always download the correct BIOS file for your specific AMD motherboard model.
How to update bios firmware?
To update BIOS firmware, identify your motherboard model, download the appropriate BIOS file from the manufacturer’s official website, and follow its recommended flashing instructions. Ensure your computer has a stable power supply throughout the process.
Update motherboard bios
To update your motherboard BIOS, check your current BIOS version and compare it with the latest version available from the manufacturer. Follow the recommended update method, such as a built-in BIOS utility or USB BIOS Flashback, to reduce the risk of errors.
Read More: https://gracethemes.com/factory-reset-iphone-ipad-ipod-touch/
A Final Checklist Before You Flash BIOS
Before you begin, take one final look at the essentials. It’s a small habit, but it can prevent a great deal of frustration.
- Confirm the motherboard model and hardware revision.
- Check the current BIOS version and read the new release notes.
- Download the firmware from the official manufacturer website.
- Verify whether an intermediate update is required.
- Prepare a compatible USB drive if your chosen method needs one.
- Save important data and encryption recovery information.
- Ensure the power supply is stable.
- Follow the motherboard-specific flashing and recovery instructions.
- Wait for the update to finish before restarting or disconnecting power.
- Verify the new version and review your firmware settings afterward.
If you cannot confidently check off the compatibility and power requirements, pause and research those details first. There’s no prize for rushing a firmware update, and a few extra minutes of preparation are worth it.
Conclusion: Update Your Motherboard BIOS With Confidence
Learning How to Update Motherboard BIOS is less about mastering a complicated technical trick and more about understanding the process well enough to make sensible decisions.
The firmware helps your computer recognize its components, begin the boot process, and communicate with the hardware that makes everyday computing possible.
A successful Firmware Update can resolve compatibility problems, improve stability, and provide important security fixes. Yet the best update is one that serves a clear purpose, uses the correct file, and is completed with patience rather than guesswork.
Whether you’re preparing a motherboard for a new CPU, troubleshooting a stubborn boot issue, or simply checking whether your system needs maintenance, remember the essentials:
verify your hardware, trust the manufacturer’s instructions, protect your power supply, and give the flashing process time to finish.
Your computer doesn’t need the newest BIOS version just for the sake of having it. It needs the right firmware for the job you expect it to do. Once you understand that difference, updating becomes a much more manageable part of caring for your machine.
Take your time, double-check the details, and approach each step with confidence. A little preparation today can help your computer run more reliably tomorrow.
