

How to Screenshot on Windows: A Complete Guide to Capturing Your Screen
There are moments when a picture really does save a thousand words. Perhaps you’re trying to show someone an error message, save an important piece of information before it disappears,
capture a funny conversation, or explain something on your computer without writing a lengthy paragraph. Whatever the reason, knowing how to screenshot on Windows is one of those small computer skills that becomes surprisingly useful once you learn it.
The funny thing is that Windows has offered several ways to capture your screen for years, yet many users still rely on just one keyboard button. And honestly, they’re missing out on quite a bit.
Whether you’re using a Windows 10 desktop, a Windows 11 laptop, or a Microsoft Surface device, there are multiple ways to take screenshots.
Some methods capture everything, others let you select a tiny portion of the display, and a few even make saving and sharing images almost effortless.
Let’s explore the different Windows screenshot methods, the keyboard shortcuts worth remembering, and the tools that can make capturing your screen a much easier experience.
How to Screenshot on Windows Using Keyboard Shortcuts
Keyboard shortcuts are probably the quickest way to capture your screen. You don’t need to open an application, search through menus, or interrupt whatever you’re doing. A simple combination of keys can do the job in seconds.
Here are the most useful Windows screenshot shortcuts to know.
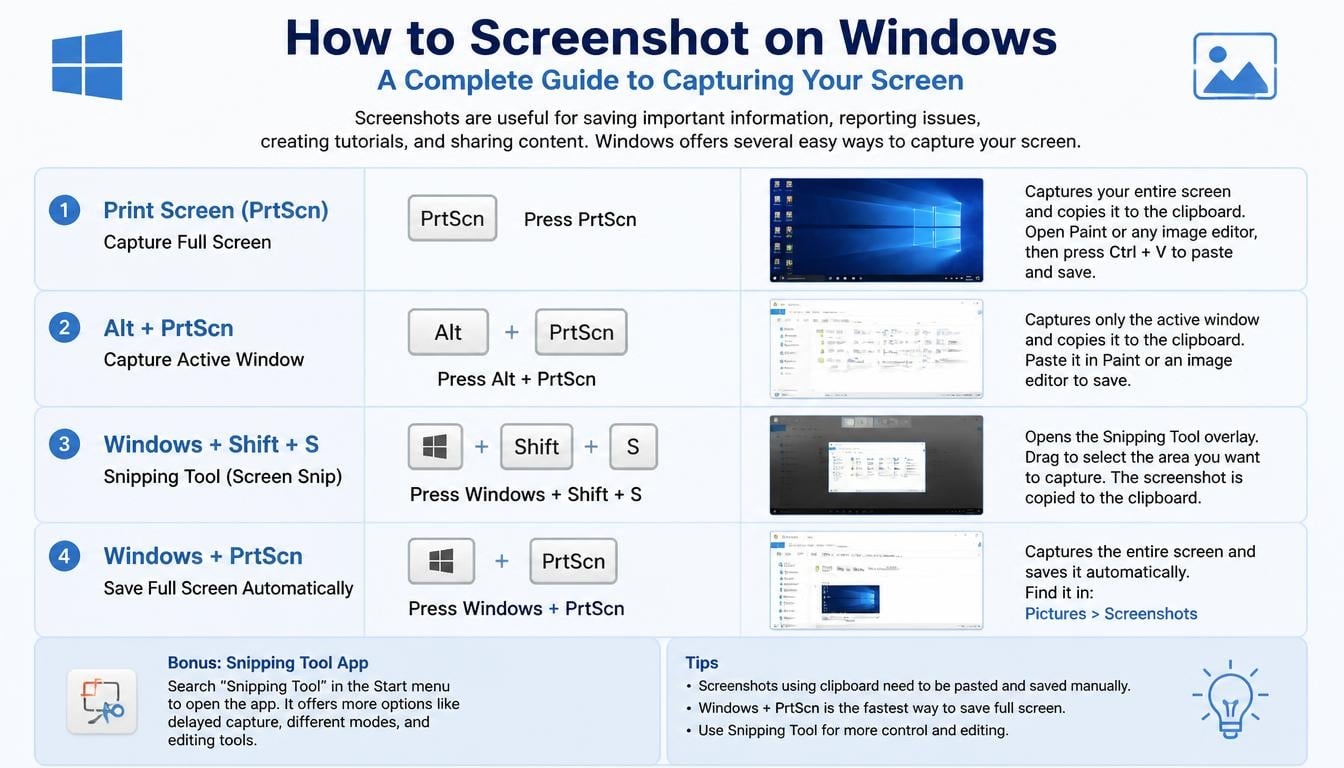
1. Press the PrtScn Key to Capture the Entire Screen
<image-placeholder/> The **Print Screen (PrtScn)** key is one of the oldest and easiest ways to take a screenshot on a Windows computer. You’ll usually find it in the upper-right section of your keyboard, although its exact position varies between manufacturers.
When you press this key, Windows copies an image of your entire screen to the clipboard.
Here’s how to use it:
- Open the screen you want to capture.
- Press the PrtScn key.
- Open Microsoft Paint, Word, Outlook, or another application that accepts images.
- Press Ctrl + V to paste your screenshot.
- Save the image if you want to keep it.
One important detail: pressing PrtScn doesn’t necessarily create a file on your computer. It generally copies the screenshot to your clipboard, meaning you’ll need to paste it somewhere before saving it.
This method is particularly useful when you only need to share something quickly rather than maintain a collection of screenshot files.
2. Use Windows + PrtScn to Save Screenshots Automatically
If you don’t want to paste your screenshot into another application every single time, this shortcut is worth remembering.
Press Windows + PrtScn together.
Your screen may briefly dim, indicating that Windows has captured the image. The screenshot is automatically saved as a PNG file.
To find it:
- Open File Explorer.
- Navigate to Pictures.
- Open the Screenshots folder.
Your captured images should appear there, usually with automatically assigned filenames.
This is one of the easiest answers to the question of how to save screenshots automatically on Windows.
It’s especially handy when you’re collecting several screenshots for a presentation, troubleshooting guide, online tutorial, or work document. No extra copying and pasting required, which is rather nice.
3. Capture Only the Active Window With Alt + PrtScn
Sometimes capturing the entire desktop is unnecessary. Maybe you’ve got several applications open, but you only want to show one particular window.
That’s where Alt + PrtScn comes in.
Follow these steps:
- Click the application window you want to capture.
- Press Alt + PrtScn.
- Open Paint or another image-compatible application.
- Press Ctrl + V.
- Save your screenshot.
Windows copies the currently active window rather than the entire desktop.
It’s a particularly useful option when creating software tutorials or reporting technical problems. You won’t need to crop away your desktop background and other open applications afterwards.
4. Use Windows + Shift + S for a Custom Screenshot
<image-placeholder/> If there’s one shortcut that every Windows user should probably learn, it’s **Windows + Shift + S**.
This keyboard combination opens the modern screenshot selection interface, allowing you to choose exactly what you want to capture.
Once the overlay appears, you’ll typically see several capture options:
- Rectangular Snip: Select a rectangular portion of your screen.
- Freeform Snip: Draw an irregular shape around the area you want.
- Window Snip: Capture a particular application window.
- Full-screen Snip: Capture the entire display.
After selecting an area, Windows copies the captured image to your clipboard. You can then paste it into another application or open the screenshot notification to access additional editing and saving options.
For people who frequently share small sections of webpages, documents, or software interfaces, this method is incredibly convenient.
And the best part? You don’t have to capture the whole desktop just to show one tiny detail.
How to Screenshot on Windows 11 Using the Snipping Tool
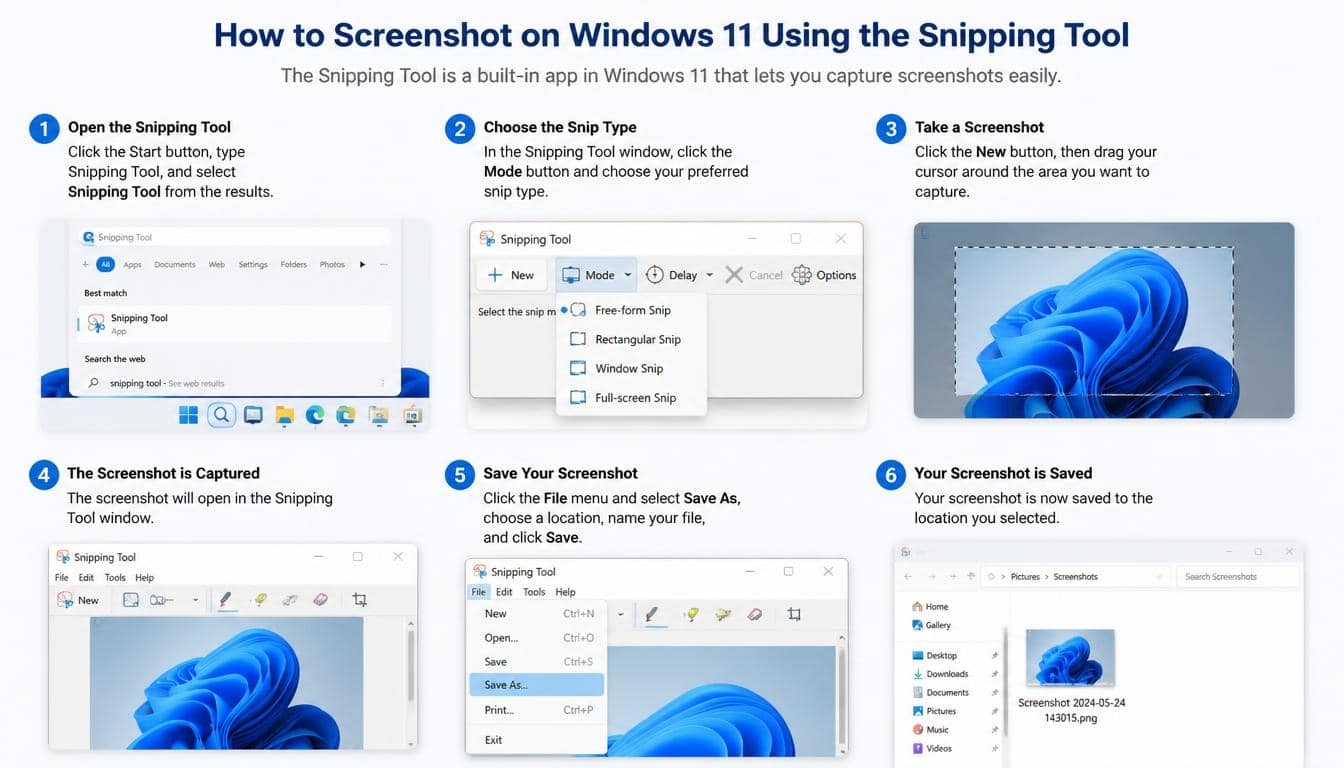
Windows 11 includes a built-in application called the Snipping Tool, which offers more flexibility than the traditional Print Screen method.
It allows you to capture selected screen areas, individual windows, and complete displays. You can also annotate screenshots and save them in different locations.
5. Open the Snipping Tool From the Start Menu
The easiest way to find the application is through Windows Search.
Here’s what to do:
- Click the Start button.
- Type Snipping Tool into the search box.
- Select the application.
- Click New to begin capturing your screen.
- Choose your preferred capture mode.
- Select the area or window you want to capture.
After taking the screenshot, the application opens an editing interface where you can make adjustments.
You can use the available tools to draw, highlight important details, crop the image, or erase unwanted markings.
When you’re satisfied, click the Save option and choose where you want the screenshot stored.
It’s a straightforward process, even if you’ve never used a screenshot application before.
6. Capture a Specific Area Using Rectangular Snip
Not every screenshot needs to include an entire application or desktop. Sometimes you just want a small portion of a webpage, perhaps a price, an important paragraph, or a particular notification.
The Rectangular Snip option makes this easy.
- Open the Snipping Tool.
- Select New.
- Choose Rectangular Snip.
- Click and drag around the section you want to capture.
- Release the mouse button.
The selected portion becomes your screenshot.
This is particularly useful for creating instructional documents because it removes unnecessary visual information and keeps the reader focused on what matters.
7. Use Freeform Snip for Irregular Shapes
A rectangular screenshot is not always ideal. Imagine trying to highlight a particular object on a complicated desktop or capture a strangely shaped section of a diagram.
With Freeform Snip, you can draw around the area you want to capture rather than being restricted to a rectangle.
Open the Snipping Tool, choose the Freeform option, and trace around your desired selection.
Windows captures the selected region, giving you more control over what appears in the final image.
It’s not a feature most people use every day, but when you need it, it’s rather useful.
8. Capture an Individual Window Using Window Snip
The Window Snip option is another convenient feature.
Instead of dragging your mouse around an application, you simply select the window you want to capture.
- Open Snipping Tool.
- Choose the Window Snip mode.
- Move your cursor over the application window.
- Click the desired window.
Windows captures the selected application, helping you avoid unnecessary desktop elements.
It’s a good option for software demonstrations, customer support instructions, and workplace documentation.
9. Use Full-Screen Snip to Capture Everything
If you need an image of your complete desktop, Full-screen Snip is the simplest option.
Select the full-screen capture mode in the Snipping Tool, and Windows will capture the entire display.
This can be helpful when documenting application layouts, displaying desktop settings, or explaining how several open windows work together.
If you use multiple monitors, remember that the captured area may include more than one display, depending on the capture method and configuration.
How to Take Screenshots on Windows 10
Windows 10 also provides several built-in screen capture options. Although some interface details differ from Windows 11, the essential shortcuts remain familiar.
10. Use Snip & Sketch in Windows 10
Snip & Sketch was introduced as a convenient screenshot and annotation application for Windows 10.
You could open it through the Start Menu or use Windows + Shift + S to access its screen capture interface.
Its main features included:
- Rectangular screen capture.
- Freeform selection.
- Window capture.
- Full-screen capture.
- Screenshot annotation.
- Image cropping.
- Clipboard copying.
The application made it easier to capture and edit screen images without installing additional software.
On newer Windows installations, the Snipping Tool provides the equivalent modern experience.
11. Use the Traditional Snipping Tool
Windows 10 also included the traditional Snipping Tool.
To access it, type Snipping Tool into the Start Menu search box and launch the application.
Depending on the version, you can select different snipping modes and capture a particular area of the screen.
It’s worth noting that Microsoft’s screenshot applications have evolved over time. Some older Windows 10 installations may display slightly different menus and features compared with newer versions.
How to Take Screenshots on a Windows Laptop
Laptop keyboards can make screenshot shortcuts a little confusing.
Unlike many desktop keyboards, some laptops combine the Print Screen function with another key. This means you might need to press an additional button to activate it.
12. Use the Fn + PrtScn Combination
If pressing PrtScn doesn’t appear to do anything, try Fn + PrtScn.
The Fn key is commonly found near the lower-left corner of laptop keyboards.
Depending on your laptop manufacturer, you may need to use:
- Fn + PrtScn.
- Fn + Windows + PrtScn.
- Windows + Shift + S.
The correct combination varies by keyboard design.
If you’re unsure, check the laptop’s keyboard documentation. Some models also have a dedicated screenshot function that works without the Fn key.
13. Take a Screenshot on Microsoft Surface Devices
Microsoft Surface devices offer additional screenshot options.
On compatible Surface models, you can use the physical Windows button and Volume Down button together to capture the screen.
On newer devices without a physical Windows button, keyboard shortcuts such as Windows + Shift + S provide a convenient alternative.
For Surface users who regularly work with a detachable keyboard, the standard Windows screenshot shortcuts are generally the easiest approach.
How to Take Screenshots While Gaming on Windows
Capturing gameplay is slightly different from taking an ordinary desktop screenshot.
You might want to save an impressive victory, a funny in-game moment, or a beautiful scene without interrupting the action.
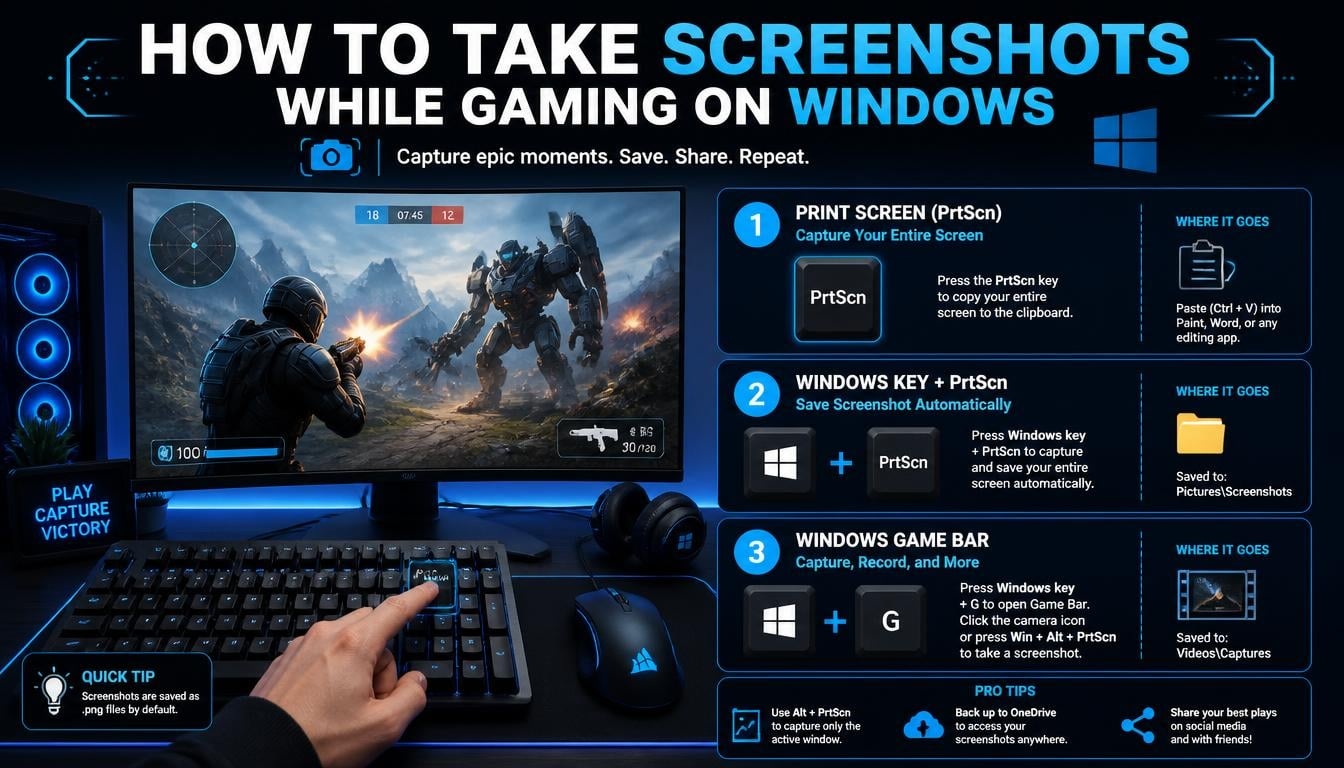
Windows includes a built-in utility called Xbox Game Bar, designed partly for this purpose.
14. Use Xbox Game Bar
<image-placeholder/> The Xbox Game Bar is included with supported Windows installations and provides several gaming-related features.
To open it:
- Launch your game.
- Press Windows + G.
- Locate the Capture widget.
- Select the screenshot button.
You can also use the shortcut Windows + Alt + PrtScn to capture gameplay directly when the feature is supported and configured.
Screenshots captured through Xbox Game Bar are generally saved in:
Videos > Captures
This makes it easy to locate gaming screenshots without searching through your regular Pictures folder.
15. Capture Gameplay Without Leaving Your Game
The beauty of Xbox Game Bar is that you don’t need to minimize your game every time you want to capture something.
Once you’ve familiarized yourself with its shortcuts, taking screenshots becomes almost automatic.
Just remember that Game Bar functionality can vary between games and applications. Some protected or unsupported content may not be captured normally.
Best Third-Party Windows Screenshot Tools
The built-in Windows utilities are sufficient for most everyday tasks. However, people who regularly create tutorials, product documentation, or technical guides may appreciate additional features.
Here are three popular options worth considering.
16. ShareX: A Powerful Free Screenshot Tool
ShareX is a free, open-source screen capture application with a wide range of customization options.
<image-placeholder/>
It offers features such as:
- Custom screenshot shortcuts.
- Region and full-screen capture.
- Scrolling capture for supported applications.
- Image annotation.
- Workflow automation.
- Optional image-sharing and upload integrations.
One of its biggest advantages is flexibility. You can configure different actions for different capture types.
For example, you might create a shortcut that captures a selected area, automatically saves the image, and opens it in an editor.
ShareX is especially useful for advanced users who want more control over their Windows screen capture workflow.
17. Greenshot: A Simple and Lightweight Option
<image-placeholder/> Greenshot is another popular screenshot application.
It’s designed to make capturing and sharing screen images relatively straightforward, without overwhelming users with complicated menus.
Some of its useful features include:
- Region capture.
- Window screenshots.
- Full-screen capture.
- Basic image annotation.
- Highlighting and drawing tools.
- Exporting screenshots to different destinations.
It’s a good choice for people who want a lightweight screenshot tool for everyday productivity.
18. Snagit: A Professional Screenshot Application
<image-placeholder/> If screenshots are an important part of your professional work, Snagit may be worth exploring.
Developed by TechSmith, Snagit offers more advanced image capture and editing features.
Some notable capabilities include:
- Scrolling capture for supported content.
- Image templates.
- Annotation tools.
- Video recording.
- Visual documentation features.
- More advanced editing options.
It’s particularly useful for technical writers, educators, software trainers, and people who regularly create instructional material.
Unlike ShareX and Greenshot, Snagit is a commercial product, so check its current pricing and licensing options before purchasing.
Where Are Screenshots Saved in Windows?
One of the most common questions beginners ask is where their screenshots actually go.
The answer depends on which capture method you use.
Here’s a simple breakdown:
| Screenshot method | Where the image goes |
| PrtScn | Clipboard |
| Alt + PrtScn | Clipboard |
| Windows + Shift + S | Clipboard |
| Windows + PrtScn | Pictures > Screenshots |
| Xbox Game Bar | Videos > Captures |
| Snipping Tool | Clipboard and saved files when you choose Save |
If your screenshot isn’t appearing in a folder, don’t immediately assume something went wrong.
You may have used a shortcut that copies the image to the clipboard rather than creating a file.
Open Paint and press Ctrl + V. If the image appears, your screenshot was successfully captured.
How to Edit and Share a Windows Screenshot
Taking a screenshot is only half the job. Sometimes you need to remove unnecessary details, highlight an important section, or send the image to someone.
Fortunately, Windows offers several simple ways to do this.
19. Edit Screenshots Using Microsoft Paint
Microsoft Paint remains one of the easiest tools for basic screenshot editing.
After capturing your screen, open Paint and press Ctrl + V.
You can then:
- Crop unwanted portions.
- Resize the image.
- Add text.
- Draw arrows.
- Highlight important areas.
- Save the screenshot as PNG or JPEG.
For everyday editing, these tools are usually more than enough.
20. Add Annotations With the Snipping Tool
The Snipping Tool also includes annotation features.
Depending on your Windows version, you can use pens, highlighters, cropping tools, and other editing options.
For example, if you’re explaining how to change a computer setting, you could capture the relevant window and draw a circle around the button someone needs to click.
That little bit of visual guidance can save quite a lot of explanation.
21. Paste Screenshots Into Word, Outlook, or Other Applications
If your goal is to share information rather than create a separate image file, clipboard screenshots are especially convenient.
After taking your screenshot, open the destination application and press Ctrl + V.
You can paste images directly into:
- Microsoft Word documents.
- Microsoft Outlook emails.
- PowerPoint presentations.
- Compatible messaging applications.
- Online forms and image editors.
Always check the pasted image before sending it, particularly if the screenshot contains personal information or confidential details.
How to Screenshot Multiple Monitors on Windows
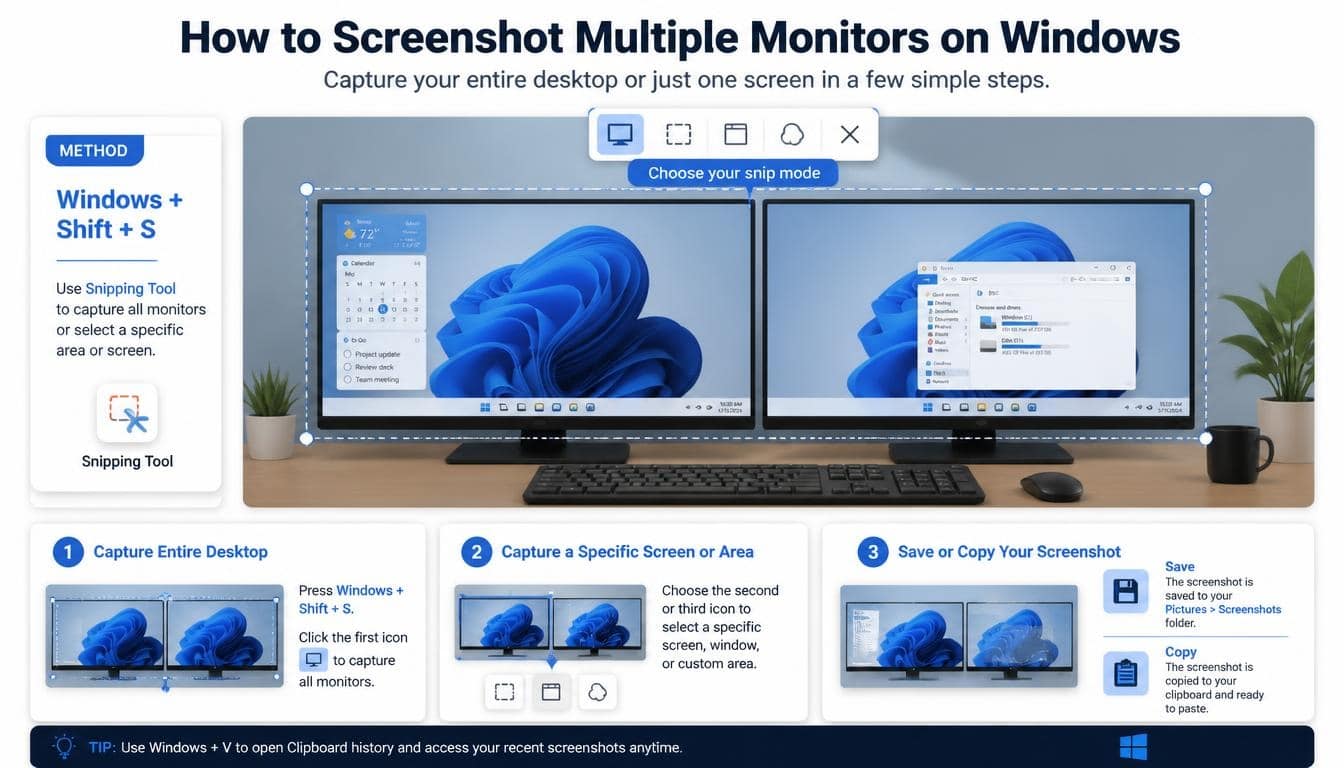
People who work with two or more monitors sometimes need to capture their entire workspace.
Windows provides several ways to do this.
The PrtScn shortcut can capture the combined desktop display, depending on the system configuration. The Windows + PrtScn combination can also save a full-desktop screenshot automatically.
If you only need one monitor, you can use the Snipping Tool to select the desired display area.
For a more precise result, make sure your displays are arranged correctly in Windows Settings under System > Display.
This is particularly helpful for people who use multiple monitors for video editing, financial work, programming, or multitasking.
How to Take a Scrolling Screenshot on Windows
Here’s something that surprises many new Windows users: the standard Snipping Tool doesn’t provide universal scrolling screenshot capture for every application.
If you need to capture an entire webpage or a long document, you may need a different approach.
Some third-party applications, including ShareX and Snagit, offer scrolling capture features for supported windows and applications.
For webpages, your browser may also offer built-in full-page screenshot options or extensions.
A useful tip is to choose the tool according to the content you’re capturing. A browser webpage, a PDF document, and a desktop application may all require slightly different approaches.
What to Do When the Windows Print Screen Key Is Not Working
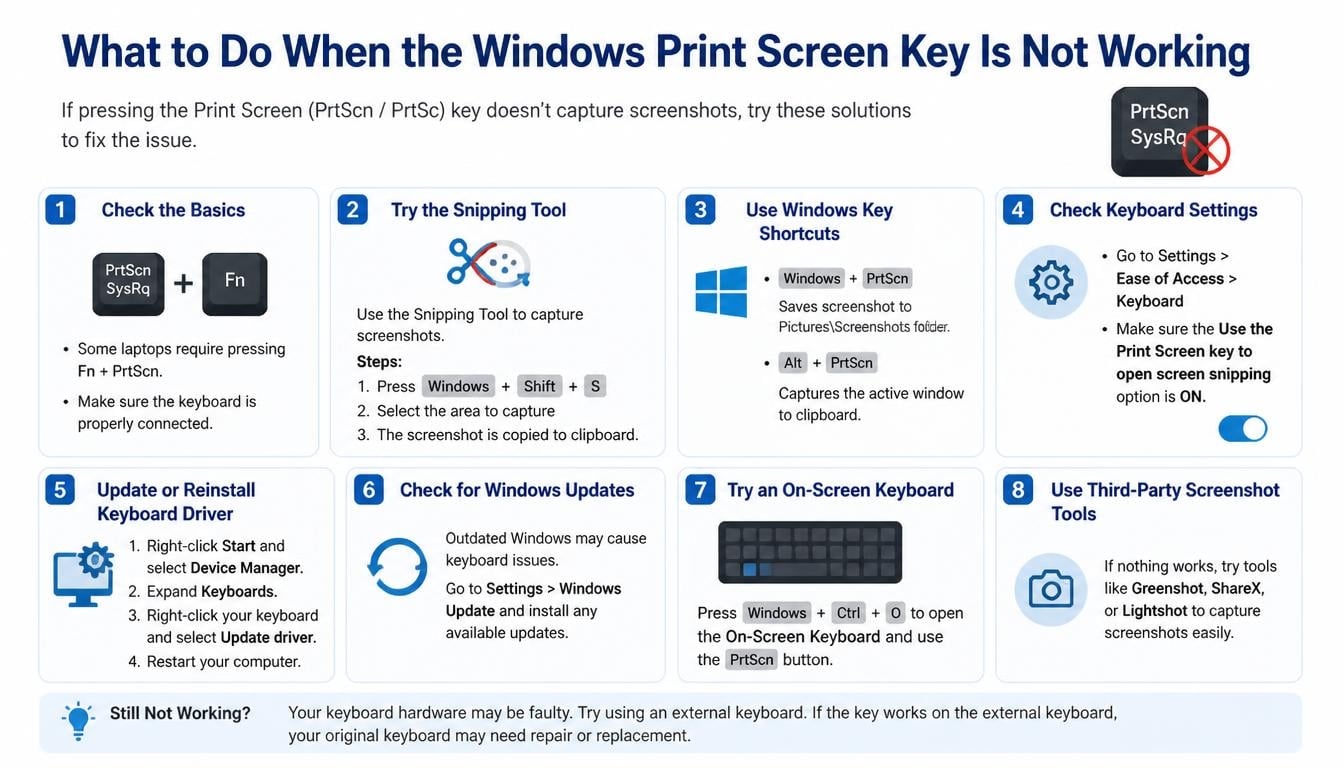
It’s frustrating when you press the screenshot key and absolutely nothing seems to happen.
Fortunately, there are a few simple things you can check before assuming your keyboard is broken.
Check Your Keyboard’s Fn Function
Some laptop keyboards require the Fn key to activate secondary functions.
Try Fn + PrtScn and see whether the screenshot is captured.
Check the Print Screen Settings
Windows 11 and some Windows 10 configurations allow the Print Screen key to open the Snipping Tool.
You can check the relevant option under Settings > Accessibility > Keyboard.
Depending on your Windows version, the setting may be called Use the Print Screen key to open screen capture.
Restart the Snipping Tool
If Windows + Shift + S isn’t responding, close the Snipping Tool and open it again through Start Menu search.
You can also check for available Windows application updates.
Check Your Clipboard
Sometimes the screenshot is captured successfully but isn’t saved as a file.
Open Paint and press Ctrl + V to check whether the image is available.
Try Another Screenshot Method
If one shortcut isn’t working, try another built-in method.
For example, use Windows + Shift + S instead of PrtScn.
This helps you determine whether the issue involves the keyboard, a particular application, or Windows screenshot settings.
Frequently Asked Questions About Windows Screenshots
How do I take a screenshot on Windows without opening an application?
Press Windows + PrtScn to capture your entire screen and automatically save the image in Pictures > Screenshots.
Alternatively, Windows + Shift + S lets you capture a selected area without manually opening the Snipping Tool first.
What is the fastest way to screenshot on Windows 11?
Windows + Shift + S is one of the fastest and most flexible options because it allows you to select exactly what you want to capture.
Can I screenshot only one part of my screen?
Yes. Press Windows + Shift + S and select Rectangular Snip. Then drag your cursor around the area you want to capture.
How do I take a screenshot on Windows 10?
You can use PrtScn, Windows + PrtScn, Alt + PrtScn, or Windows + Shift + S.
Windows 10 also supports screenshot capture through its Snip & Sketch and Snipping Tool applications.
What format are Windows screenshots saved in?
Windows screenshot files are commonly saved as PNG images, although some applications allow you to export or save screenshots in JPEG and other formats.
Can I take a screenshot on Windows using my mouse?
Yes. Open the Snipping Tool from the Start Menu, click New, and select the area you want to capture using your mouse.
Does Windows have a built-in screen recording tool?
Yes. Xbox Game Bar provides screen recording functionality for supported applications and games. The Snipping Tool also offers screen recording on supported Windows versions.
Can I take screenshots without a Print Screen key?
Absolutely. Windows + Shift + S is a convenient alternative. You can also open the Snipping Tool through the Start Menu and capture your screen using your mouse.
PC screenshot
A PC screenshot allows you to capture everything displayed on your computer screen or select a specific area, window, or application. Windows provides built-in tools such as Snipping Tool and Print Screen to make capturing and saving screenshots easy.
How to screenshot on a windows
To take a screenshot on Windows, press Windows + Shift + S to open the Snipping Tool and select the area you want to capture. You can also press Windows + PrtScn to capture and automatically save the entire screen.
How to screeshot on windows
You can screenshot on Windows using keyboard shortcuts or the built-in Snipping Tool. Press PrtScn to copy your screen to the clipboard, or use Alt + PrtScn to capture only the active window.
How to print screen on computer
To print screen on a computer, press the PrtScn key on your keyboard to copy the entire screen. Then press Ctrl + V to paste the screenshot into Paint, Word, or another application.
Screenshots on pc
Screenshots on PC can be captured using Windows shortcuts, Snipping Tool, or Xbox Game Bar. You can save screenshots as image files, copy them to the clipboard, edit them, or share them with others.
How to Choose the Best Windows Screenshot Method
With so many options available, choosing the right one can feel a little confusing at first.
But you really don’t need to memorize every shortcut. Just understand what each method is best at.
Here’s a quick comparison:
| Your requirement | Recommended method |
| Capture the entire screen | Windows + PrtScn |
| Capture a selected area | Windows + Shift + S |
| Capture one application | Alt + PrtScn |
| Edit a screenshot | Snipping Tool |
| Capture gameplay | Xbox Game Bar |
| Automate screenshots | ShareX |
| Create professional visual guides | Snagit |
| Make simple edits | Microsoft Paint |
For most people, learning just three shortcuts is enough to get started: Windows + Shift + S, Windows + PrtScn, and Alt + PrtScn.
Once those become familiar, taking screenshots will feel less like a technical task and more like second nature.
Read More: https://gracethemes.com/modem-vs-router/
Final Thoughts: Make Screen Capturing Easier on Windows
Learning how to screenshot on Windows doesn’t require advanced computer knowledge, expensive software, or hours of practice. A few keyboard combinations and a little familiarity with the built-in Windows tools can make everyday computer tasks considerably easier.
Whether you’re capturing an important message, saving a memorable gaming moment, preparing a tutorial, or showing someone exactly what’s happening on your screen, there’s a method that fits the situation.
Start with Windows + Shift + S if you want flexibility. Use Windows + PrtScn when you need an automatically saved image, and explore the Snipping Tool when you want to edit or annotate your screenshots.
And don’t forget that tools such as ShareX, Greenshot, and Snagit can take things further if screen capture becomes a regular part of your work.
The real trick isn’t knowing every possible shortcut. It’s knowing which one to reach for when the moment comes.
Have a favourite Windows screenshot trick that saves you time? Share it with others in the comments. Your little discovery might be exactly what another Windows user has been looking for.
