Optimize your WooCommerce Store in 11 Simple Steps
WooCommerce — The intuitive, flexible, free, open-source WordPress plugin with a fast-growing fanbase! Though termed as a plugin, WooCommerce is in fact more than other standard WordPress plugins, with regard to its performance and functionality. It is a highly customizable e-commerce platform that makes the setup of your online store a breeze.
“93.7% of WordPress e-commerce websites use the WooCommerce plugin.”
Source: Barn 2
Your ultimate aim of running an online store is converting your store visitors into as many paying customers. And the key to winning more customers is “optimization”! An optimized WooCommerce store can drive more organic traffic and thus bring in more revenue.
The WooCommerce platform offers great flexibility to optimize your online store compared with other options, thus enhancing its performance. This is also why many store owners move to WooCommerce. Let’s see how!
Ways to Optimize your WooCommerce Store
Following are some important methods that will help you in optimizing your WooCommerce store:
1. Make your product titles SEO friendly
Your product title must be created in such a way to quickly and precisely convey what your product is all about. Identify the easy-to-rank keywords for your product and include it in your product page titles as well as category page titles. You could use keyword research tools to come up with the most suitable keywords.
For category pages, you could use broad, competitive, high-volume keywords and for product pages, using specific keywords would be ideal to rank higher in search results. However, ensure your page titles are not overpopulated with keywords.
See how Archiproducts have titled their categories and products.
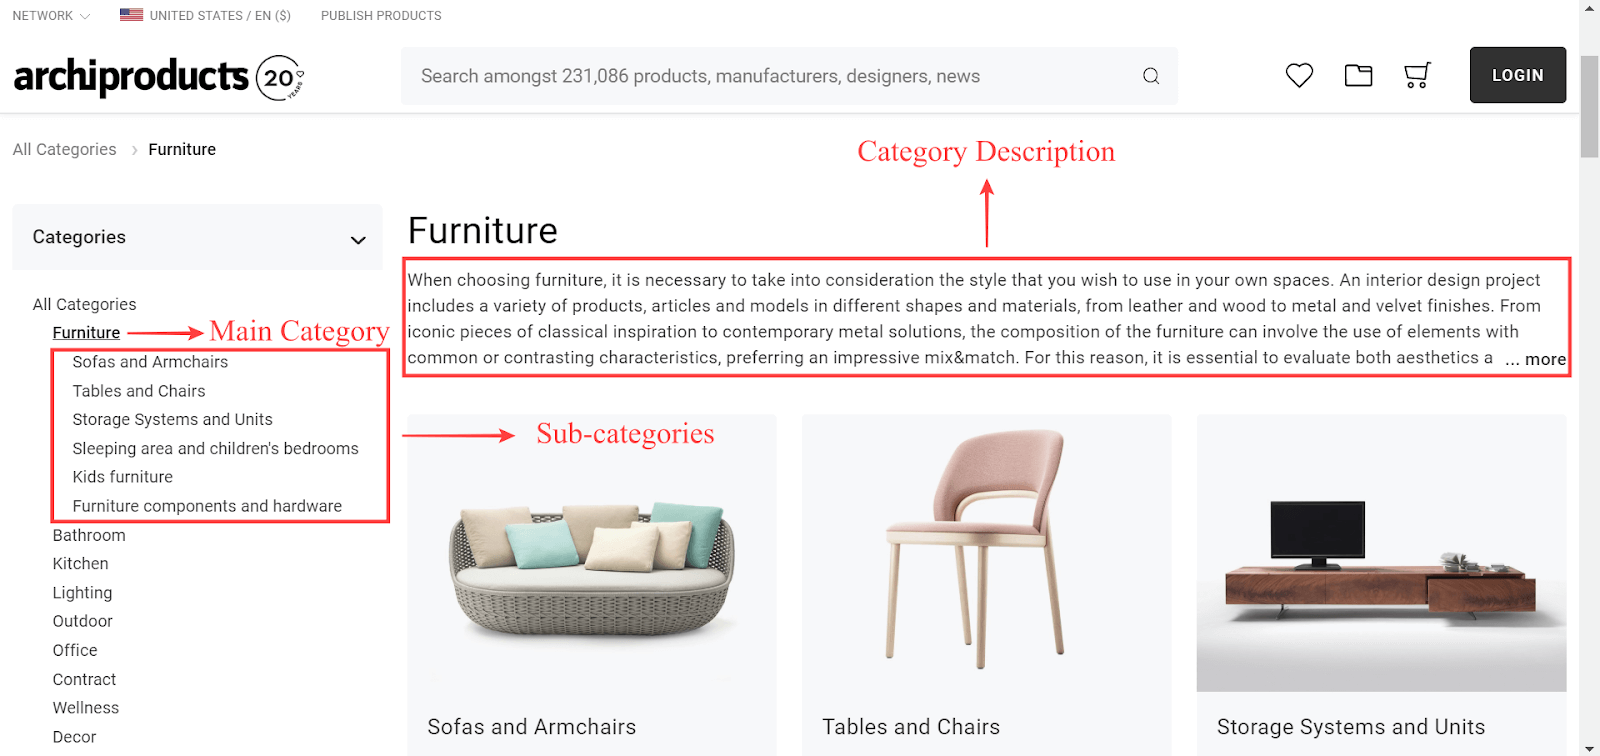
SEO-friendly category titles
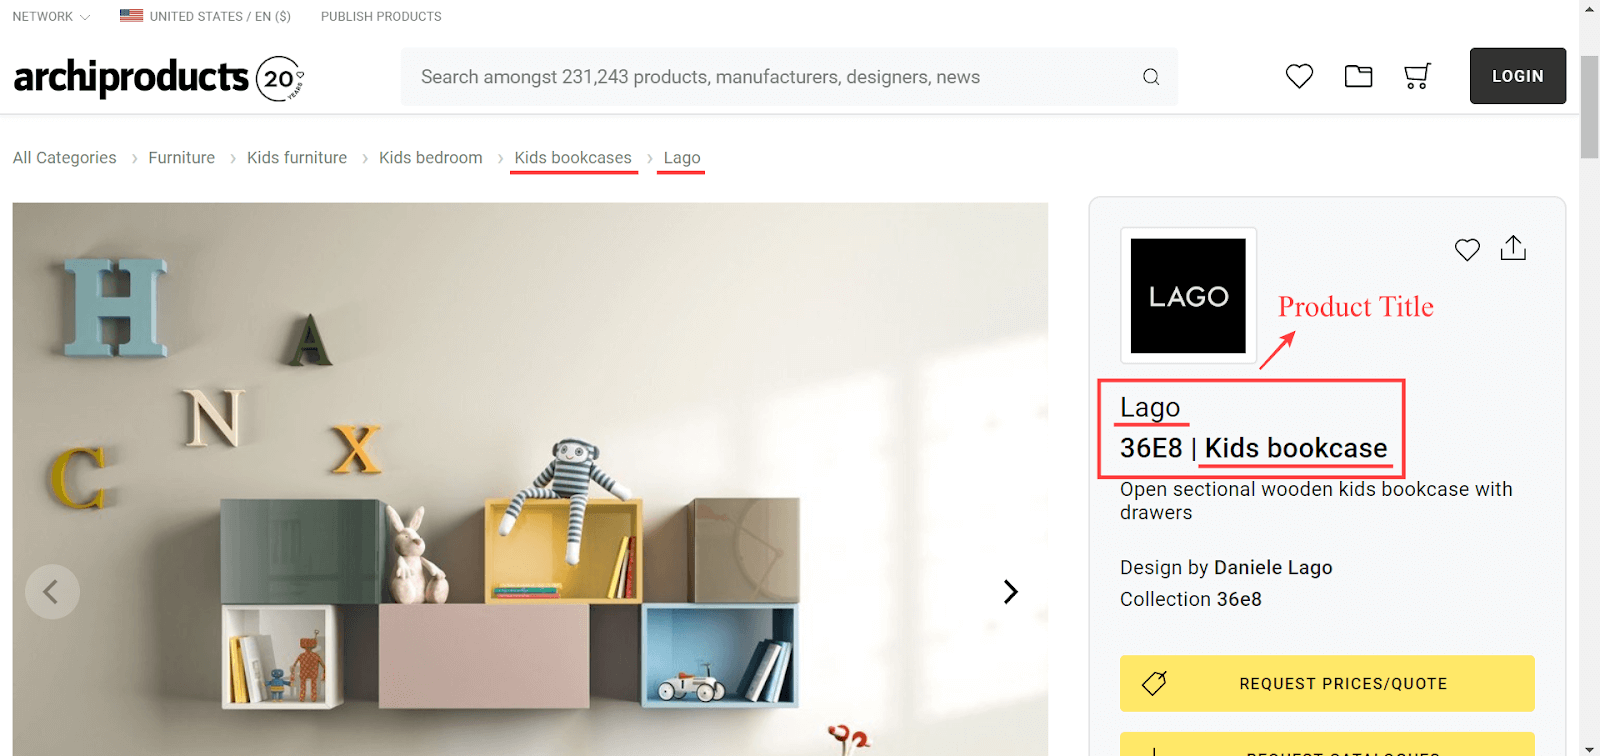
SEO-friendly product title
2. Optimize your product page URLs
If you do not manually set URLs for your WooCommerce product pages, it will automatically generate URLs based on the product IDs. These kinds of URLs are difficult to rank in search results, as they are non-SEO friendly. So it is always desirable to set custom URLs for your product pages.
You could set up custom URLs using Product permalink settings. The following are the steps:
Step 1: Log in to your WordPress dashboard > Go to Settings > Permalinks
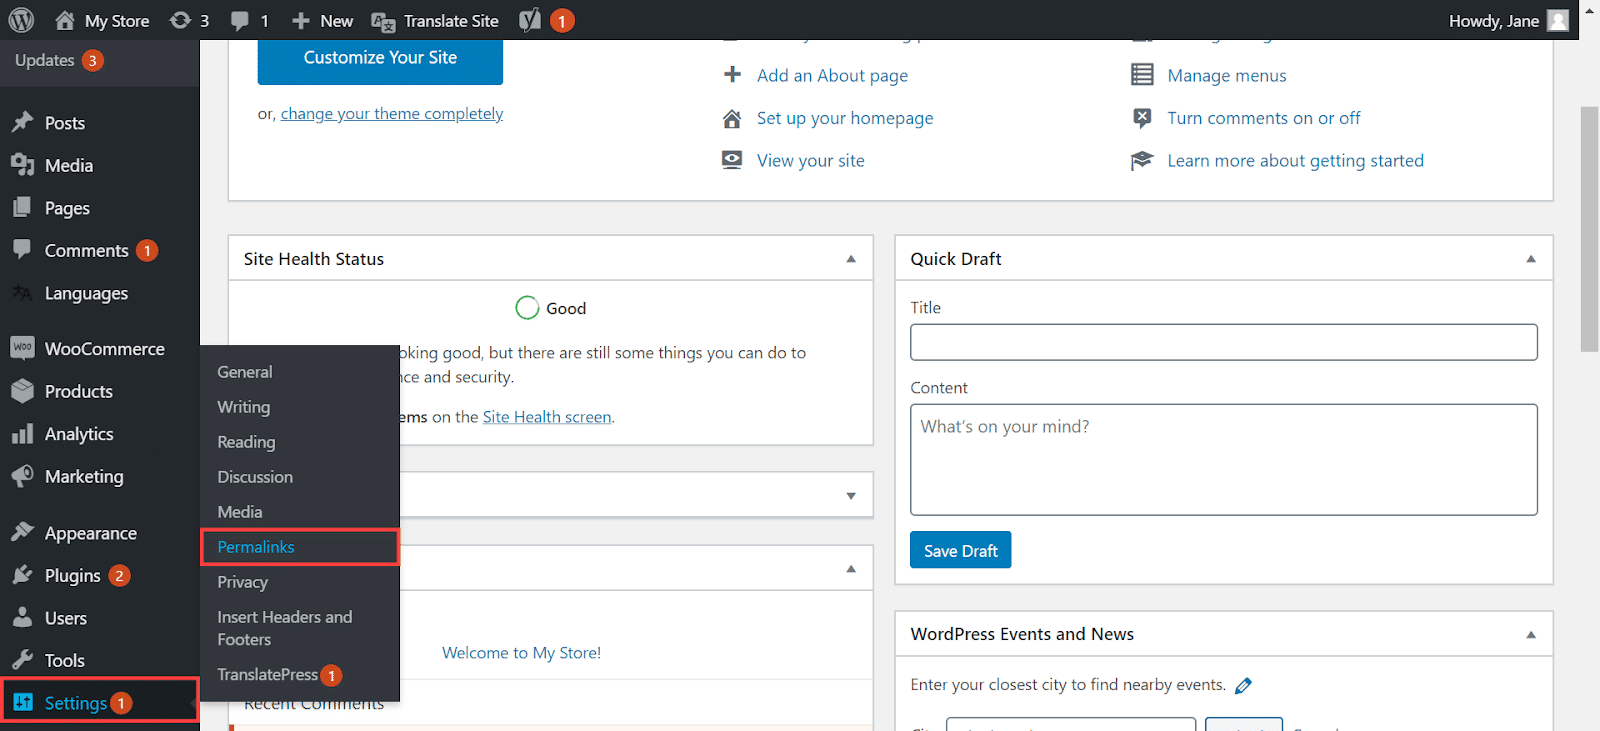
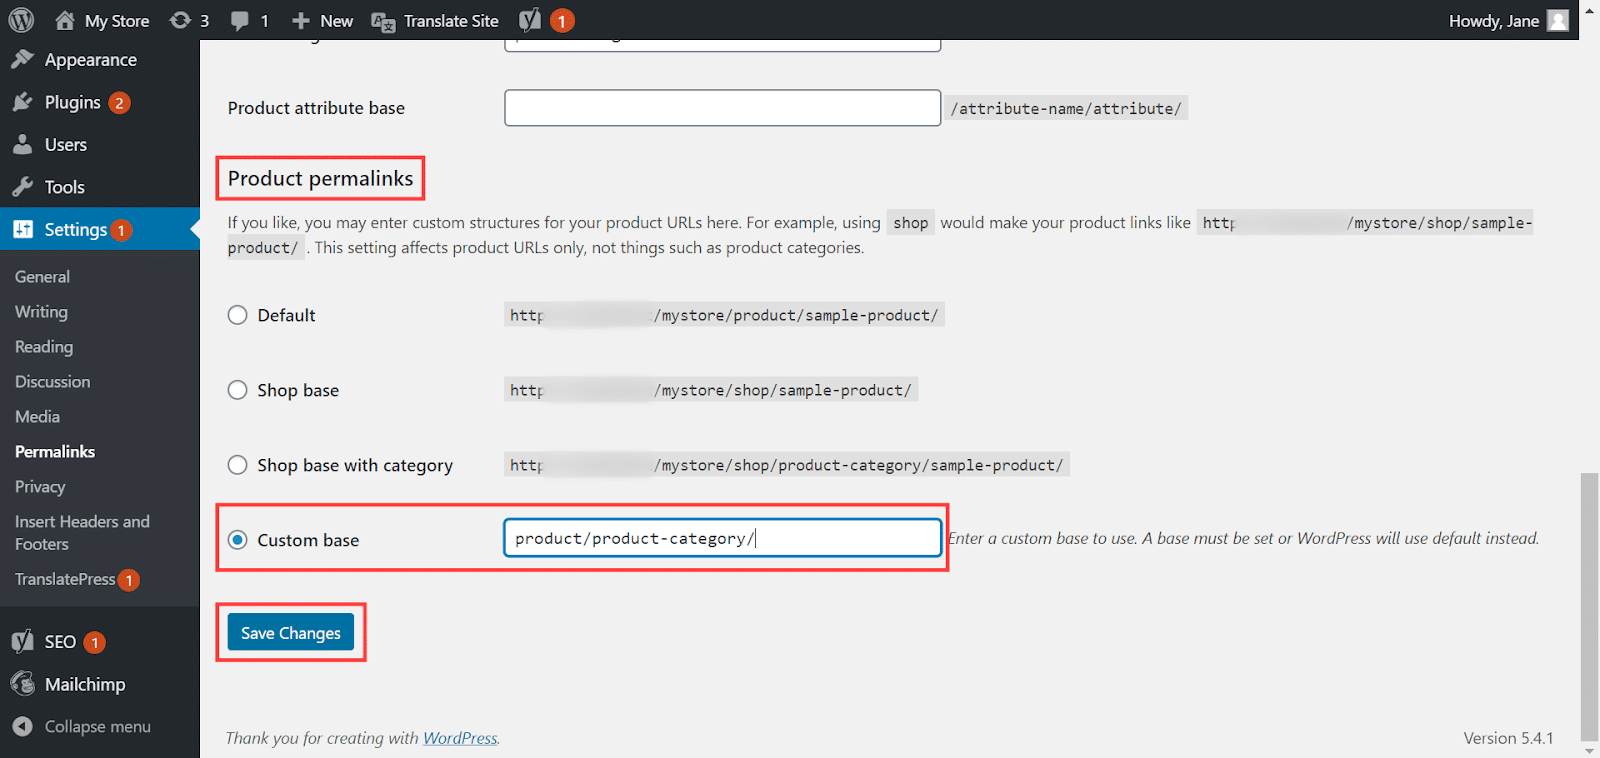
Step 2: Scroll down to Product permalinks > By selecting the Custom base option, you can configure a URL that is relevant to your product > click Save Changes to save the settings.
Make sure to keep your product page URLs simple, straightforward, easy to remember, and self-explanatory. Optimizing your product page URLs this way would certainly help you rank higher in the search engine result pages (SERPs).
Shown below are the examples of how an SEO optimized and non-optimized product URL may look like:
Non-SEO optimized product URL
http://www.example.com/product_id=33?T983_ABC

Optimized URL
3. Create a clear, detailed product description
You might probably know that the product pages are the most visited pages on an e-commerce store. Considering the importance of a product page in e-commerce, ensure you take considerable effort and time to optimize your product page. A sufficiently detailed product description would easily help you drive more targeted traffic to your WooCommerce store.
Key tips for generating compelling product descriptions
- Define your target audience.
- Highlight your product features and benefits.
- Keep your product description clear, concise, and convincing.
- Be consistent in your tone of voice.
- Avoid creating duplicate content.
Here’s how GameStop describes their product.

Product Description
4. Optimize your product images
Product images are essential and add more value to your e-commerce website. Every product page of your WooCommerce store must be equipped with high-quality images that help them make better purchase decisions.
“93% of consumers consider visual content a critical factor in an e-commerce store.”
Source: Justuno
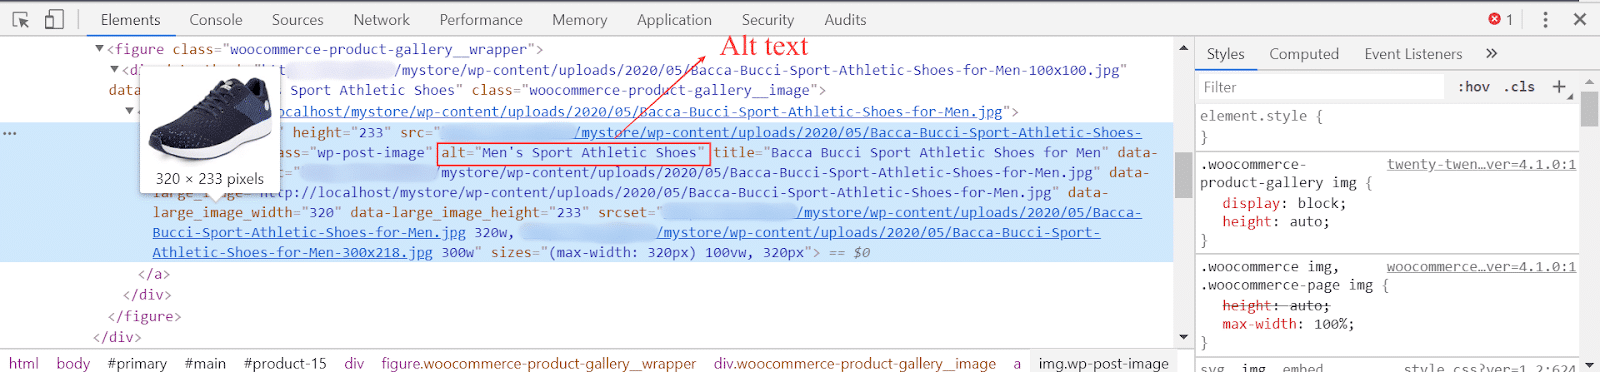
When adding product images to your WooCommerce store, make sure you add alternative texts (alt attributes) to it. Alt texts are short texts or phrases that appear on the image box when it fails to load. Ensure you include appropriate keywords to your image alt texts in order to make it SEO-friendly. Adding alt attributes to the images will also help improve the accessibility of your website.
Follow the steps below to add image alt texts to your product images:
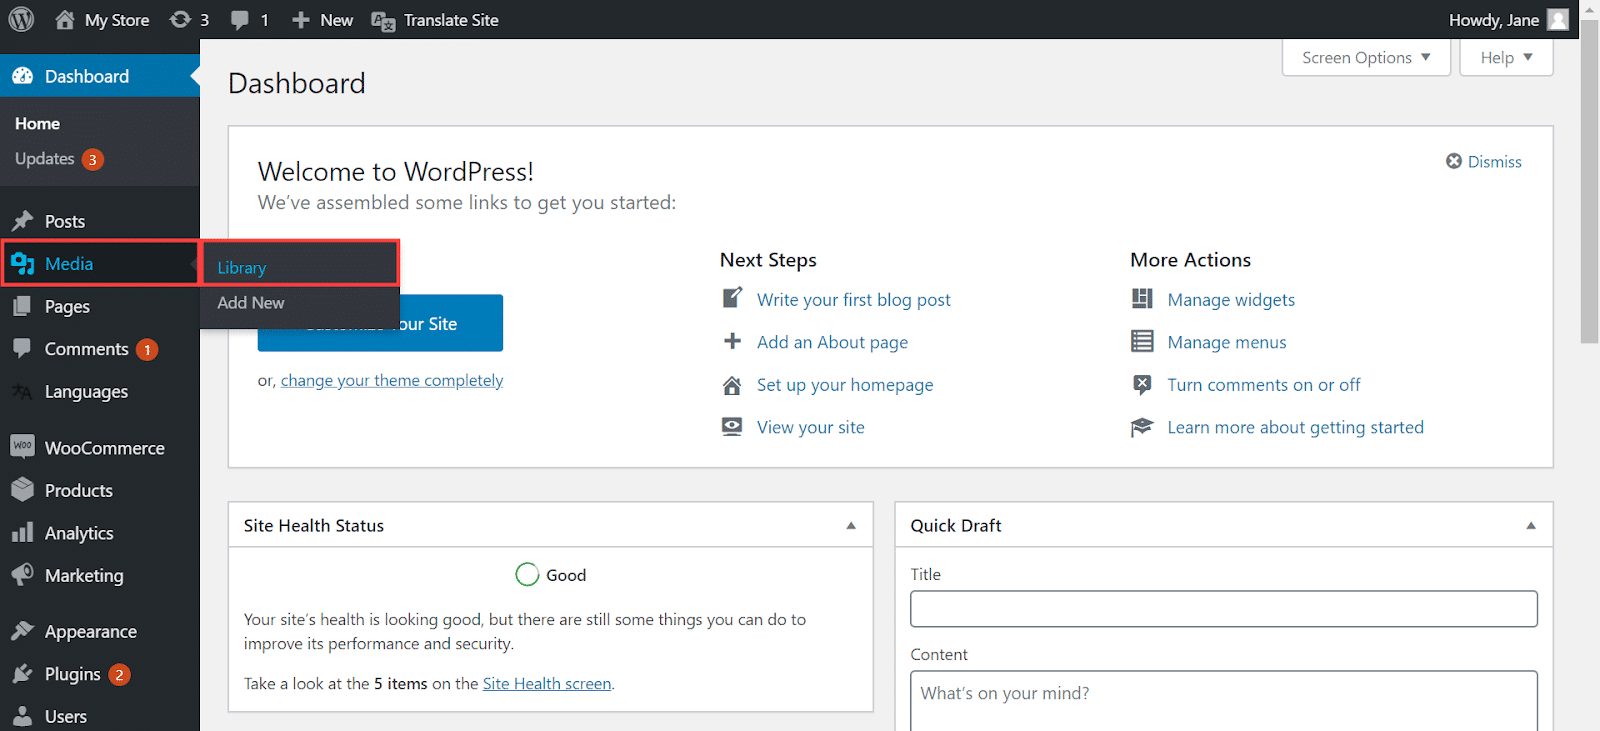
Step 1: Log in to your WordPress dashboard, head on to Media > Library.
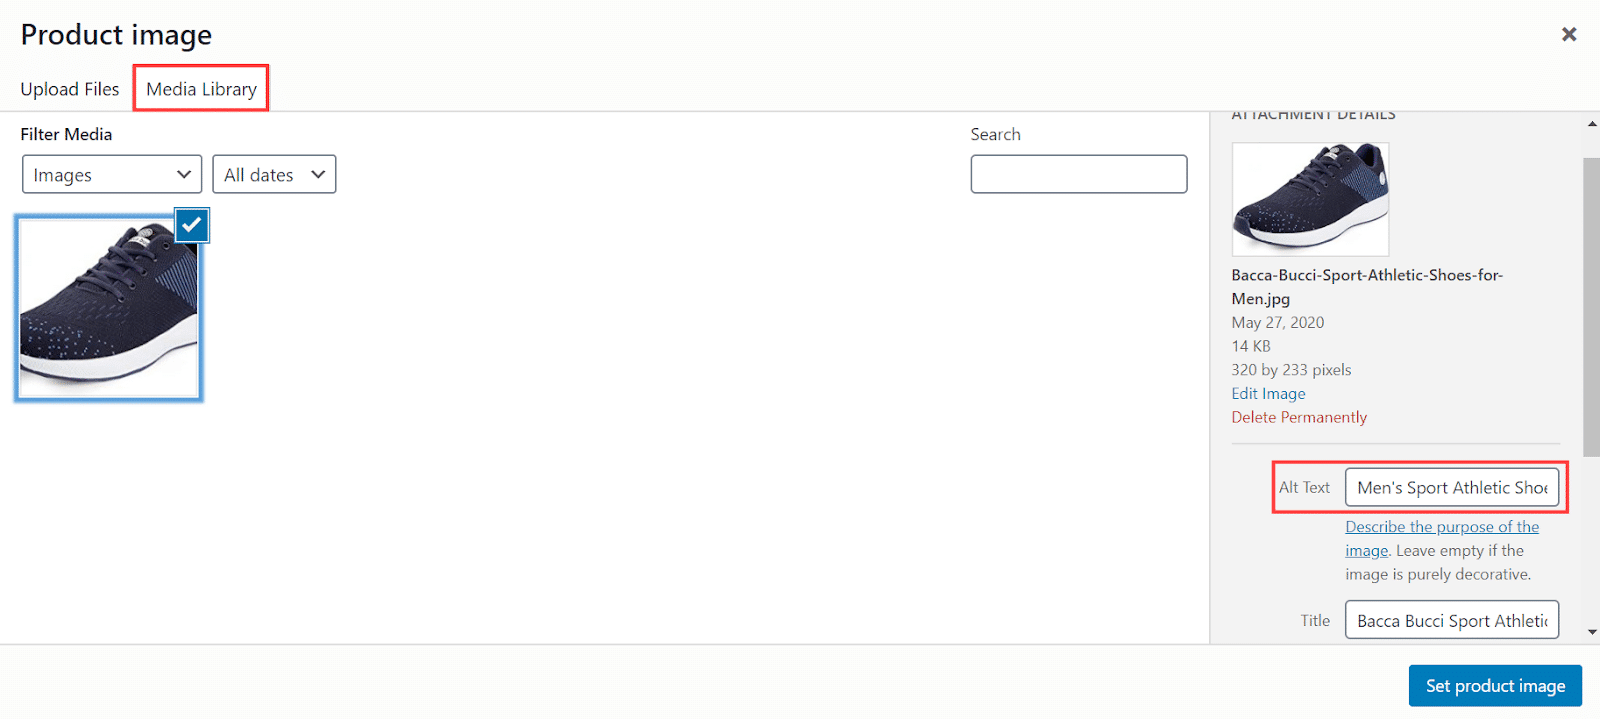
Step 2: Select a product image > Enter/edit the Alt Text > Click Set product image.
Note: Go to Media > Add New > Select Files to upload new images to your media library.
From your storefront, right-click your product image and click Inspect to confirm that the alt text that you’ve set now, exists on your product image.
Although your WooCommerce store necessitates high-quality images, it may considerably reduce the loading speed of your website, leading to higher bounce rates. Therefore, the best option is to compress the images without affecting their quality. You could choose a suitable WordPress image compression plugin to do this.
5. Add a compelling meta description
A meta description is a short piece of text that helps your audience get a brief idea about your web page’s content. Search engines will use these text snippets to display it in the search results.
The meta description for your product page must be created in such a way that it clearly reflects your product. Ensure the length of your meta description is not less than 120 characters and not more than 156 characters.
In case you fail to specify a meta description for your product page, Google may select the first snippet from the content. But it’s better to create your own unique, interesting meta description that appeals to your target audience.
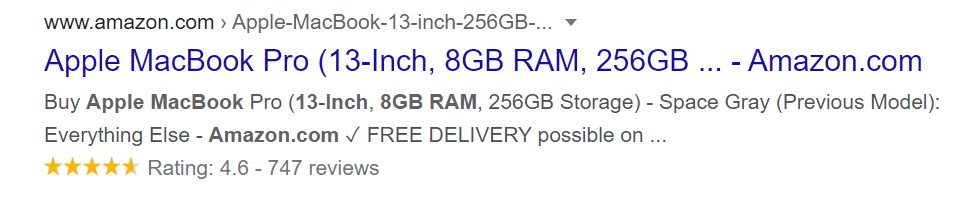
Here’s an example of an ideal (short and sweet) meta description.

Meta description
Incorporating your focus keyword in your meta description is yet another important factor to consider. If the user’s search term matches up a piece of text in your meta description, Google tends to highlight the term in the search results. It helps you earn much more click-through rates.
Also, by adding important product specifications to your meta description, you could easily attract the audience who often make search queries that contain technical details. Here’s how:
Meta description with product specs
You could easily set meta descriptions for your product pages using WordPress plugins. Though there are a number of SEO plugins to choose from, Yoast SEO is the most popular and highly recommended plugin to improve your product page SEO.
Find below how Yoast SEO helps you seamlessly set up meta descriptions for your WooCommerce product pages:
Step 1: Log in to your WordPress dashboard > Navigate to WooCommerce > Products > Open the Product page in which you want to add the meta description > Scroll down to Yoast SEO.
Step 2: Click on Edit snippet > Add your meta description under Meta description > Click Publish/Update to save the settings.
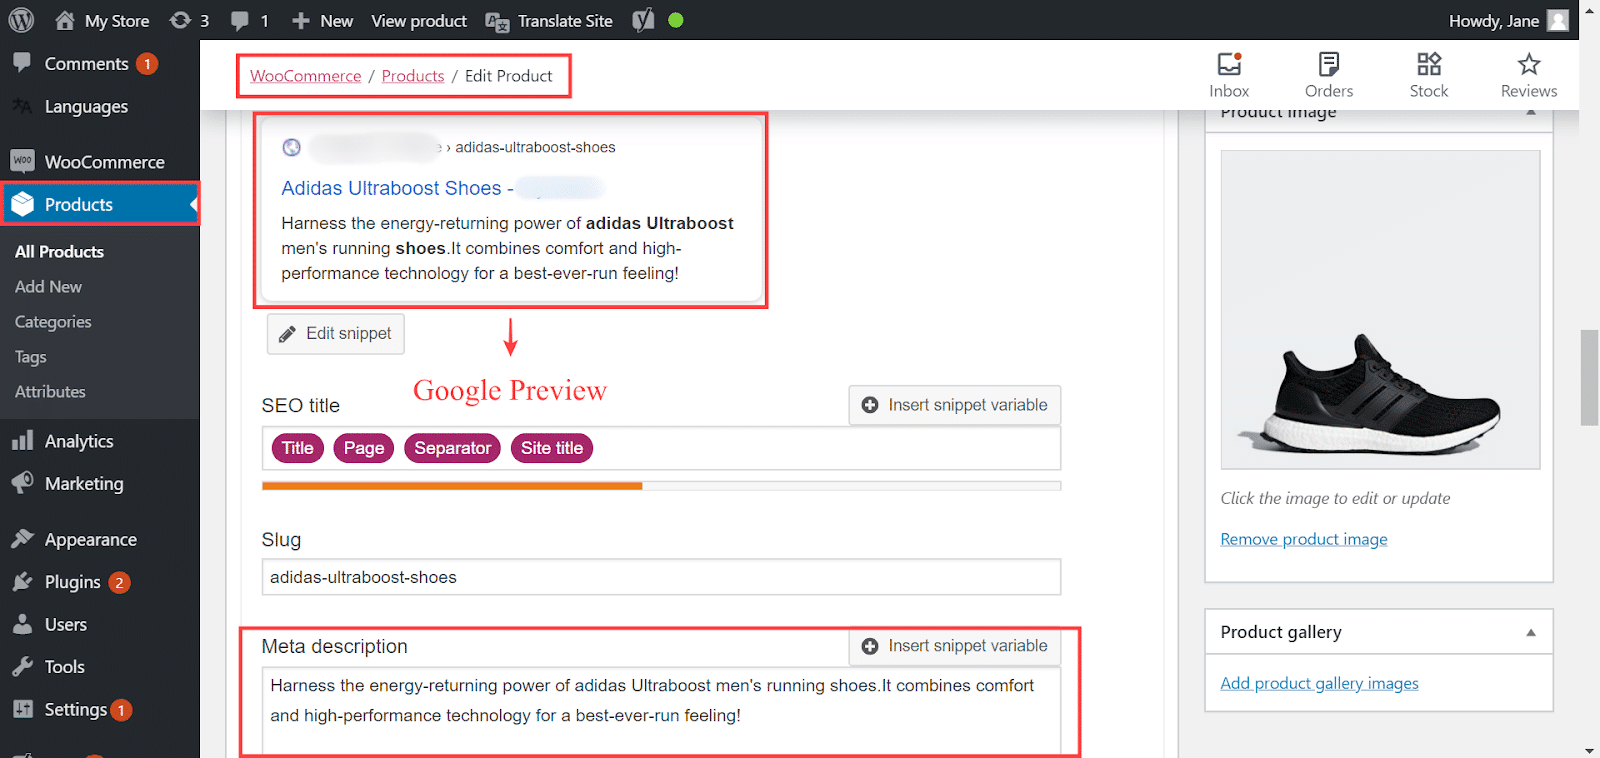
Source (Product image and Meta description): adidas
6. Create rich snippets
Rich snippets aka rich results are the structured data markup (schema) that you can add on your existing HTML. It helps search engines to better understand what information is included on your product pages and thus produce enhanced search results. Rich snippets enable search engines to display additional details about your product or website resources.
A rich snippet for a product page usually comprises user ratings and reviews, product price, stock info, etc. Moreover, they could also include images and videos related to your product. So the rich snippets would help users abundantly by letting them figure out the value of a product at a quick glance.
Here’s an example of a rich snippet:
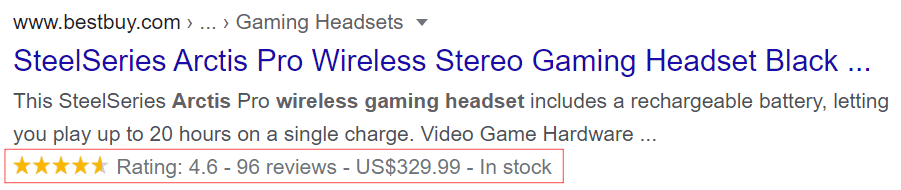
Rich snippet
There are a number of WordPress plugins that help you create rich snippets. Now, read here how to configure rich snippets for your WooCommerce products with Rich Snippets WordPress plugin.
7. Make your WooCommerce store easy to navigate
Complicated, hard-to-understand store navigation will certainly ruin your sales. When users are not able to find the woocommerce trending products quickly, they’re more likely to click away.
By keeping the navigation of your WooCommerce store simple and straightforward, you could enable your site visitors to instantly find what they are looking for. Smooth site navigation also creates yet another opportunity to rank higher in search results.
Check below how Zappos have designed their header and footer navigation intuitively:
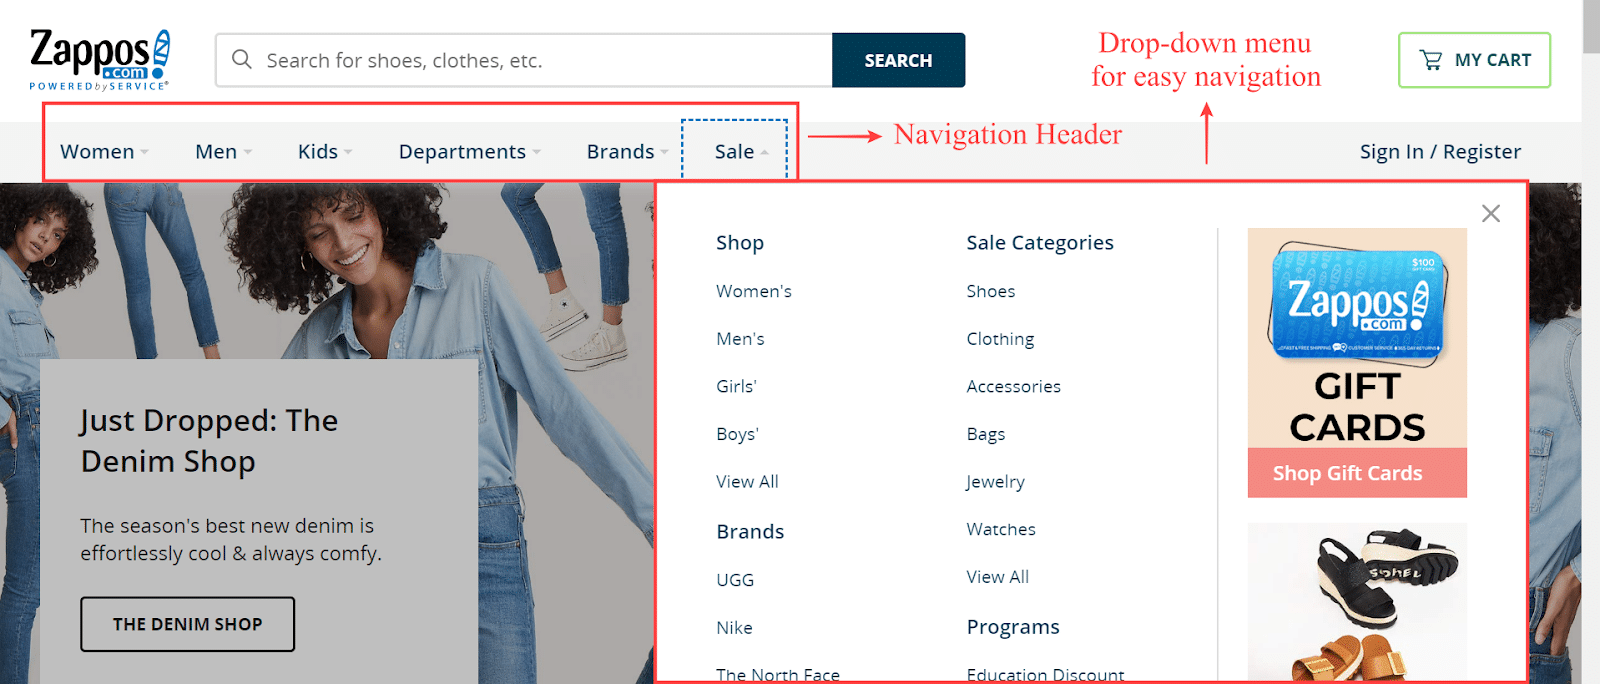
Site navigation (header)
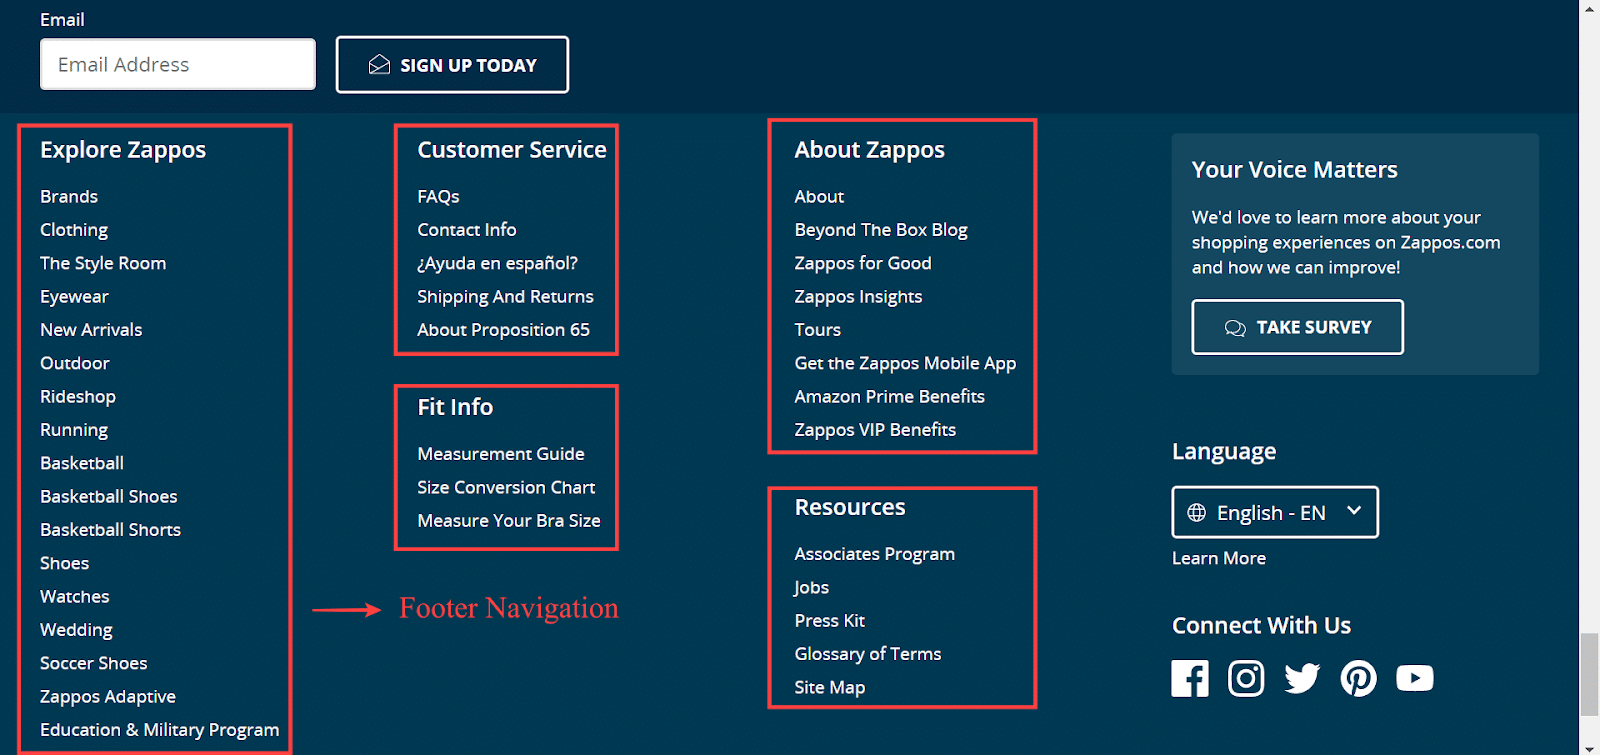
Site navigation (footer)
8. Use breadcrumb navigation
Breadcrumb navigation makes your WooCommerce store pretty much user-friendly and highly intuitive. The use of breadcrumbs would make your search result snippets visually appealing for your audience. Also, it significantly increases your click-through rates. Therefore, make sure you build your breadcrumb menus with a proper data structure that is easily understood by Google.
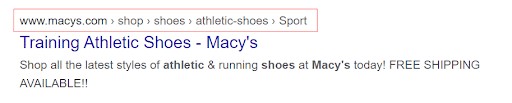
Breadcrumb navigation
WooCommerce Breadcrumbs is a good WordPress plugin that would be worth trying.
9. Optimize your checkout process
It is undeniable that customers hate lengthy or complicated checkout processes. This can lead to higher checkout abandonment rate — loss of customers during the checkout phase. Hence, it is important to optimize your checkout page and fix checkout errors, ensuring that your customers enjoy a quick and seamless buying experience.
21% of US online shoppers have abandoned an order in the past quarter solely due to a “too long / complicated checkout process”
Source: Baymard
Check out the steps that you need to take in order to optimize your WooCommerce checkout page.
See how R.E.D.D. has designed their checkout page with an easy, single page checkout flow:
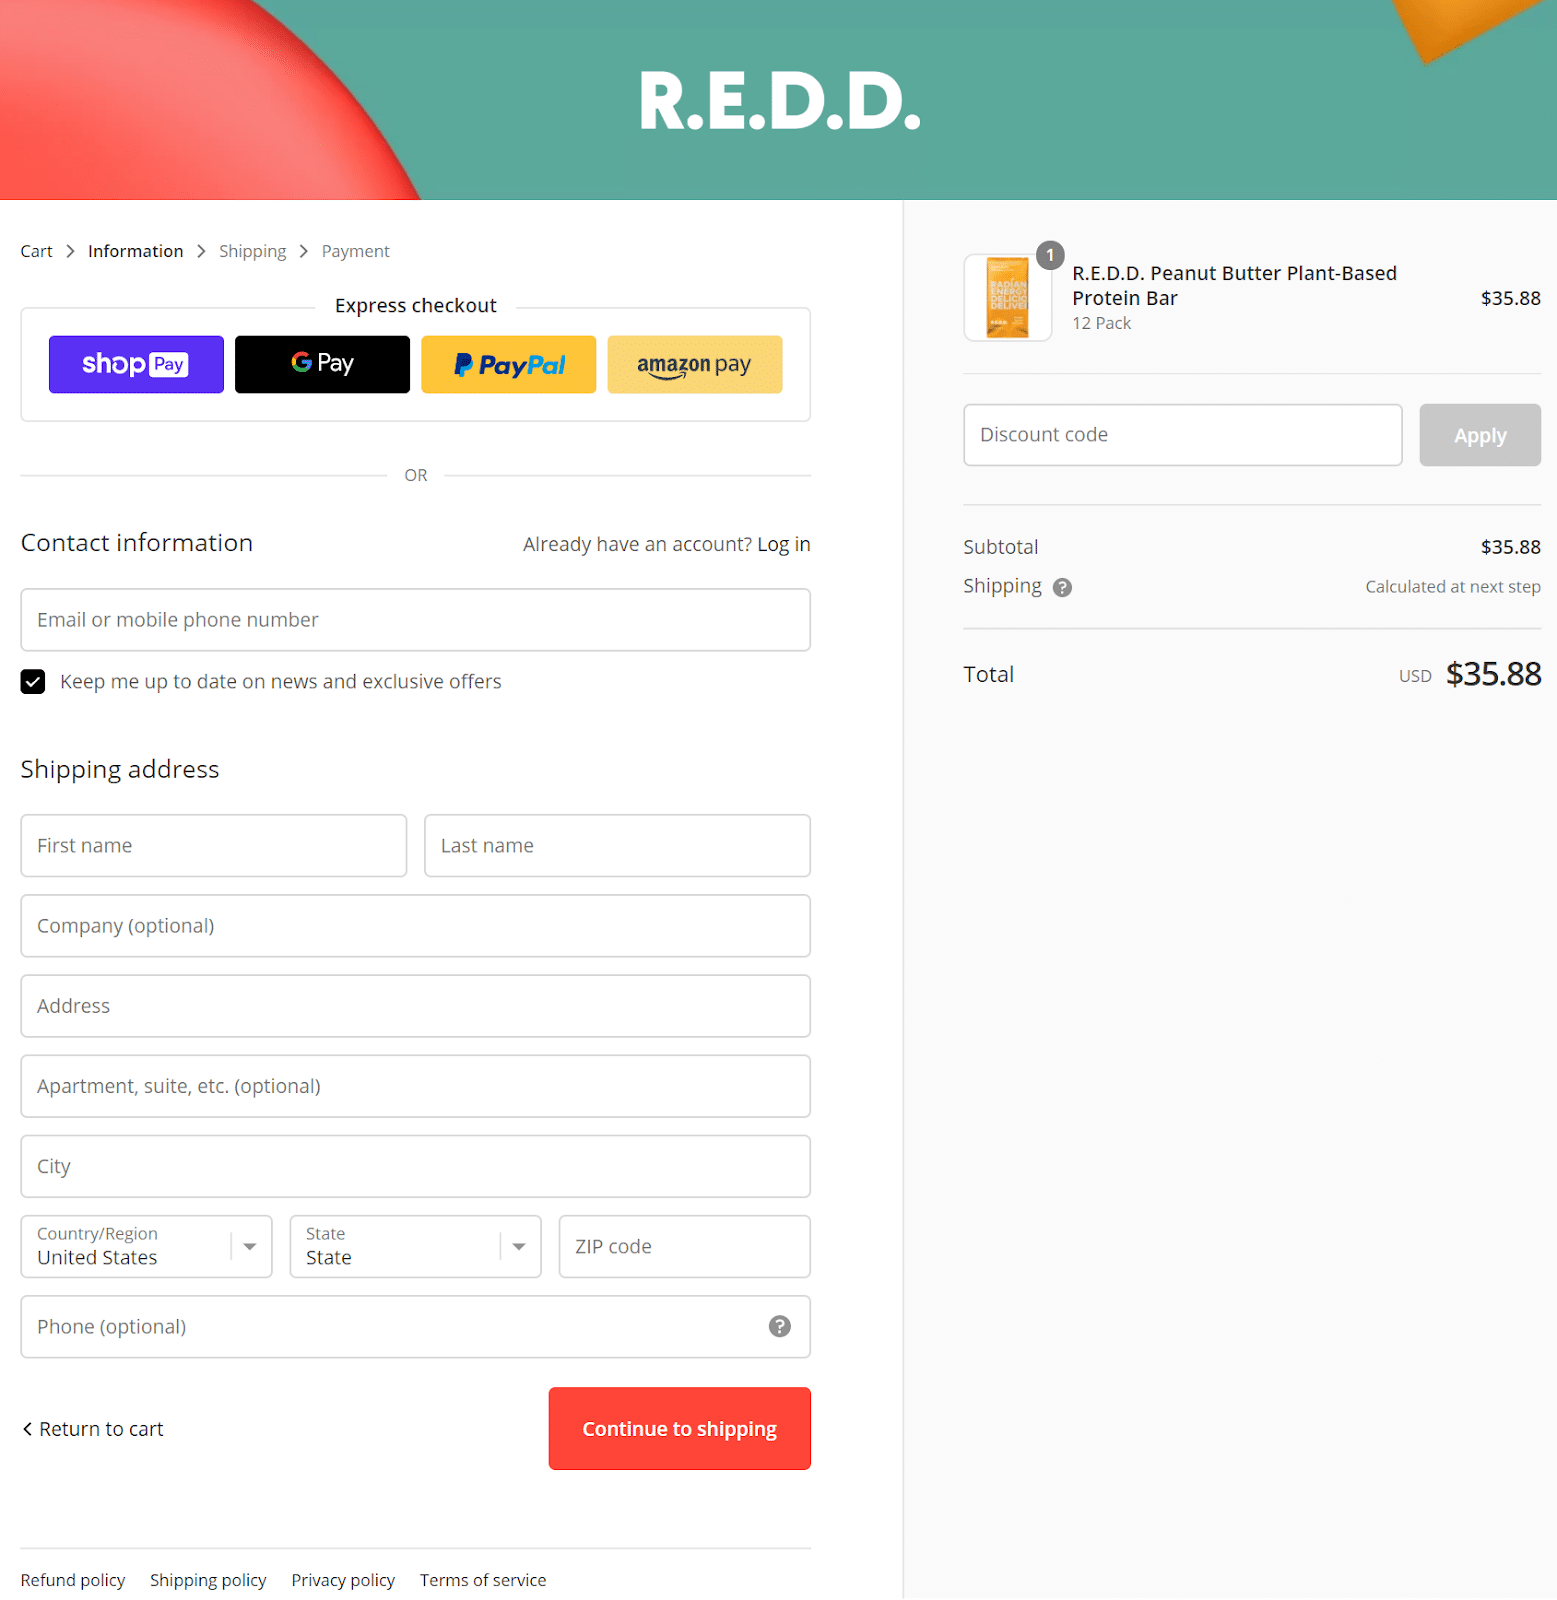
R.E.D.D.’s checkout page
Here’s a list of WooCommerce checkout plugins that helps you optimize your store’s checkout page and thus increase sales.
10. Integrate the best payment gateways into your WooCommerce store
Not having the most commonly used payment methods on your store is yet another reason for shopping cart abandonment. Stripe, Square, PayPal, Authorize.net, Braintree, Amazon Pay, etc. are some popular online payment gateway providers.
Confused about choosing the appropriate payment gateway? Then you’d want to find how to select the right payment gateway for your WooCommerce store.
Adding more payment gateways to your store will definitely help you attract potential buyers, and therefore increase your conversion rate.
Here are some best WooCommerce payment gateway plugins that are worth paying for:
- WooCommerce Stripe Payment Gateway
- Square for WooCommerce
- PayPal Express Checkout Payment Gateway for WooCommerce
- Authorize.Net by SkyVerge
- Braintree For WooCommerce
- ELEX Amazon Pay WooCommerce Plugin
11. Optimize your Call-to-Action (CTA) buttons
Call-to-Action (CTA) buttons are essential for the conversion of leads into paying customers. Always ensure your CTA buttons are clear and specific — Add to Cart, Buy Now, Try Free Now, Subscribe Now, Join Free for a Month, Learn More, etc. are some of the most popular and widely used CTA buttons.
Listed below are some quick tips for optimizing your CTAs:
- Make use of clear, specific, and actionable text for your CTA buttons — Like Sign Up for Free, Redeem Your Voucher Now!, etc.
- Make sure the button text is short and easy to understand.
- Establishing a sense of urgency can improve your click-through rates.
- For example:- Activate Your Free Plan Today!, Book Now, View My Offer, etc.
- Enhance your CTA buttons with impressive colors, shapes, graphics, etc.
You could use a plugin like the WooCommerce Customizer to change the default button text in WooCommerce. For example:- Add to Cart button, Submit Order button, etc.
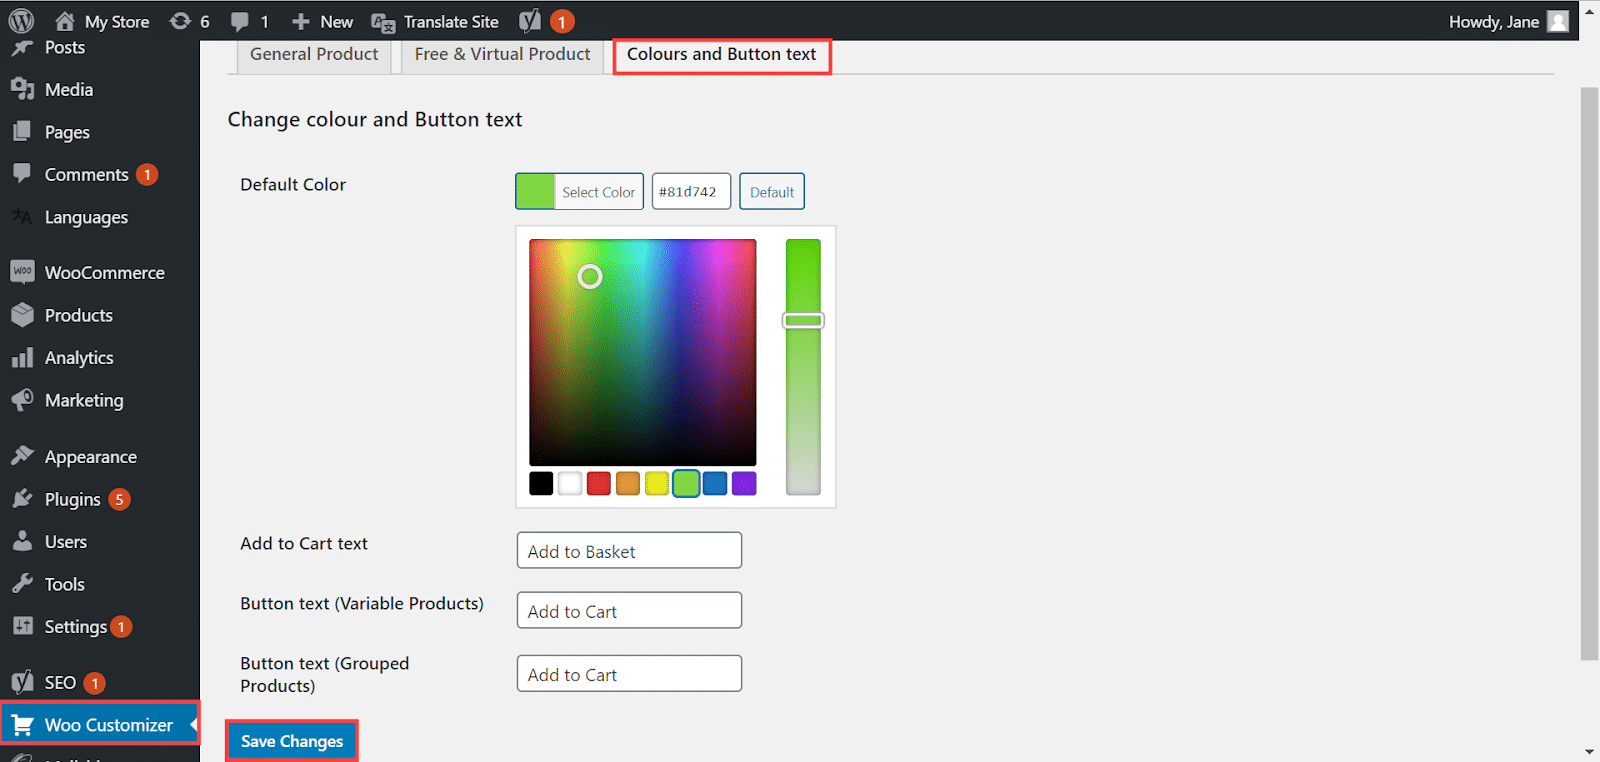
Customizing “Add to Cart” button text using Woo Customizer plugin
In conclusion
Of course, there are tons of other factors to consider when optimizing your WooCommerce store. Nevertheless, the above described are simple, actionable strategies that undoubtedly help increase your store’s conversion rate.
WooCommerce offers a huge number of plugins and extensions to serve various purposes, ensuring seamless online sales. However, ensure you only have a few high-performing plugins that best suits your needs, because using numerous plugins can potentially affect the performance of your WooCommerce store.
Besides, you can even upgrade your store to a higher level for additional capabilities by WooCommerce Update. After that you can migrate everything from your previous store to the new one in a matter of hours.
Disclaimer:
This article is intended to be used for informational purposes only. We recommend you seek guidance from an appropriately qualified professional for any further assistance related to optimizing your WooCommerce store.