
How to Fix “Upload: Failed to Write File to Disk” Error in WordPress
Have you ever come across the “Upload: Failed to Write File to Disk” error in WordPress. If you did, you are not alone as it is one of the most common errors in WordPress.
In this article, we will be going through the steps that are required to solve the “Upload: Failed to Write File to Disk.”
So, why does the error occur in the first place? Let’s explore below.
Reasons behind the error
Multiple reasons can trigger the error on your WordPress installation. To understand the reason, we first need to learn how permissions work within WordPress. As there are different roles within a WordPress website, the web server allocated different file permissions to different users.
Most of the time it is set correctly. However, sometimes, it can go wrong due to the wrong configuration. The web server requires permission to access some files which means that if a file or folder access is set incorrectly, it can hamper normal operations such as uploading files or even installing plugins.
Another reason you can get the permission error if your website got hacked. The hacker would change the file permission in order to disrupt the proper functioning of the website.
The common types of error, you can get while uploading file to the WordPress admin area is that “WordPress failed to write to disk” or “Unable to create file or directory wp-content/uploads/xyz” and so on.
Here is how to fix the Upload Error: Complete Guide:
With a clear idea of the reasons behind the error, we are now ready to fix it. You just need to follow the steps mentioned below:
The first step is to connect to your WordPress directory through an FTP client. There are many FTP clients that you can find for free. We recommend the FileZilla FTP client as it offers intuitive design.
However, you can use other FTP client or even go to your web hosting, and access the WordPress installation files through cPanel’s file manager. In any case, the procedure will remain the same, only thing that will differ is the interface.
Setting the correct folder permission to the wp-content folder.
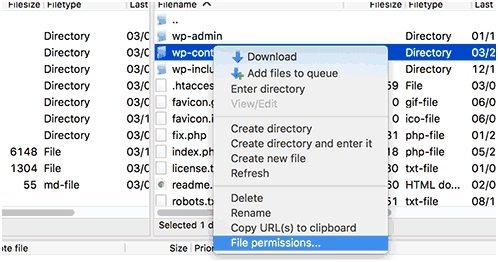
Once you are connected to the WordPress files, you now need to find to the wp-content folder. Now, right click on it and then click on “File permissions.”
If done right, a new window will open up that will give you the options to “change file attributes.” The dialog box will show you file permissions for group, owner and public.

Now, type in “755” in the Numeric value field as seen in the above screenshot. After that, click on the “Recurse into subdirectories” and then select “Apply to directories only.” Once done
click on “OK” and wait for the operation to be completed. It should take a few seconds for it to complete. Great job! You have successfully set 755 permission to the wp-content folder. In layman terms, you have given yourself(the administrator), the ability to have the complete ownership of the folder. You have also take care of the group and public permissions.
Setting the correct file permission to wp-content files
Now that we have correctly managed to set permission for the wp-content folder, we now have to do the same for the files within the wp-content folder. To do so, you again need to select the wp-content folder and then type “644” in the numeric value field. Once done, now click on the “Recurse into subdirectories,” and now select “Apply to files only.”
The process of applying permission to the files will start, and it should take a little while for it to get completed.
Try Uploading Now
If you have done everything correctly, you should be able to upload the files as intended, and you will not get the “Upload: Failed to Write File to Disk” Error.
Changing file permission through SSH
If you are into coding and know how to operate using SSH, you can set the file/folder permission using SSH. To do so, first, access the WordPress installation folder and then type in the following command.
chmod 755 wp-content
To make it recursive, you need to add – R flag to the chmod command.
Other reasons that you should know about and how to solve them
Two other major reasons can still stop you from uploading files to WordPress. The first reason can be that you have exhausted your disk space. If you are using a web hosting with unlimited storage, you may find yourself in this situation way earlier than you can expect, as they have pretty low limits for these kinds of web hosting accounts. The only way to solve this is to contact your web hosting provider and ask them to increase the upload limit. You may also want to buy a better hosting plan.
The temporary folder can also cause the error to pop up. If your WordPress temporary folder is full, it will throw the “Failed to Write File to Disk” error. Whenever you upload a file or image, your temporary folder comes into play as a temporary place to save content. The solution is to free the temporary folder. You can take help of your developer or WordPress tech support.
What’s next? Will the error surface again?
First of all, congratulations on solving the error. However, the error can pop up again later. It can happen due to the above-mentioned reasons. If it happens again, you need to follow the tutorial. In most cases, you will not see the error again with your WordPress website. The three main reasons it can happen include:
- Incorrect folder/file permission set by administrators or changed by hackers
- Web hosting provider quote finished – happens mostly on cheap web hosting providers
- Temporary folder issue – can occur from time to time.
So, did you find the tutorial useful? If you do, then do comment below and let us know. We are listening. Also, do share it with your peers so that they can stay ahead of the problem and know what to do if it happens to their WordPress website.