How to Create a Custom Login Page for WordPress

Do you want to create a custom login page for your WordPress website?
A custom login page allows your users to log in from your site’s custom page instead of the standard WordPress login page.
Why and When do you need a Custom Login Page?
If you have a member site of the Without a plugin space, your users can connect from the classic WordPress login page.
This can work very well for small websites. However, if you have a high-traffic business website or online community, you can customize your login page to more and more reflect your brand image. Else custom WordPress development services company can also be leveraged to create the best Custom Login page as they have the professional experts.
One way to do this is to add your own logo and custom image to your WordPress dashboard. But if you do not want users to access the dashboard, you need to create a custom login page.
A custom login page works just like any other page on your WordPress blog. It uses the colors and styles of your WordPress theme and users will not be able to access your WordPress dashboard.
That said, let’s see how easy it is to create a custom WordPress login page without writing any code.
Different Techniques to Create a Custom Login Page for WordPress
Technique 1: Clean Login Plugin (Free)
Theme My Login was one of the outstanding custom login page plugins. Nevertheless, this plugin charged money suddenly for every feature that was free previously. This made everyone find some other Theme My Login alternative.
As there are several plugins, but the free Clean Login plugin is the best one. It provides you simple shortcodes that assist you to include the below information or forms anywhere on the WordPress website:
- Login form
- Register form
- Restore password form
It also has a central front end profile management shortcode if you like to allow the user to manage their profiles, even though you do not have to leverage the feature. For using the plugin, all you need to install and activate it. Later, simply include the shortcode wherever you like the custom login form to be:
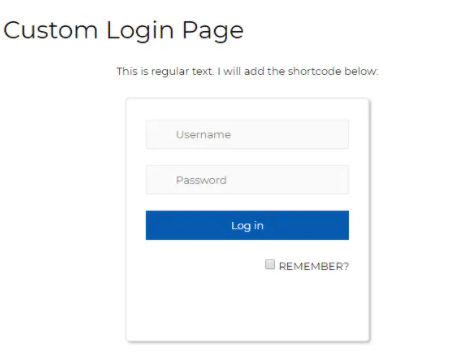
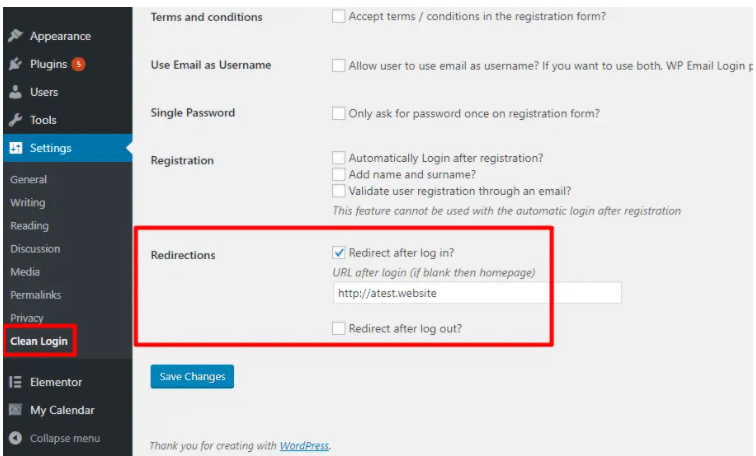
If you go to Settings → Clean Login, you can also choose to redirect users to a specific page after they log in (or log out):
That’s it.. very simple to use!!
Technique 2: Login by Ajax Plugin (Free)
Choosing login with Ajax is the other best free option over the Theme My Login. It allows you to include the custom login form to WordPress with a widget or shortcode (it also has a PHP option for developers).
Why AJAX is the best option:
First and foremost it uses AJAX and it has no screen refresh that has no clear effect (there is a fallback when AJAX does not work).
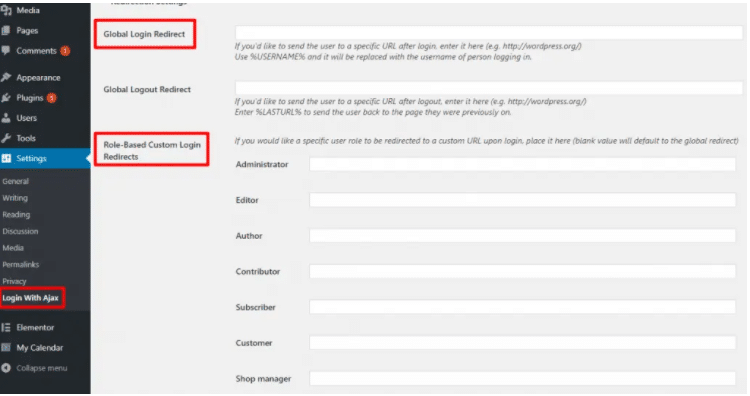
On the second basis, you cannot settle custom redirects for logging in, however, you can manage several redirect rules according to the users’ role.
To start, you need to install and activate the free plugin. Later, you can include the login page with:
- The [login-with-ajax] shortcode
- The Login With Ajax widget
As it is clear to you that is huge than the Clean Login Plugin and requires the shadow/box on the form by default:
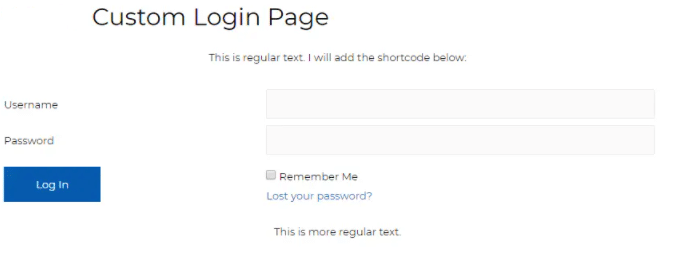
For changing the width, it is simple, CSS fixes and modifies the .lwa class width. Even, you can leverage the custom redirect rules by navigating to Settings → Login With Ajax:
The other best thing while Login with Ajax is that it allows you to create the custom email that users receive after registration, only when you are leveraging the custom registration page functionality.
Technique 3: Consider the Elementor Pro Login Widget
If you consider the Elementor Pro and Elementor page builder, you need to access the custom login page tools with the Login widget. Then, this widget is accessible with the Elementor Pro. After having that, you can include the login from anywhere on the website.
It can be done with the Login Widget. **This can also be blended in the sidebar with the Embed Anywhere feature in the Elementor Pro. For using it, just move to the Login widget and form it with the Elementor side panel:
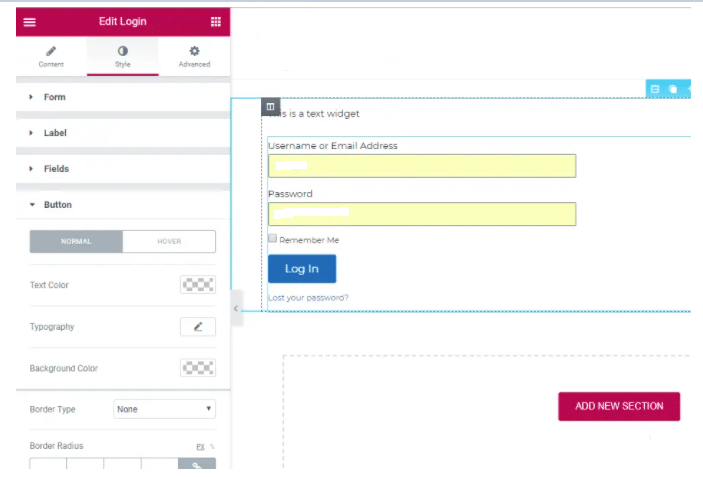
The Additional Options Section in the content tab can also be used to manage the custom redirect after the user logs in:

It is possibly the versatile way to make and customize the custom login page. You need to pay for the Elementor Pro to leverage it.
Technique 4: Include Social Login by Nextend Social Login (Free)
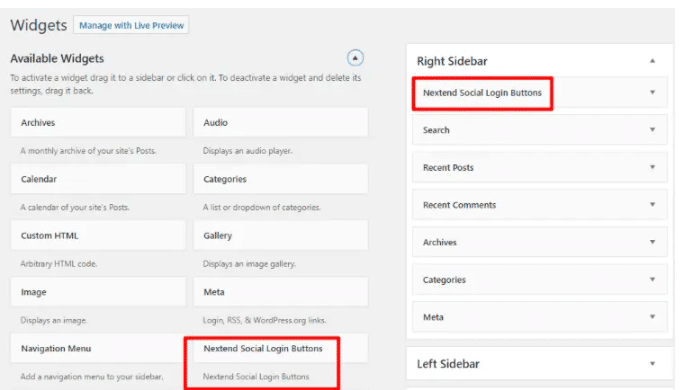
Till now, we have revealed how you can include the basic custom login page. However, if you like to create the custom with something, like, social login. If so, you must leverage the Nextend Social Login plugin to include the social login anywhere on the website with the widget or the shortcodes.
And, similar to another plugin, you can also create the custom redirects when the user logs in.
Technique 5: Customize the Essential WordPress Login Page
Undoubtedly, there are several free plugins which assist in customizing the essential WordPress login page, instead of creating the login page.
This type of plugin enables you to change the wp-login.php page by maintaining the same features. Generally, you can change:
- The default WordPress logo in the own logo
- Backgrounds and Colors
- Placeholders and Form labels
And any plugins also provide you different options.
Concluding Remarks
If you have an urge to make the custom login page which you can include the sidebar or content, then, login with Ajax and Clean Login are the best options.
Every plugin not only allows you to include the login form anywhere on the website, they can even assist you to create the custom redirects for sending the visitors to the accurate login after logging in.
In addition, if you are from the one Theme My Login users, they can create the Theme My Login options.
If you are using the Elementor Pro on the website, you do not require some external plugin as you can leverage the versatile Login widget. and similar to the other two plugins, the Elementor Pro enables you to manage the redirect for the user logins.
Hopefully, this article is liked by you. If you have any queries or suggestions, then, let us know in the comment section below.
Thanks for reading!!!

