

How to Build a Membership Website With WordPress
I’ll be honest, when I first thought about building a membership site, it seemed complicated. All those payment systems, user accounts, restricted content… where do you even start?
Turns out, WordPress makes it way easier than I expected.
If you’ve been sitting on a great idea, maybe an online course you want to sell, exclusive articles for your biggest fans, or a private community space, a membership website is probably the perfect fit. And here’s the best part: you don’t need to be a developer or have a massive budget to pull it off.
I’ve put together this guide to walk you through everything. We’ll cover why WordPress is actually the best choice for this, what you’ll need to get started, and then the actual step-by-step process of building your site.
Whether you’re a blogger looking to monetize, a coach wanting to offer premium content, or an entrepreneur building a subscription business, this guide will get you there.
Benefits of Building a Membership Website with WordPress?
It’s Actually Affordable: First off, WordPress itself is free. You’ll only need to pay for hosting and a domain name, which typically runs you around $3-15 a month. Compare that to dedicated membership platforms that can easily cost $50-300+ monthly, and you’re already saving serious money.
You’re in Complete Control: With WordPress, you own everything, your content, your member data, your entire site. You’re not locked into some platform that could change its rules or pricing on you tomorrow.
The Plugin Ecosystem is Incredible: There are tons of plugins available that can handle all the complicated stuff (payments, access control, member management) so you don’t have to code anything from scratch.
It Grows With You: Starting small with just a handful of members? Perfect. Planning to scale to thousands? WordPress can handle that too. You can start simple and add features as your community grows – no need to migrate to a different platform later.
SEO Benefits Built Right In: WordPress is naturally search-engine friendly, which means your free content can attract new members through search engines.
Tons of Support Available: Stuck on something? There’s a massive WordPress community out there. Forums, YouTube tutorials, blogs, you’ll find answers to pretty much any question.
Requirements to Build a Membership Website with WordPress
Before you start creating your membership website, there are a few important things you’ll need to have in place. These will form the foundation of your site and make sure everything runs smoothly.
1. A Domain Name and Hosting Plan: Your domain name is your website’s address on the internet (for example, www.yourwebsite.com), while hosting is where all your site’s data is stored.
When choosing a domain name, go for one that’s short, memorable, and reflects your brand or niche. Next, buy hosting from a reliable WordPress hosting provider such as Bluehost, SiteGround, or WP Engine.
2. WordPress Installation: Once your hosting plan is active, the next step is to install WordPress. Good news most hosting companies make this easy by offering one-click installation. Seriously, it takes like two minutes.
3. A Membership Plugin: This is where the magic happens. A membership plugin handles all the important stuff like registration forms, login form, subscription management, locking down your premium content, processing payments and lot more. ProfilePress is a solid choice that won’t make you want to pull your hair out.
4. WordPress Theme: Go for a theme that looks good on all devices and fits the style of your membership website. You can check out our Grace Themes, which offer professional WordPress themes that are easy to set up and customizable to match your brand.
5. Payment Gateway Integration: Are you planning on charging for access? If yes, then you’ll need a secure way to accept payments from your members. WordPress supports several payment gateways like PayPal, Stripe, and Paystack, allowing you to collect one-time or recurring payments safely.
6. Email Marketing Platform: Don’t skip this one. Email is how you’ll stay connected with your members, sending welcome messages, course updates, special offers, whatever makes sense for your site. The nice thing about ProfilePress is it integrates well with tools like Mailchimp and Campaign Monitor, so you can automate most of this.
7. Quality Content for Members: Your content is the heart of your membership site. Prepare valuable materials such as tutorials, videos, downloadable guides, or community access that will make people want to subscribe and stay engaged.
Having these essentials in place gives you a solid foundation for your membership website.
Steps to Building a Membership Website with WordPress
Start by registering your domain name, setting up reliable web hosting, installing WordPress, and activating a professional theme from Grace Themes.
Once you’ve got that foundation down, it’s time to add the piece that actually makes your site a membership site: the membership plugin. This is what handles all the important stuff – people signing up, controlling who sees what, managing subscriptions. Basically, it’s the engine that runs everything.
For this guide, we’re going with ProfilePress, an excellent WordPress membership plugin used by thousands of websites. It makes creating membership sites, selling digital products, and managing content restrictions effortless.
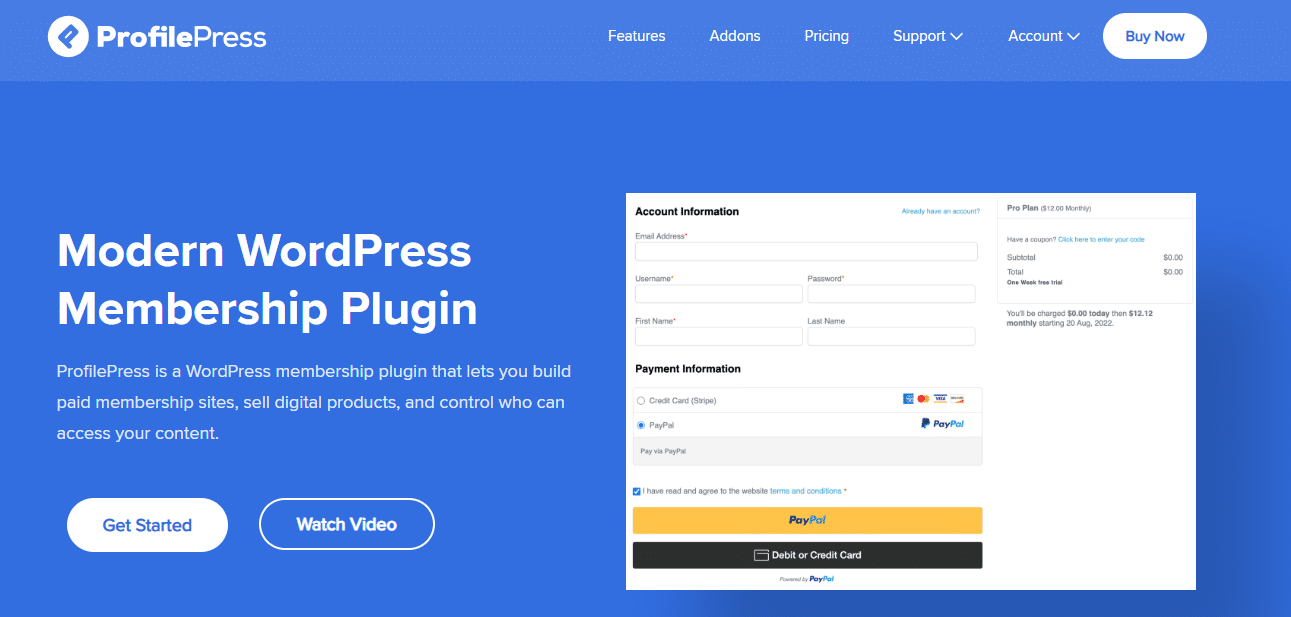
ProfilePress integrates with most major payment gateways you’ve heard of, including Stripe, PayPal, Razorpay, Paystack, and Mollie, ensuring smooth, secure payment processing.
Beyond memberships and payments, ProfilePress also includes a range of useful features, including customizable checkout forms, coupon codes, metered paywalls, member directories, and integrations with learning management systems (LMS). Plus, you can enable social logins, require admin approval for new users, and track performance with built-in analytics.
Install and Activate the ProfilePress Plugin
Now that you know why ProfilePress is the ideal solution for creating a membership website, lets show you how to install and activate it on your WordPress site.
To do this, visit the ProfilePress website and purchase the plugin. After completing your purchase, download the ZIP file from your account area to your computer.
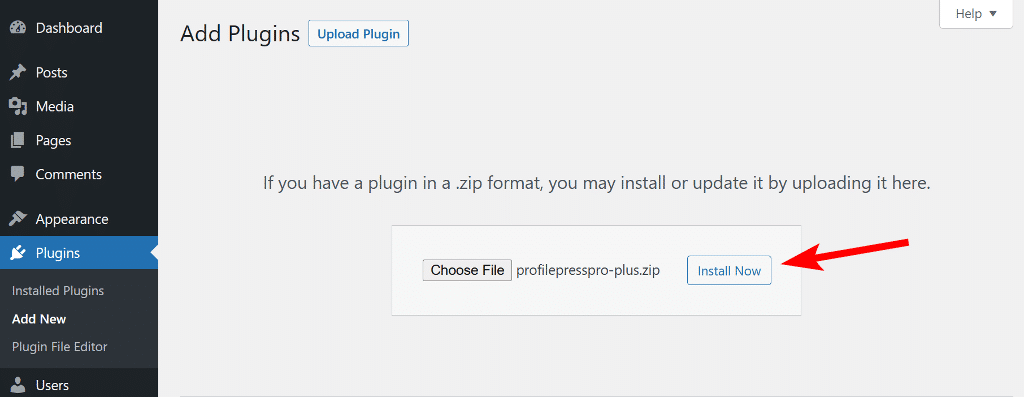
Next, sign in to your WordPress admin dashboard and navigate to Plugins > Add New. Click the Upload Plugin button, then drag and drop the downloaded ZIP file or use the Choose File option to upload it manually.
Once uploaded, click Install Now, and after installation, select Activate.
Next, you’ll then see a notification at the top of your dashboard that says “ProfilePress needs to create several pages to function properly.” Click Create Pages to let the plugin automatically generate the necessary pages for login, registration, and account management.
With ProfilePress successfully installed and activated, the next step is to integrate a payment method.
Integrate a Payment Method
ProfilePress integrates with several popular payment options, including Stripe, PayPal, Razorpay, Paystack, Mollie, and Bank Transfer. This gives you the ability to offer your users different payment options.
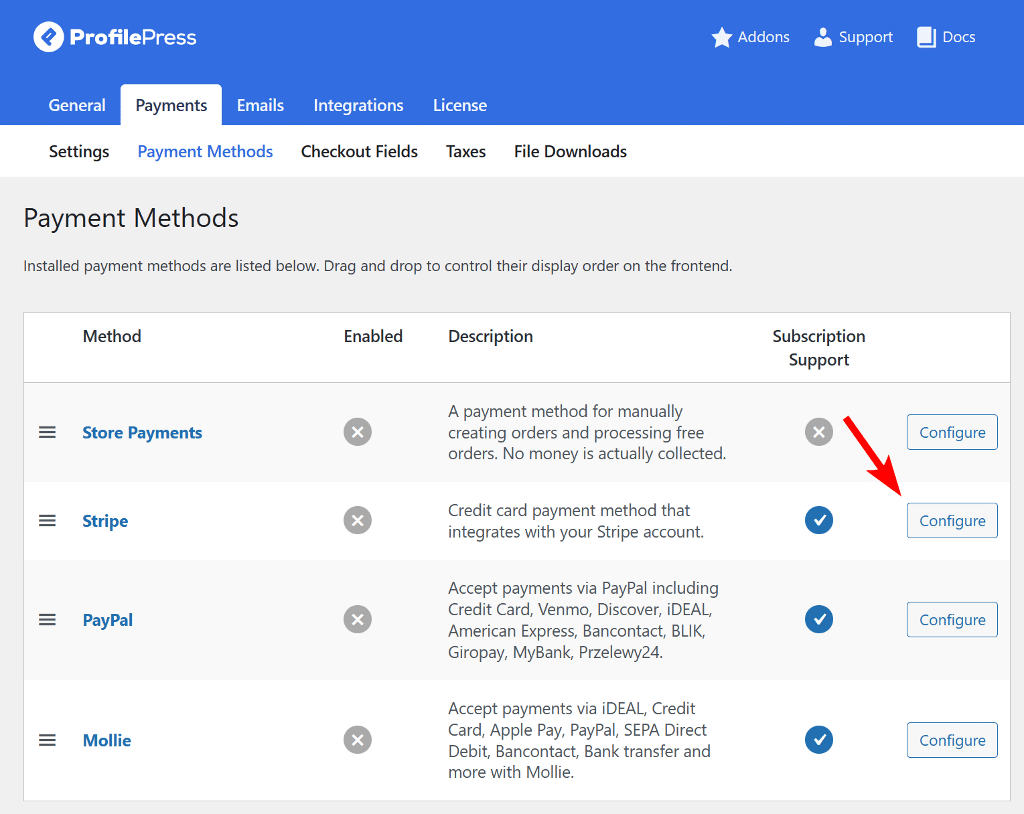
To set up your chosen payment gateway, go to ProfilePress > Settings > Payments > Payment Methods in your WordPress dashboard.

Next, configure your preferred payment gateways by connecting your accounts and entering the required API keys or login credentials provided by the payment service.
Once you’ve finished, click Save to apply your settings
Configuring Stripe
ProfilePress integrates with Stripe to support various payment options, including debit and credit cards, Link, ACH Direct Debit, Apple Pay, and Google Pay.
To connect Stripe to your membership website, click on the Configure button next to Stripe.
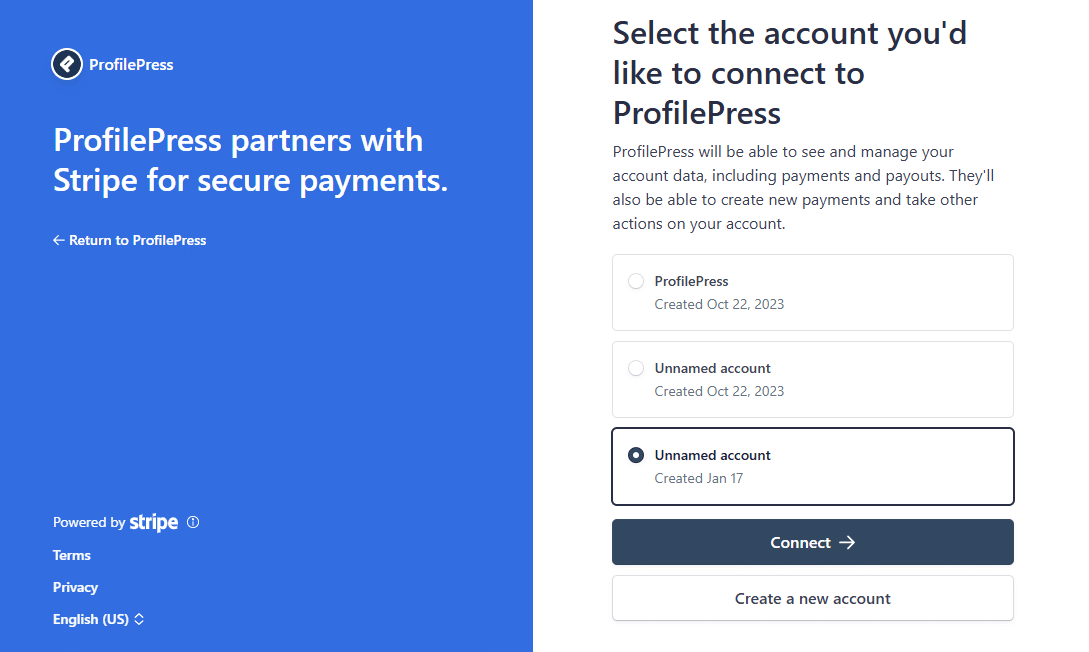
On the next page that appears, click on Connect with Stripe. Then you’ll be redirected to the Stripe website.
Next log in to your existing account or create a new one.
Once signed in, select the Stripe account you want to connect to ProfilePress and click Connect.
After doing that, you’ll be redirected back to your WordPress site. Check the box labeled “Check to Enable” to activate Stripe, and click Save Changes.
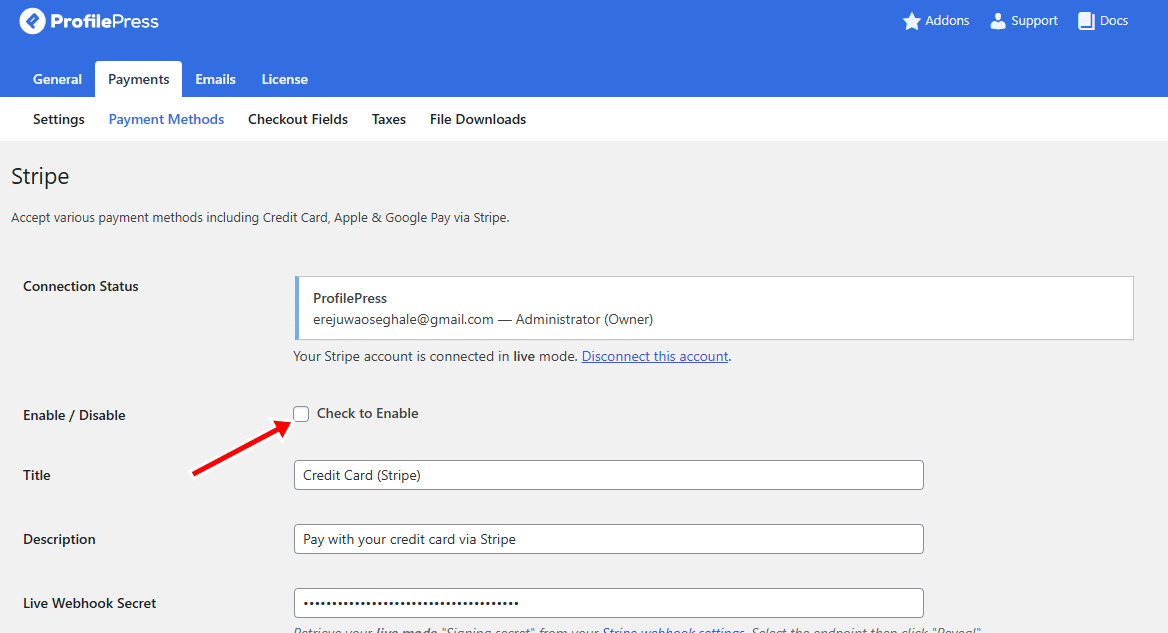
Once this is done, Stripe payments will be active on your WordPress website.
Add Your Business Information
After setting up your preferred payment gateway, the next step is to add your business details.
To do this, go to ProfilePress > Dashboard and click Add Your Business Information.
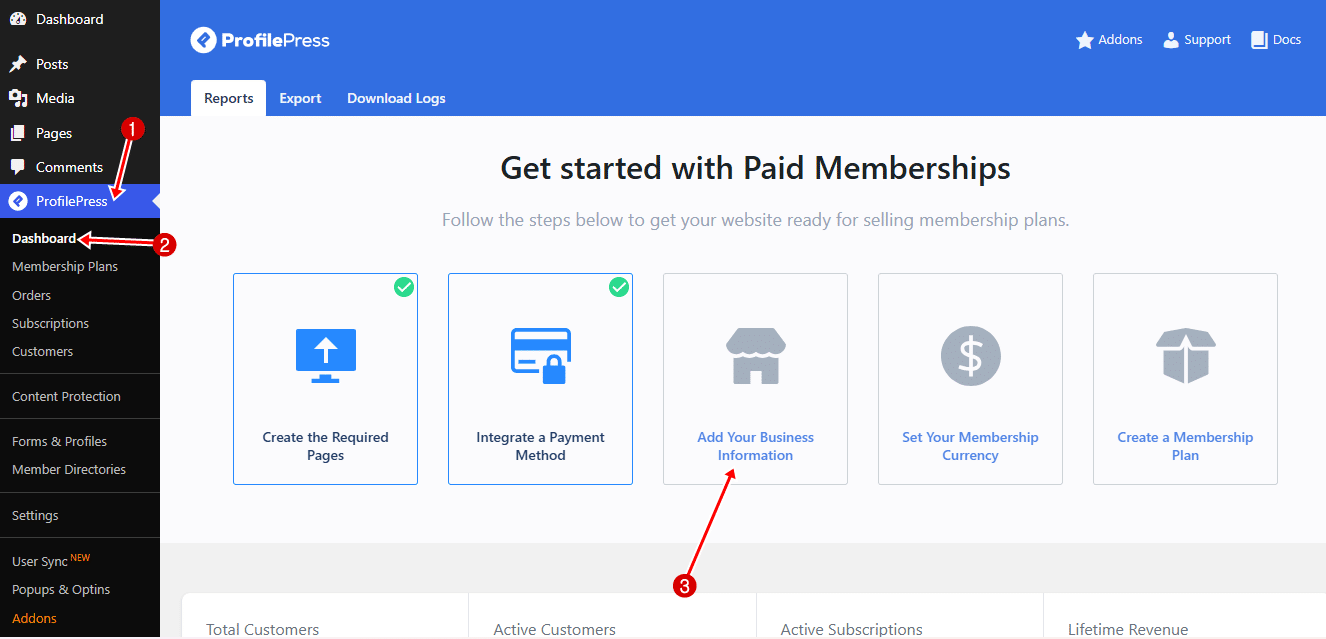
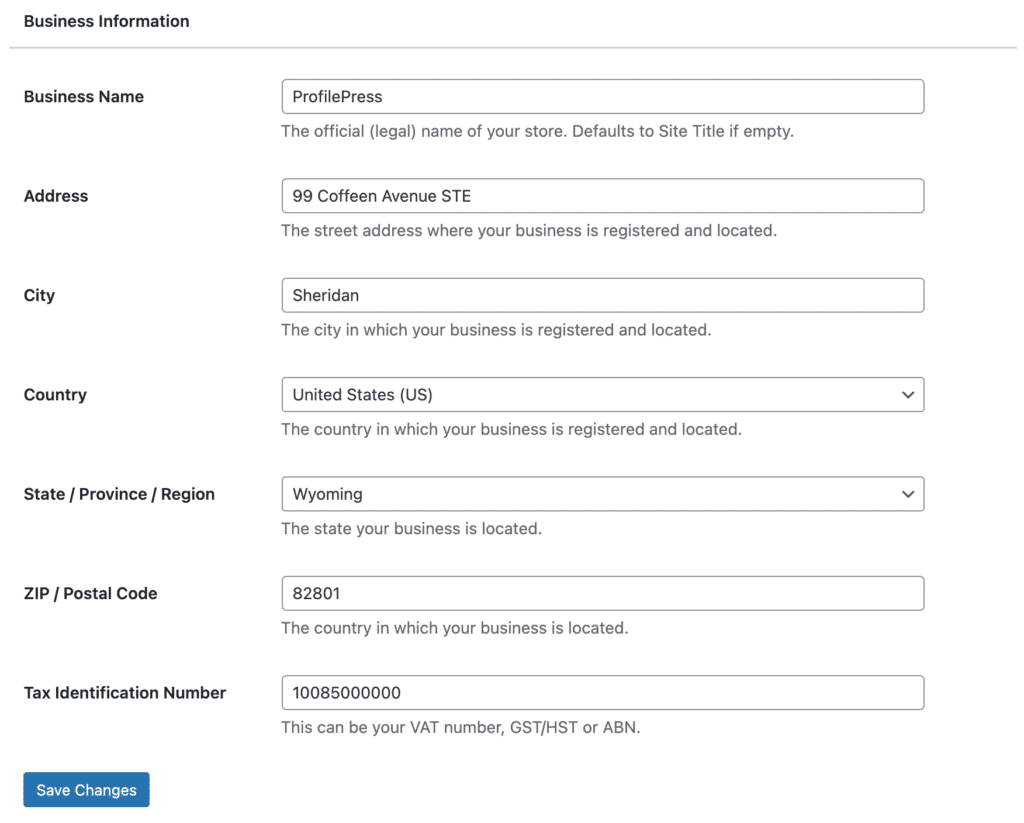
Enter your business name, address, and tax identification number in the fields provided, then click Save Changes to update your settings.
When done move on to the setting the default currency for your membership website.
Setting Your Membership Currency
ProfilePress allows you to choose the currency you want to charge your members.
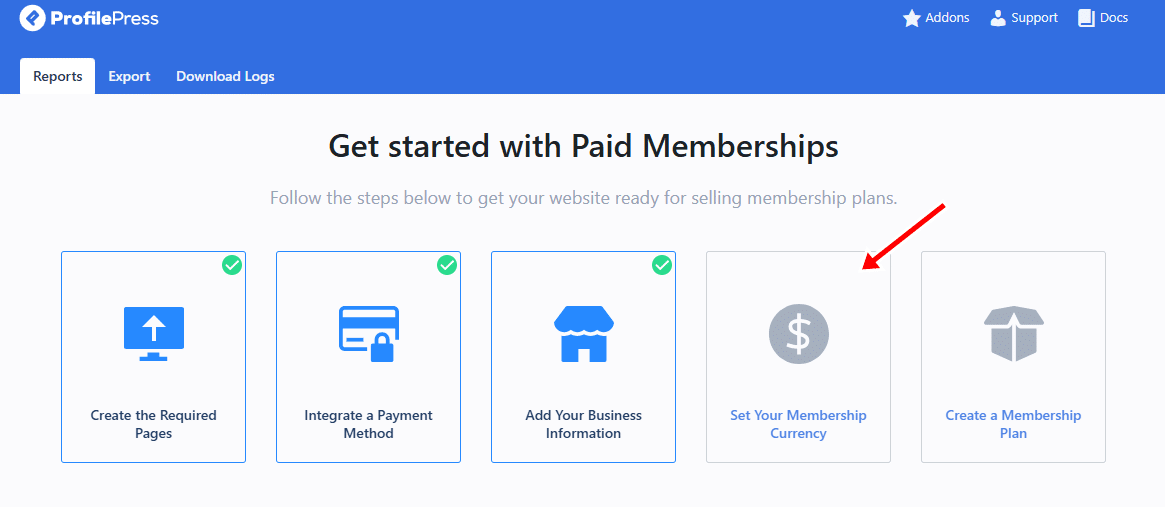
To set this up, go to ProfilePress > Dashboard and click Set Your Membership Currency.
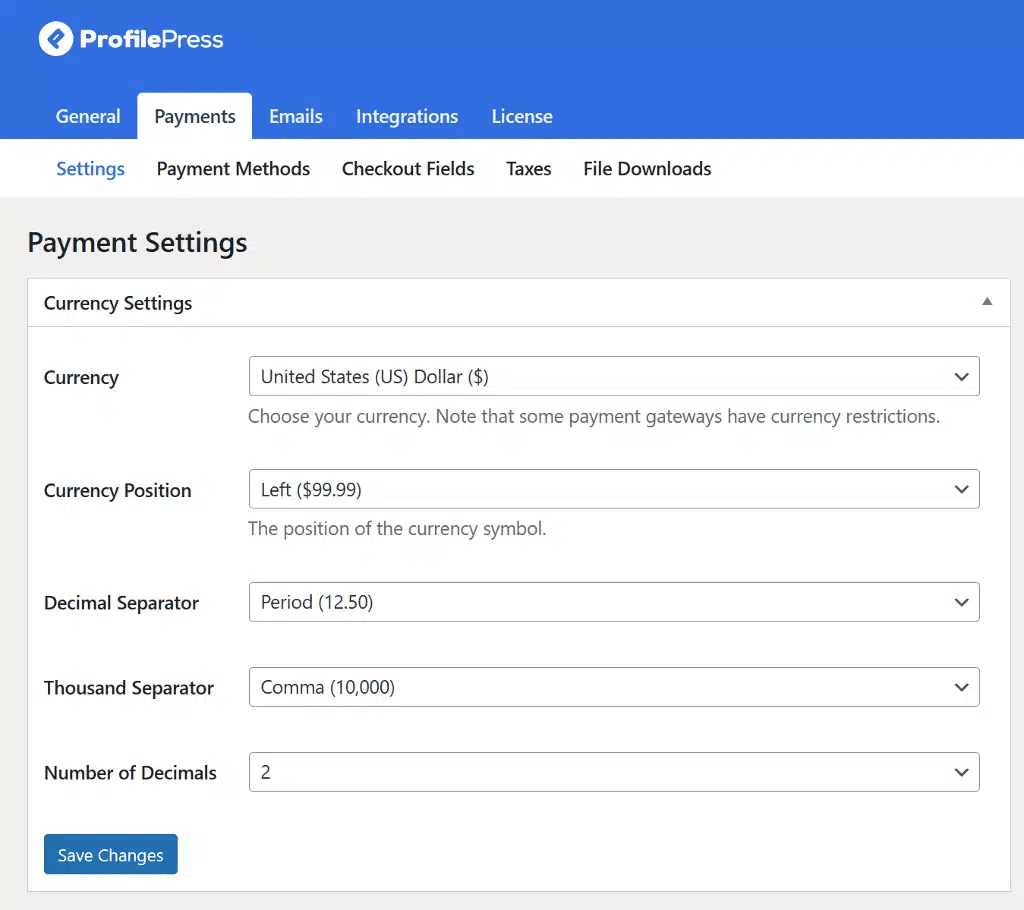
In the Currency Settings section, select your preferred currency and choose how the currency symbol should appear.
You also have the option to customize formatting options such as decimal and thousand separators, as well as the number of decimal places.
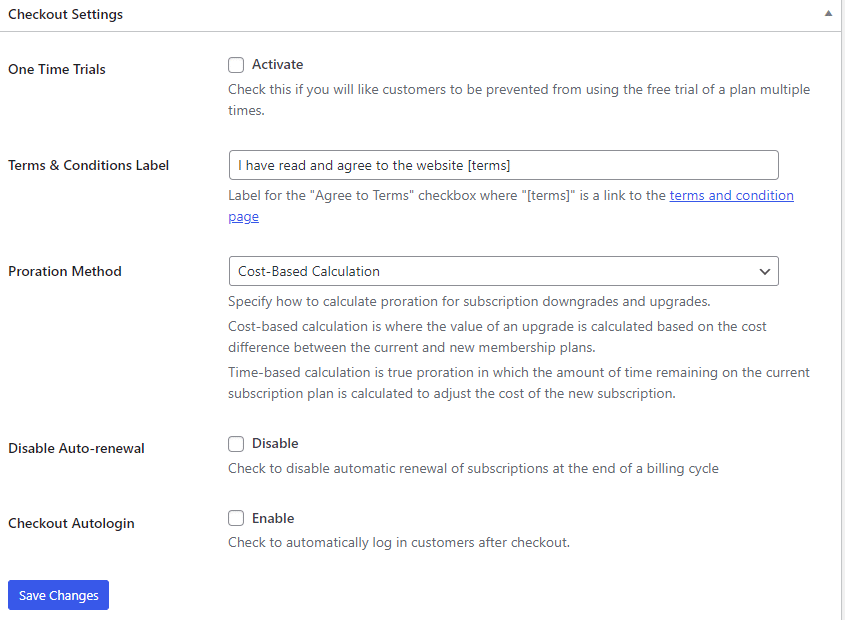
Next, scroll to the Checkout Settings section.
In this section you can enable one-time trials, customize the label for your terms and conditions checkbox, manage proration settings, disable auto-renewal for subscriptions, and allow automatic login after checkout.
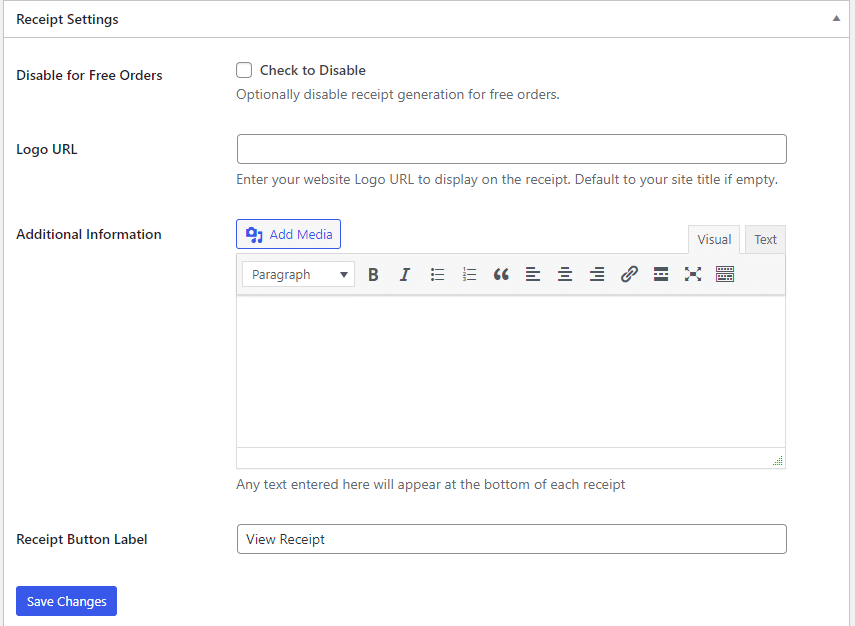
After setting up the checkout setting section, scroll down to the Receipt Settings section.
In the receipt section you can disable receipts for free orders, upload your logo, include a thank-you message, and customize the label of the receipt button.
When you’re done configuring these settings, click Save Changes to apply them.
Next, you will need to go to the Checkout Fields tab and choose which fields you want to display during checkout.
Configuring Your Checkout Fields
ProfilePress makes it easy to customize your checkout form so you can collect the exact information you need, without making the process feel complicated for new members.
To set it up, click on Checkout Fields.
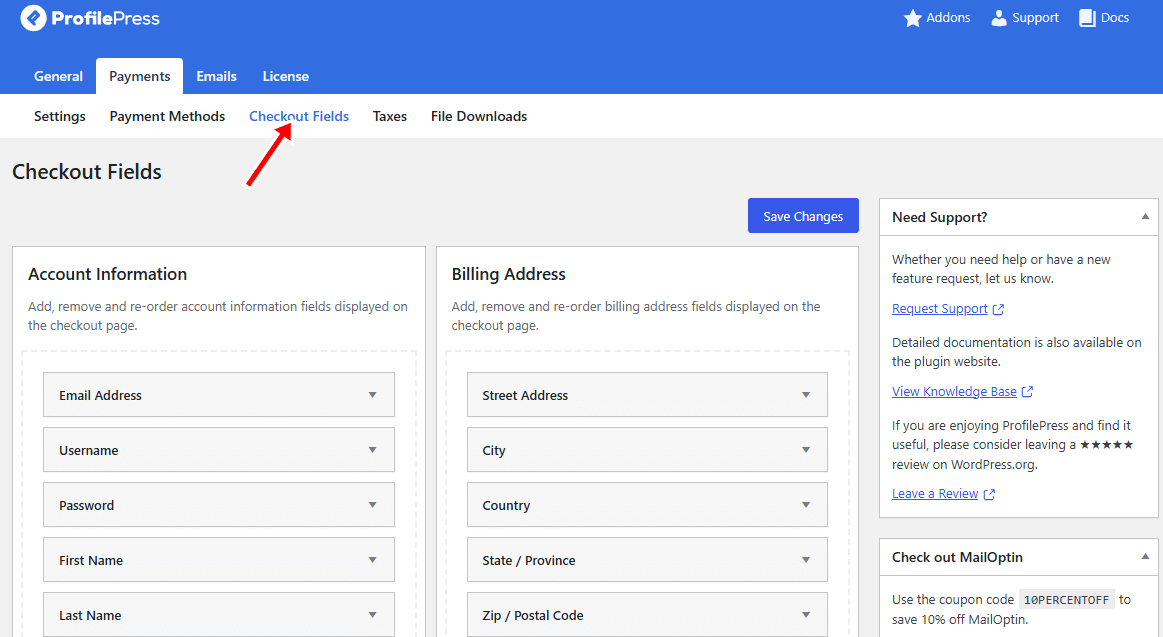
Here, you see options that allow you to edit field labels, adjust their width, make them required, or hide certain fields for logged-in users.
If you need to add a new field, select it from the dropdown menu and click Add Field.
You can also rearrange fields by dragging and dropping them into the order you want.
When you’re satisfied with your setup, click Save Changes to apply your updates.
Create a Membership Plan
To create a membership plans head over to ProfilePress > Dashboard and click on Create a Membership Plan.
Next, click on the Add New Plan button at the bottom of the page.

Next, you’ll be taken to a new page with three sections. These sections are; Plan Details, Subscription Settings, and Downloads & Integration.
Below, we walk you through setting up each section
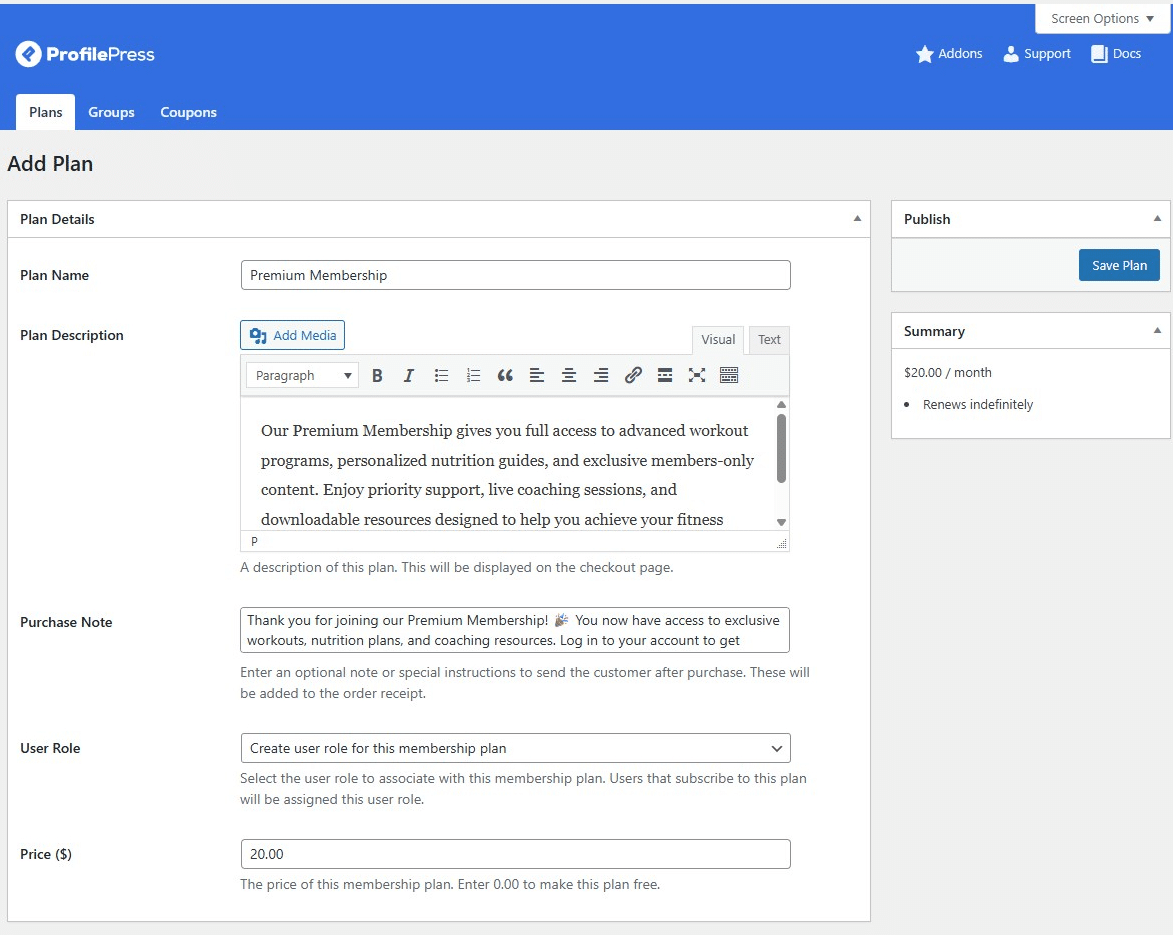
Plan Details Section
This section is where you set up the core information for your membership plan. Start by giving your plan a clear and attractive name that instantly tells potential members what they’re signing up for.
Next, use the description field to explain what the plan offers, its features and benefits, and what members will have access to.
You can also have a filed where you can fill in a purchase note, any thing you fill into the purchase note field will appears on the customer’s order receipt. So you can use this field sharing a thank-you message, onboarding instructions, or any extra details after purchase.
Lastly, set your price, ensuring it aligns with the value you provide and what your audience is willing to pay.
When done with the Plan Details section, move on to the next section: Subscription Settings.
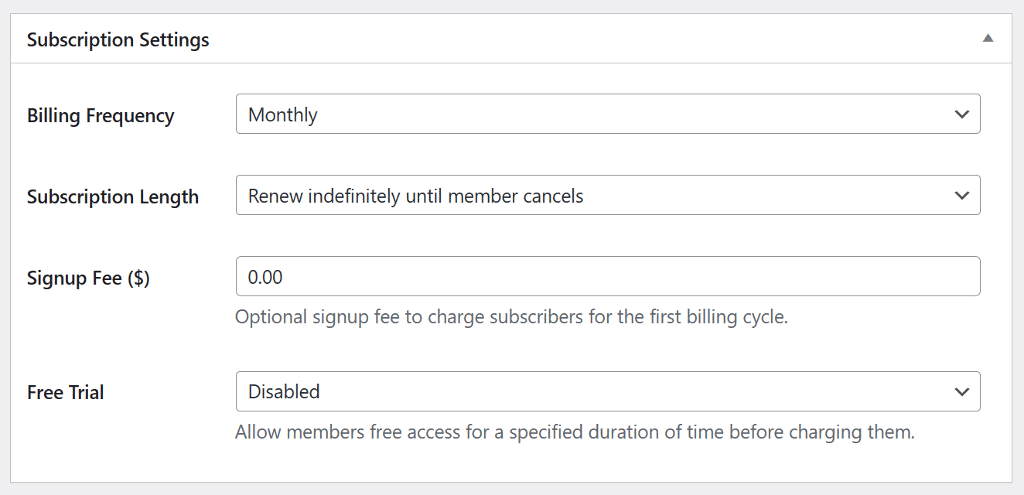
Subscription Settings Section
The Subscription Settings section controls how your membership plan operates, including billing frequency, subscription duration, signup fees, and free trial options. These settings determine how and when members are charged.
Start by setting the billing frequency, which decides how often customers make payments. The available options are daily, weekly, monthly, quarterly, biannually, yearly, or a one-time fee.
Next, define the subscription length. You can go for an ongoing plan, where members are billed automatically until they cancel, or a fixed-term subscription with a set number of payments, such as a 12-month program. This allows you to align billing with your membership structure.
You can also include a signup fee to cover onboarding or setup costs.
This section also has an option that allow you to offer free trial.
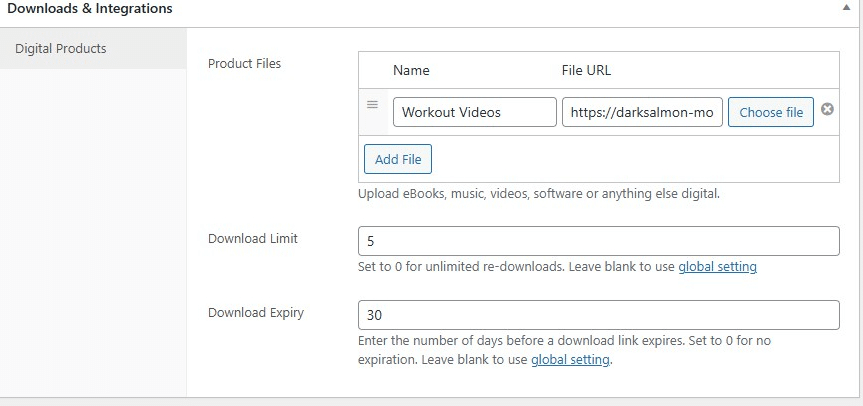
Downloads & Integration Section
The Downloads & Integration section is perfect if you want to include digital products or exclusive resources in your membership plans. It lets you attach files that paying members can instantly access once they subscribe.
The Product Files option allows you to upload digital contents such as eBooks, training videos, templates, PDFs, or any other premium content . Members will then be able to download these files directly from their accounts.
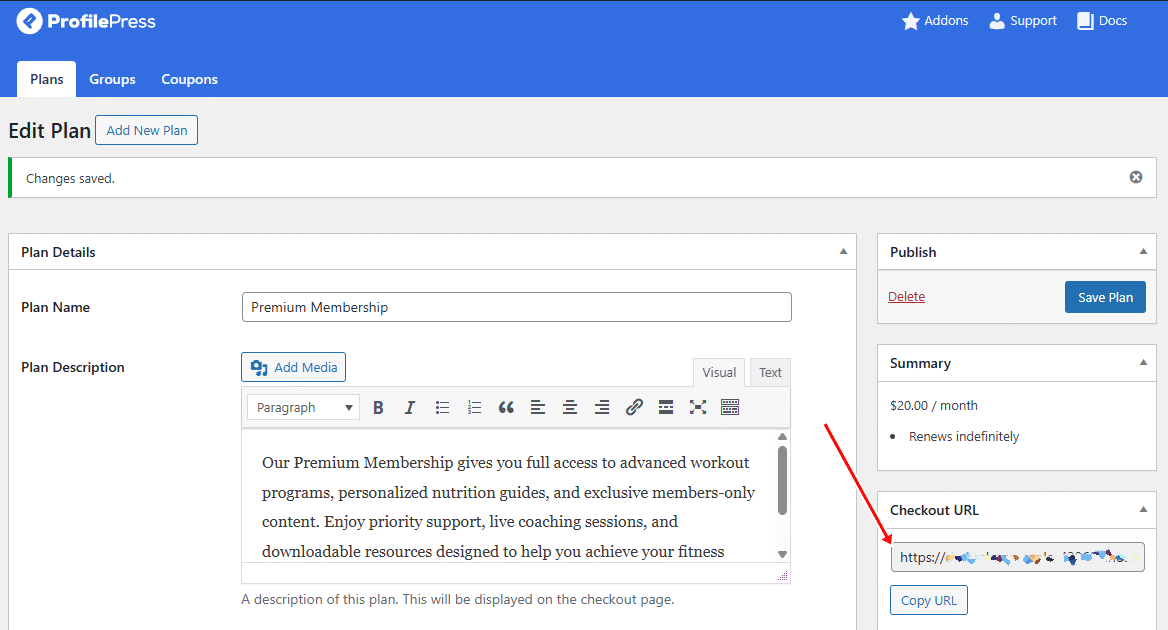
When done, click on Save Plan to publish your membership plan.
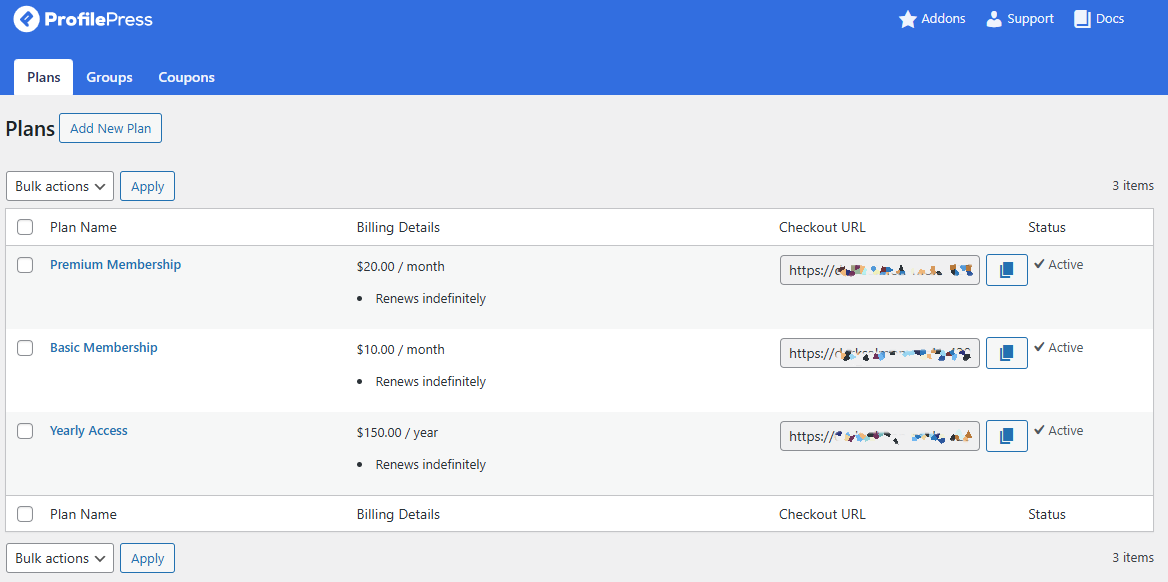
Once your plan is published, ProfilePress automatically generates a unique checkout link.
You can add this link anywhere on your website, such as landing pages, blog posts, or pricing sections, to start attracting and accepting new members.
If you want to offer more plans, repeat the steps above to create additional plans.
Create a Pricing Page
After setting up your membership plans, the next step is to design a pricing page that clearly showcases your available options. This page helps visitors compare plans and choose the one that best fits their needs.
You can create your pricing page using the default Gutenberg editor in WordPress or use pre-designed templates from popular builders like Elementor, Beaver Builder, WPBakery, or Visual Composer. These options make it easy to design an attractive and well-organized layout without starting from scratch.
The next step is to connect each Subscribe button to the correct membership plan.
You can do this by navigating to ProfilePress > Membership Plans in your WordPress dashboard, copy the subscription link for each plan, and paste it into the corresponding button on your pricing page.
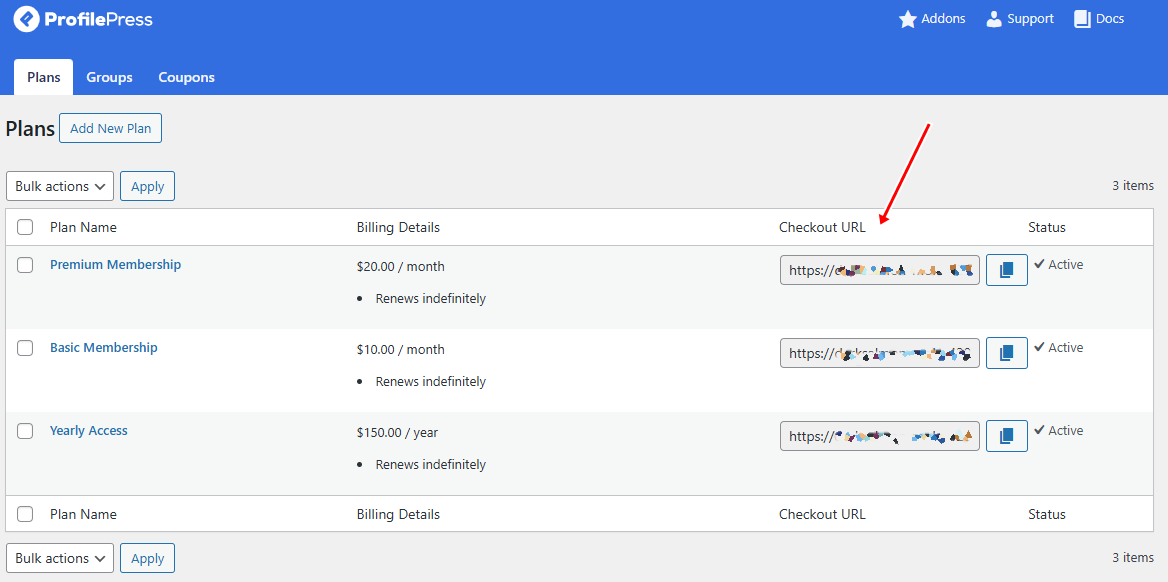
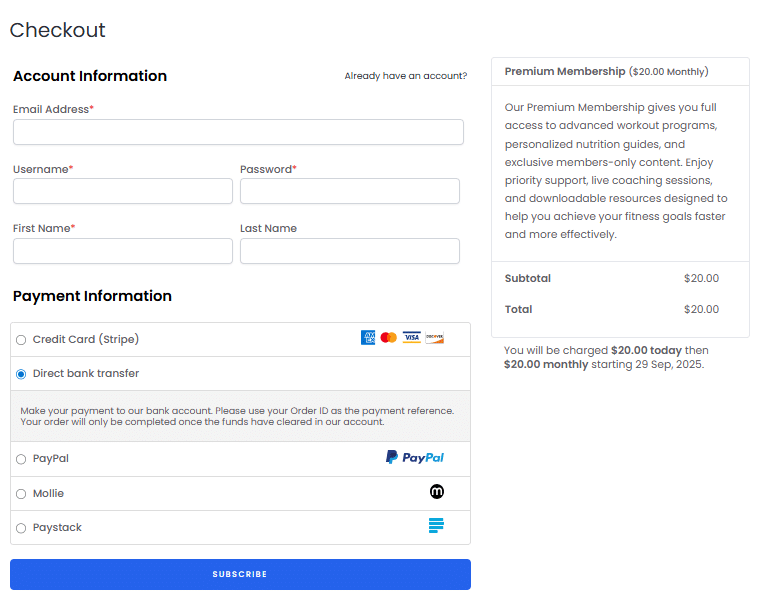
Now, when a visitor clicks a Subscribe button, they’ll be taken directly to the checkout page for that specific membership plan.
Below is an example of what the checkout page looks like:
With your pricing page ready, the next step is to set up content access for your members.
Setting up Content Access and Metered Paywall
ProfilePress gives you two effective options for controlling access to your content: full content restriction and the metered paywall.
Full restriction makes specific content available only to members, while the metered paywall allows visitors to view a set number of articles or pages before asking them to subscribe.
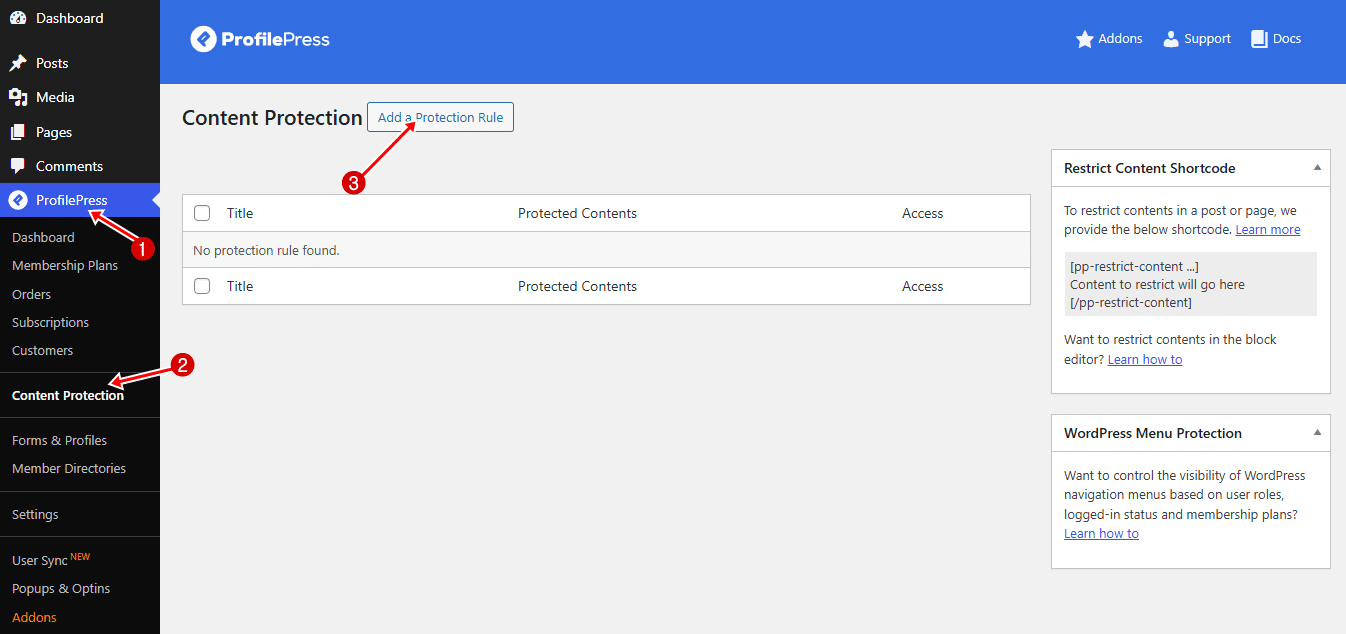
Setting up a Full Content Restriction
To do this, go to ProfilePress > Content Protection and click the Add Protection Rule button at the top of the page.
Give your protection rule a clear and descriptive name, then choose the content you want to secure. You can apply restrictions to posts or pages based on category, tag, archive, or format, and even combine several conditions for more precise control.
Based on your selection, extra options will be displayed. You can connect the protection rule to a membership plan, assign it to a particular user role, or manually allow access for specific usernames.
For instance, in the example below, we created a protection rule named “Members Only” to protect posts in the “Premium Access,” “Pro Access,” and “Meal Plan” categories. We limited access to only logged-in users who have an active subscription linked to those membership plans.

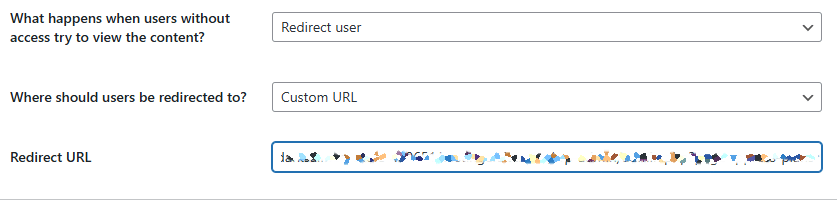
For visitors without access, you can decide how they should interact with the protected content. ProfilePress gives you two main ways to manage this.
The first is to redirect them to another page, like your pricing page. This lets visitors know how to upgrade their accounts or subscribe to so that they can access premium content.
The second option is to show an access-restricted message directly on the content. For instance, you could display a short preview of the article followed by a note indicating that the full content is available only to members, along with details on how to subscribe.
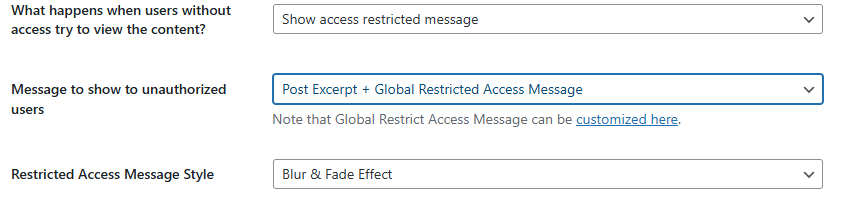
Both approaches are effective depending on your goals.
After selecting your preferred option, click Save Rule to activate it. From then on, all content linked to that rule will follow the access settings you’ve defined.
Setting up a Metered Paywall
Another option for controlling content access is by using the ProfilePress Metered Paywall addon. Rather than blocking content right away, this feature lets visitors view a limited number of posts for free before asking them to subscribe. It’s an excellent way to demonstrate the value of your content and convert readers into paying members.
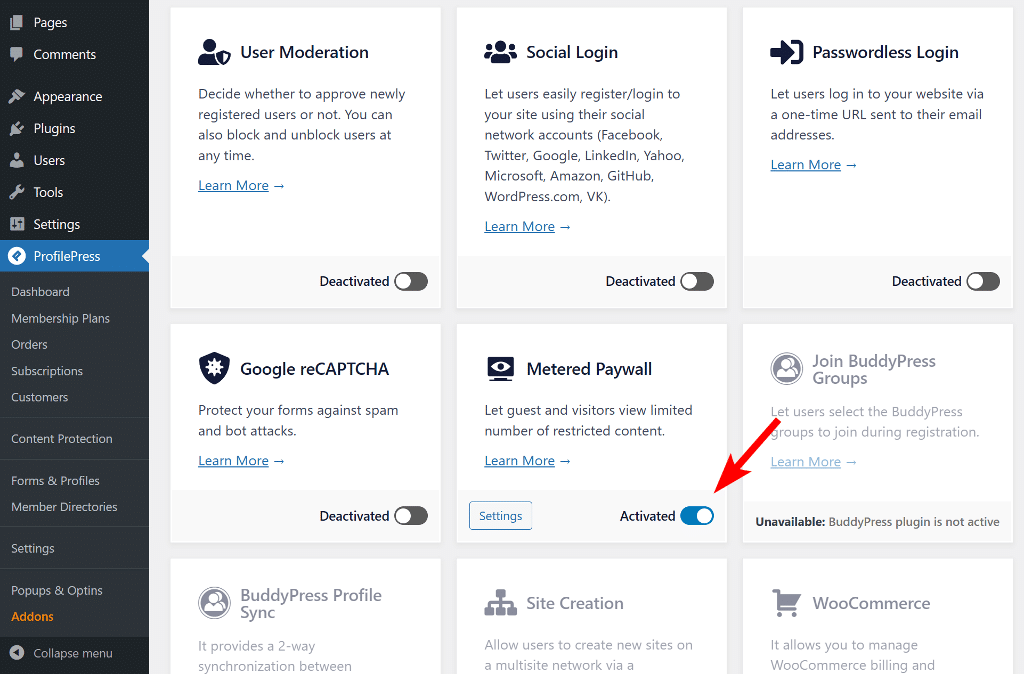
To activate the paywall, go to ProfilePress > Addons, locate the Metered Paywall addon, and toggle it on.
Next, click Settings to open the configuration page. You can also access it by navigating to ProfilePress > Content Protection in your WordPress dashboard and selecting the Metered Paywall tab.
Before configuring the paywall, check to confrim that the post types or categories you want to meter are already restricted under your existing Content Protection rules. If they aren’t, visitors will continue to access those posts freely even after exhausting their free views.

Once that’s in place, you can start configuring the metered paywall.
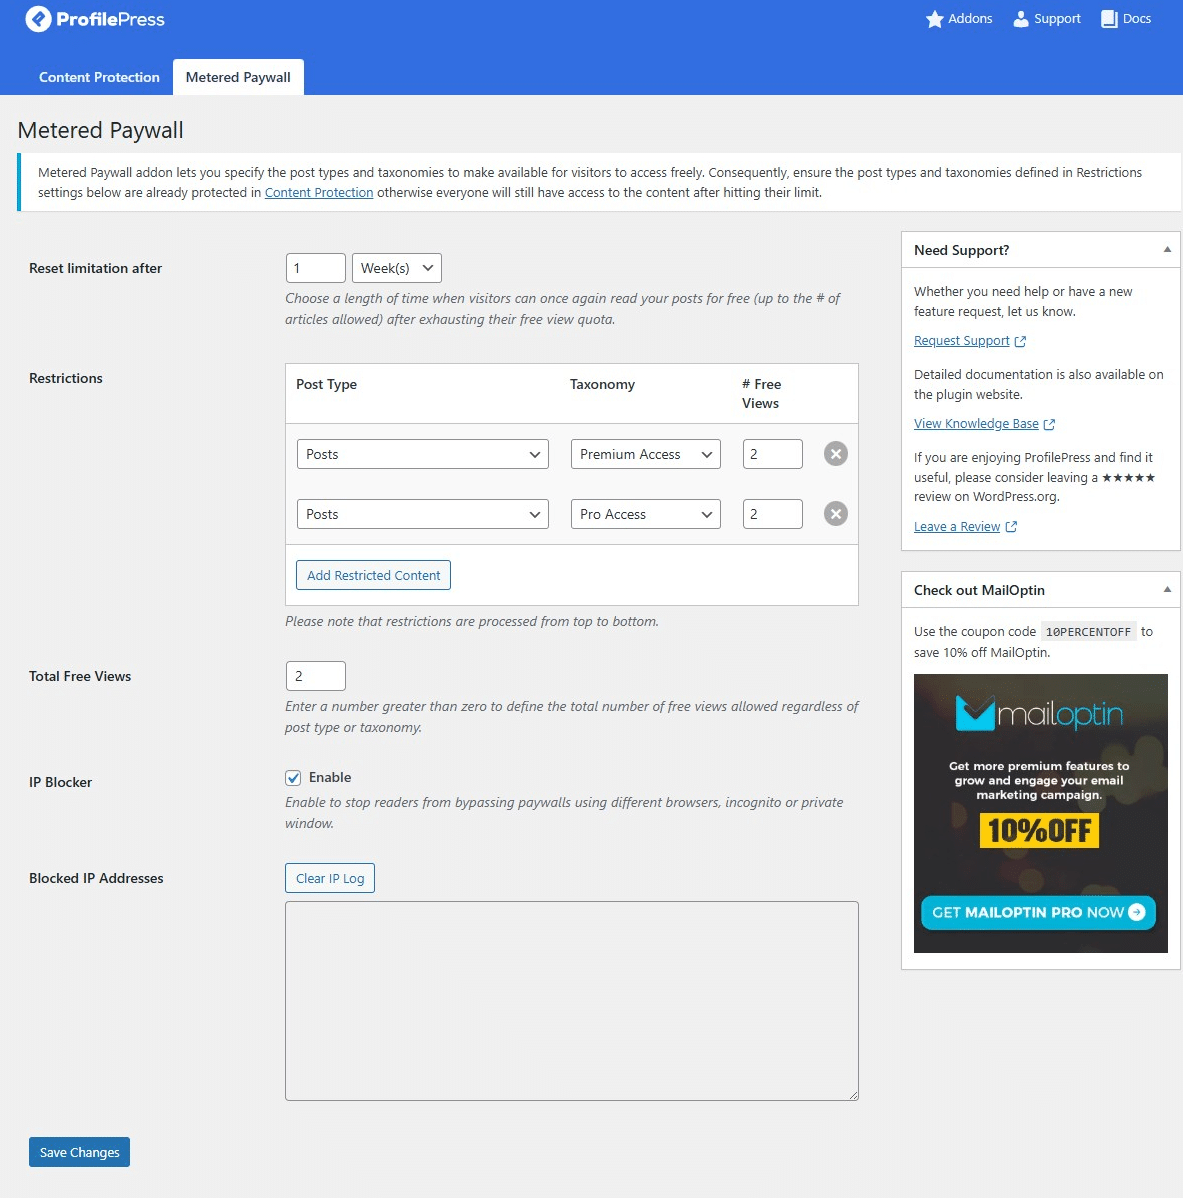
The first option, Reset limitation after, determines how long a user must wait before their free access resets after reaching the limit. You can choose any duration from a few hours to several years.
Next, under Restriction, select the post types and taxonomies available for free viewing and specify how many views each visitor is allowed. You can also define a Total Free Views limit that applies across all content.
To prevent readers from bypassing the paywall by using different browsers or private/incognito windows, enable the IP Blocker feature.
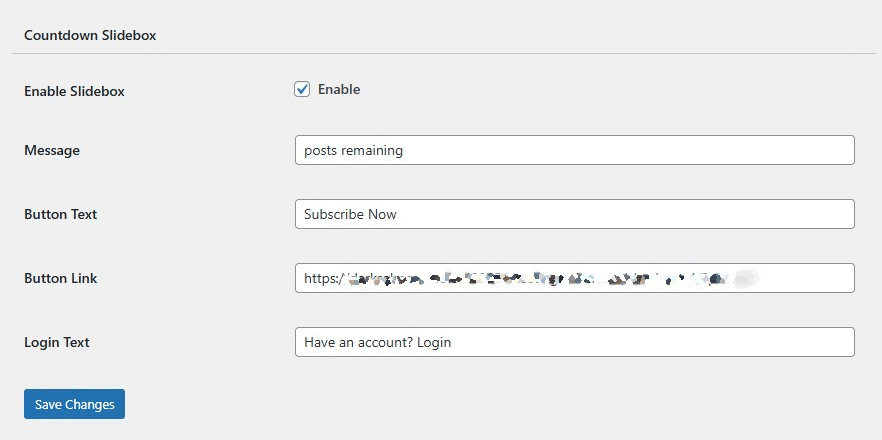
To make your paywall more engaging, you can activate the Countdown Slide feature. This adds a small pop-up that shows visitors how many free articles they have left and includes a button linking them to your pricing page.
You can also customize the message and button text to create a call to action that encourages visitors to subscribe.
After configuring your settings, click Save Changes to enable the paywall.
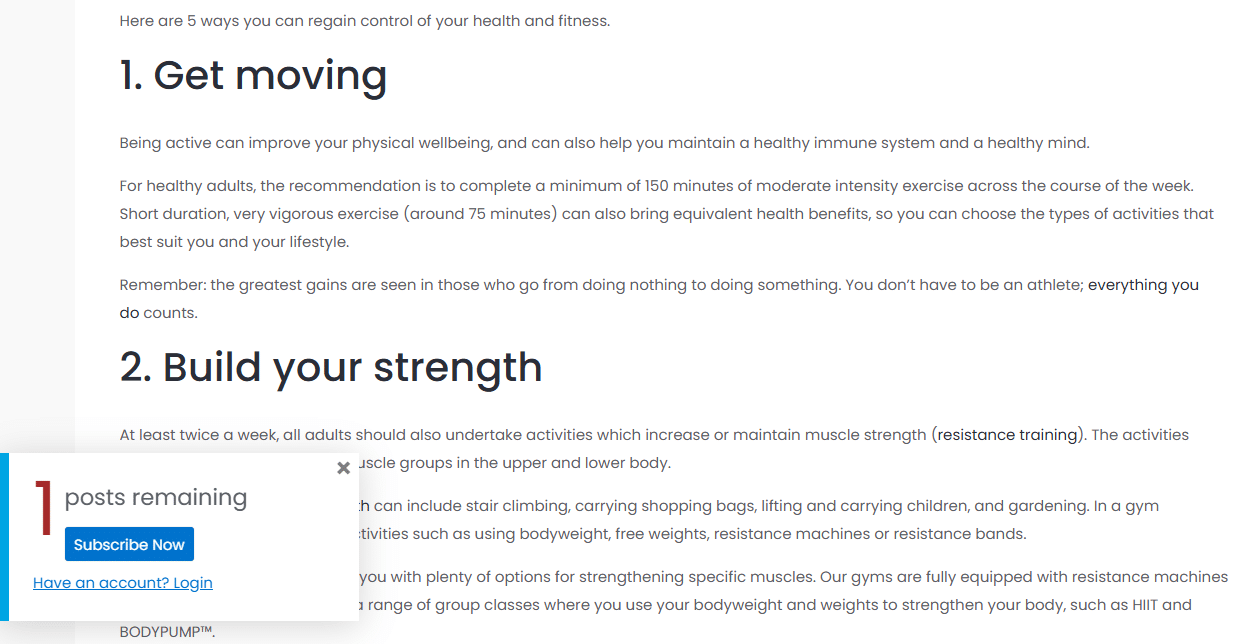
Once active, visitors will see a message showing how many free articles they have left, along with a prompt to either subscribe or log in.
In the example below, the notification box shows that the reader has one free post remaining, along with a “Subscribe Now” button that encourages them to upgrade their access.
It is important that your WordPress membership website content be discoverable and indexed by search engines such as Google, Bing, and Yandex. Therefore, we recommend using the CrawlWP SEO plugin. Besides ensuring your content gets indexed, it also offers insights and analytics on how your website performs on Google and Bing directly within your WordPress admin dashboard.
Reporting and Analytics
When your membership website is live, proper management becomes essential for sustained growth. ProfilePress offers built-in features that help you manage memberships, track performance with detailed reports, and handle taxes with ease.
Here’s how to use these features effectively:
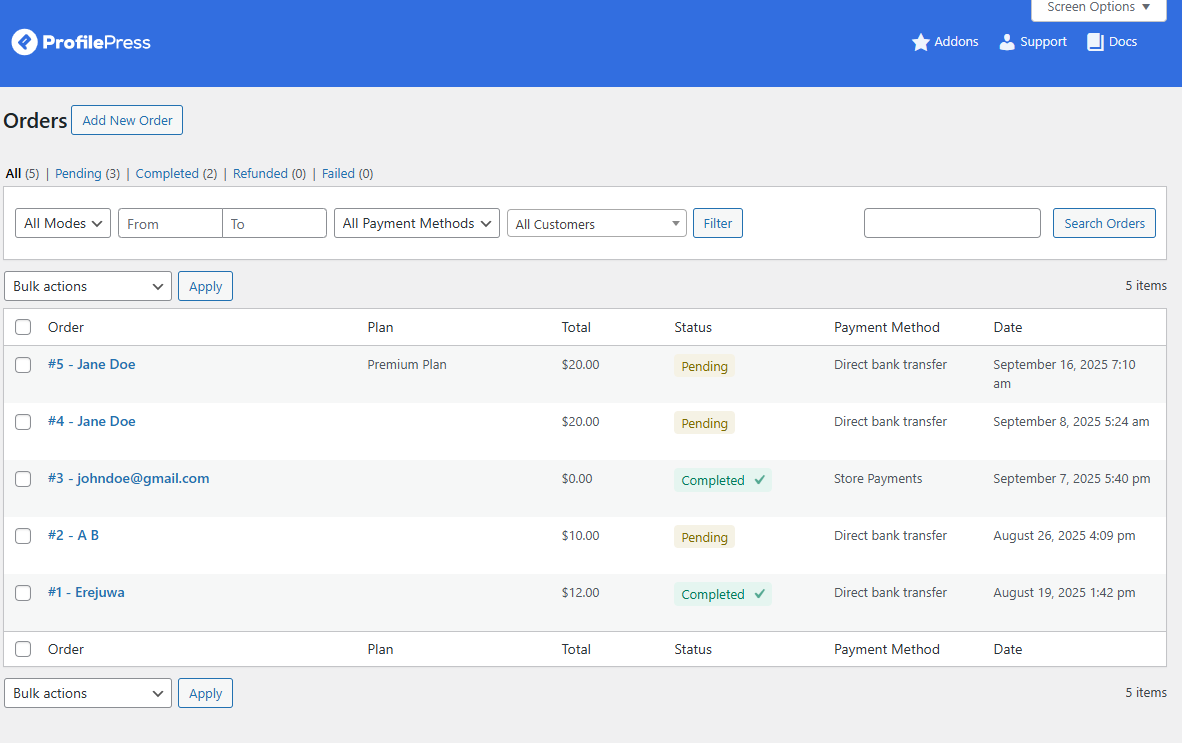
Order Management: This section provides a complete overview of all transactions on your membership website. You can view order details, including payment methods, transaction dates, and order status.
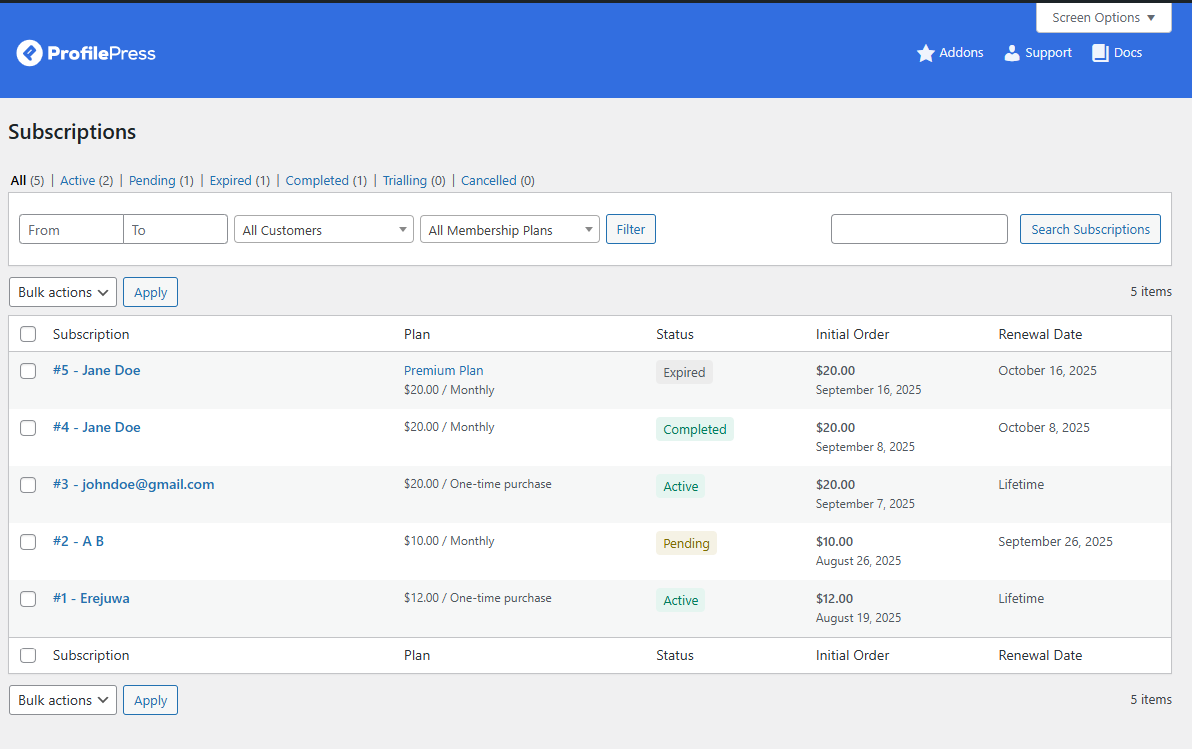
Subscription Management: This section allows you to manage all member subscriptions, including active, pending, and canceled ones. Each record shows the renewal date, payment frequency, and initial order details. In this section you can also manually renew, cancel, or modify subscriptions as needed.
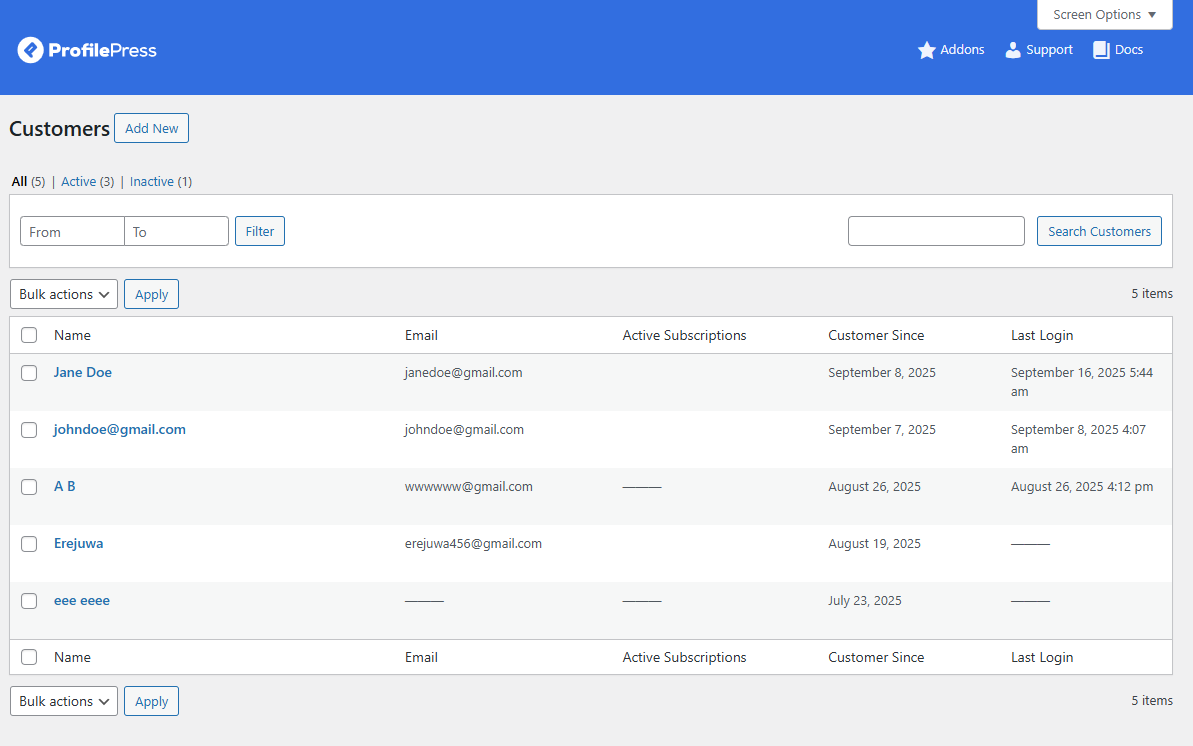
Customer Management: This section gives you valuable insights into your member base. You can view a list of all registered users, their subscription status, active plans, and account activity.
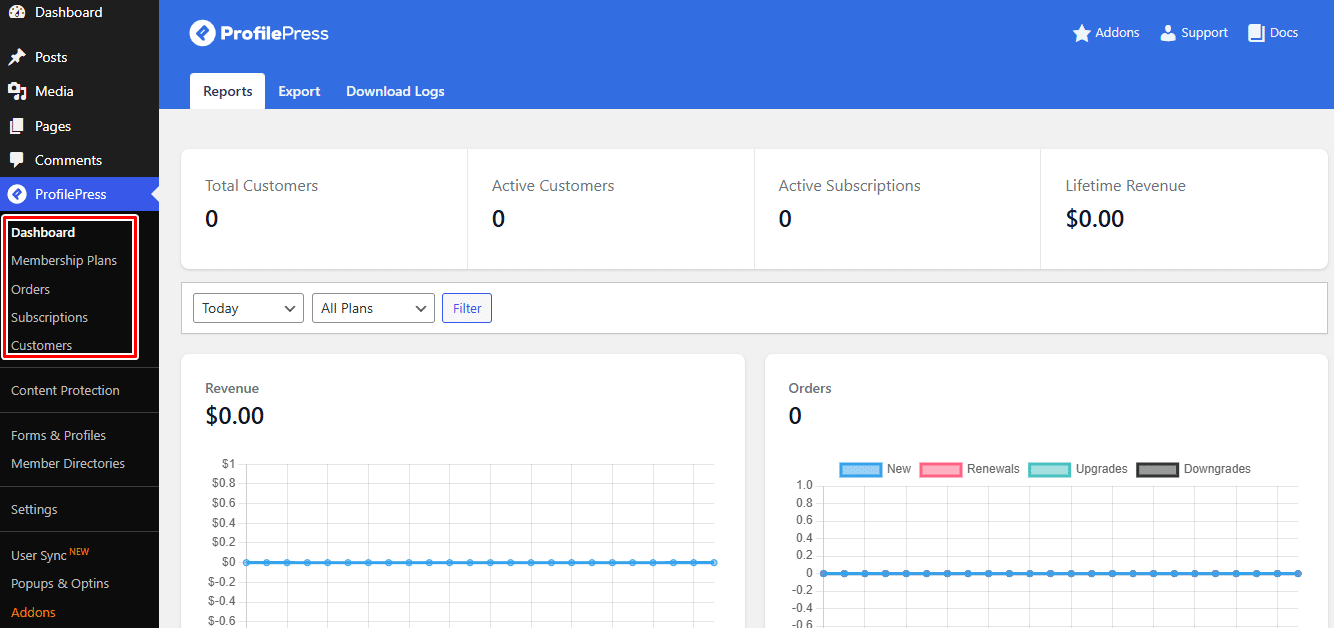
Analytics: This section lets you see how your membership site is performing. To view it, go to ProfilePress > Dashboard, where you’ll find detailed reports on subscriptions, orders, total revenue, and more.
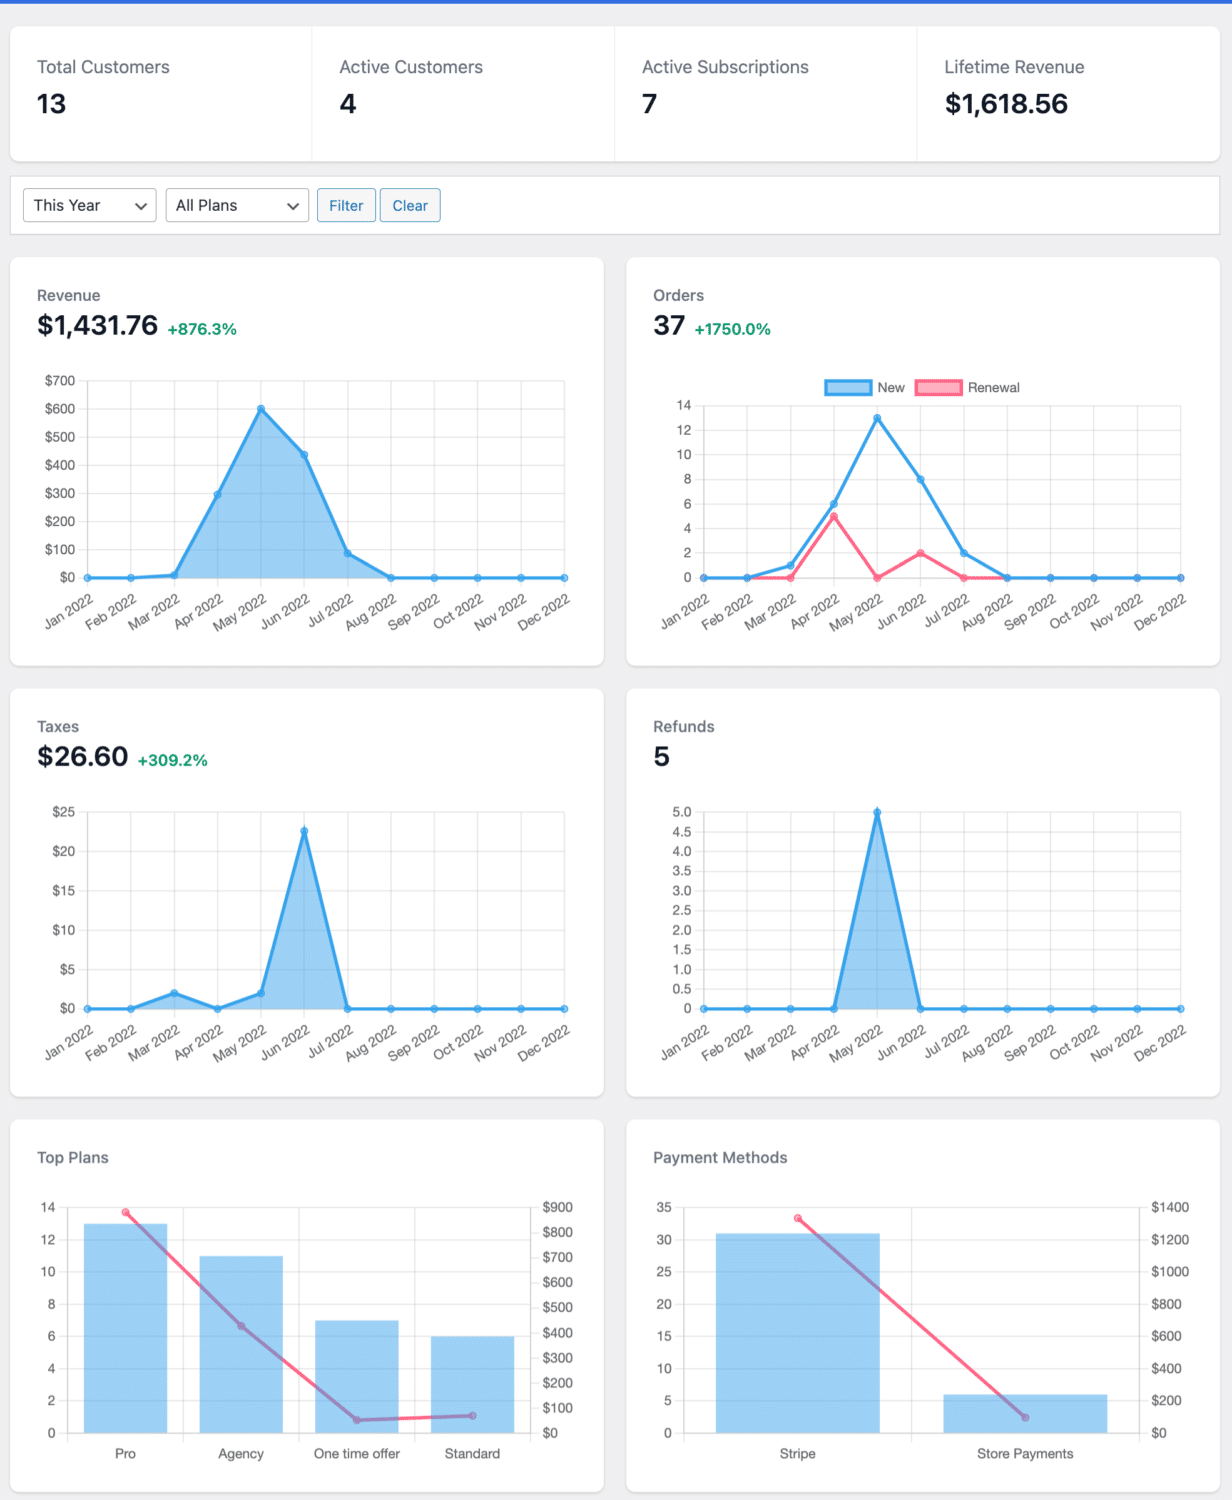
By using these management features, you can easily monitor your membership site’s performance, manage daily operations more effectively, enhance member satisfaction, and make data-driven decisions to boost growth and revenue.
Creating a Member Directory
A member directory helps build an effective community by allowing members to discover and connect with one another.
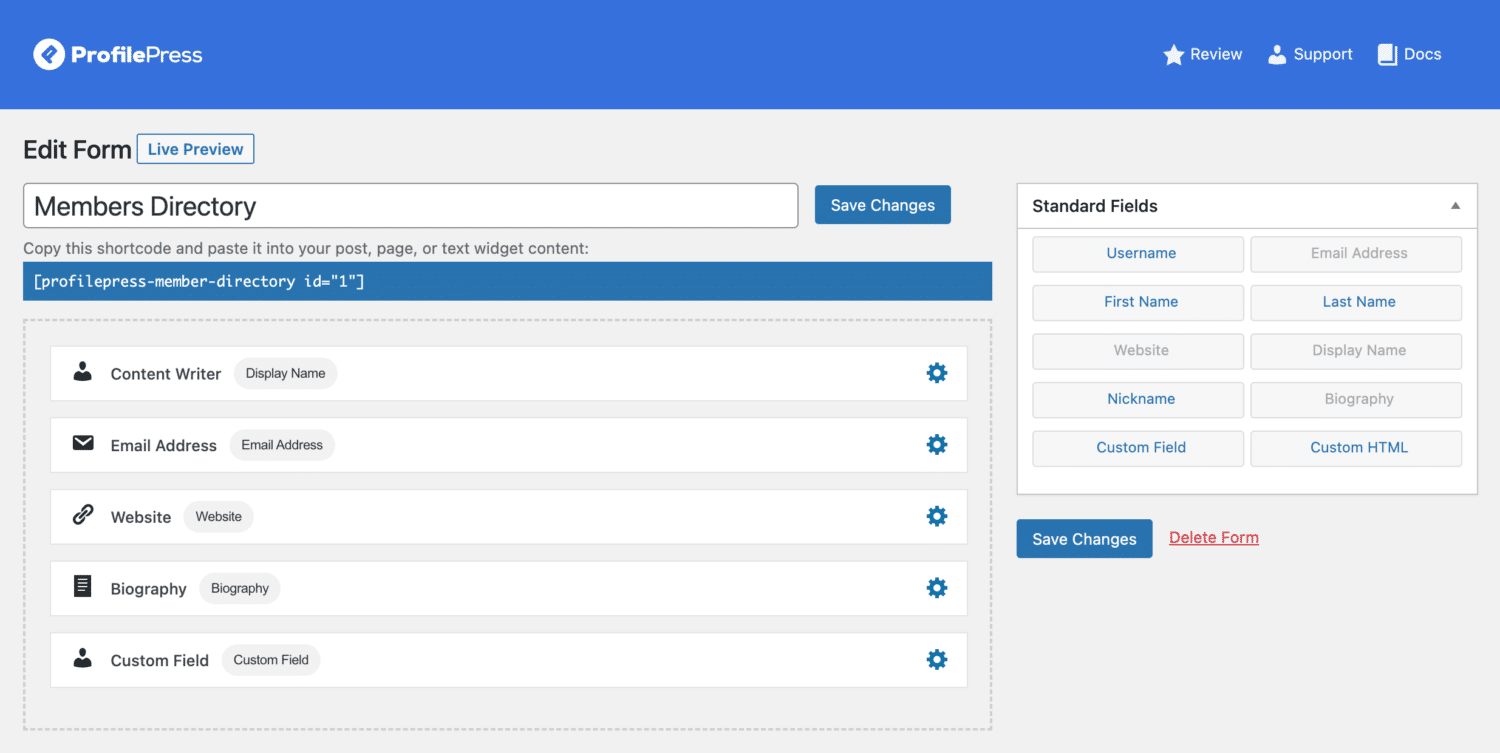
To create one, go to ProfilePress > Member Directories and click Add New to start.
On the setup page, enter a name for your directory and choose a template. The selected template determines how member profiles will appear on your membership site.
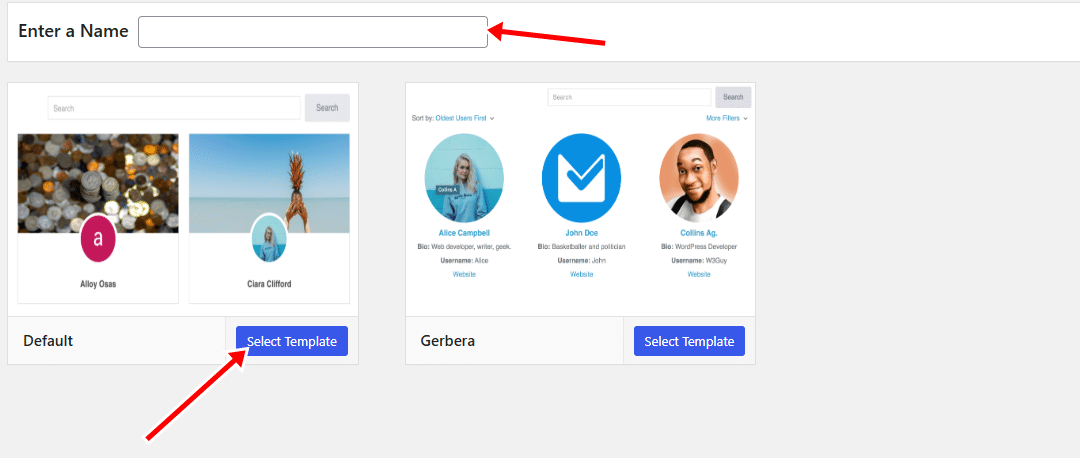
You can use a drag-and-drop editor to choose which fields appear on your member directory page, making it easy to customize the layout and information displayed.
Below is a screenshot showing how the directory appears on the front end, with all the fields we selected in the editor now visible on the live page.

Conclusion
Building a membership website with WordPress is one of the most effective ways to share your knowledge, connect with your audience, and earn recurring income.
With a plugin like ProfilePress, you can manage everything from memberships, payments, and content access to member engagement without needing any technical skills.
Throughout this guide, you’ve seen how to set up membership plans, customize checkout and registration pages, restrict or meter content, and manage members efficiently.
Get ProfilePress today and launch your membership website to start generating recurring income.