
How To Add Caption to Images in WordPress Step by Step
Adding captions to your images is a great way to improve your website’s SEO. Not only do they help break up the text on a page, but they also provide information about the image that can help with search engine rankings. In this article, we’ll show you how to add captions to images in WordPress.
Captioning your images is a two-step process: first, you need to add the caption text to your image file, and then you need to tell WordPress where to display the caption. Before we dive into how to add captions to your images in WordPress, let’s understand what are they.
What are image captions in WordPress?
Image captions are text that you add to an image to provide additional information about it. Captions can include the title of the image, who took the photo, what the photo is of, and any other relevant information. They’re a great way to provide additional context for your images and help improve your website’s SEO.
Captions are important as they are a ranking factor for Google. When you add a caption to your image, you’re providing Google with additional information about the image that can help with rankings. In addition, captions improve the overall readability of your website, breaking up the text on the page and making it easier to read.
Step by Step process to add captions to images in WordPress
Adding captions to images is easy and even if you’re a beginner, you can get it done quickly without taking the help of a developer or WordPress expert:
Upload images to your WordPress gallery:
The first step is to add your images to the WordPress media library. You can do this by either dragging and dropping them into the media library or by clicking on the Upload Files button.
Add caption text to your image files:
Once your images are uploaded, you need to add the caption text to them. This is done by adding the tag with the title attribute. The text between the
and tags will be displayed as the caption. Here’s an example:
<img src=”https://www.example.com/wp-content/uploads/2022/02/add-caption-to-images-in-wordpress.jpg” title=”Adding captions to images in WordPress”>
The text “Adding captions to images in WordPress” will be displayed as the caption for the image above.
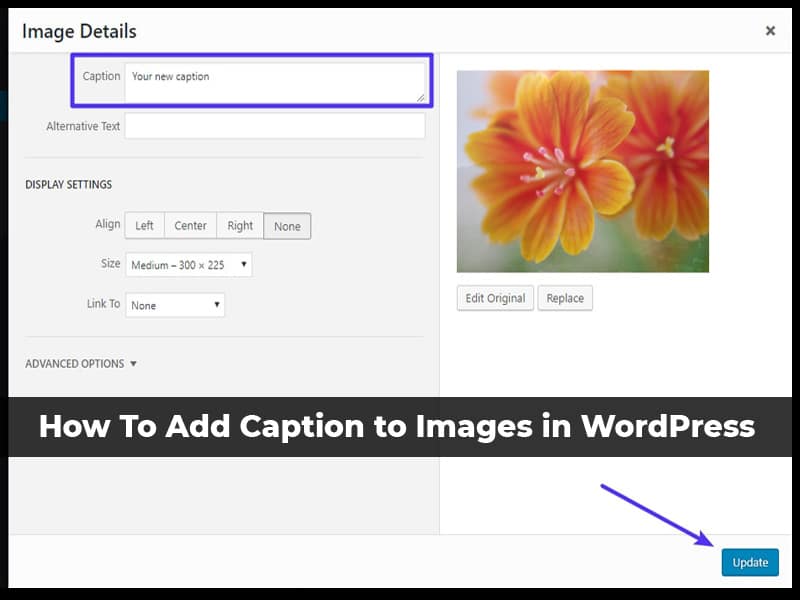
Or you can click on the edit button and you will see the option of adding the caption. By using that option, you can add the caption without using the <img> tag.
Configure where to display your image captions in WordPress:
Once you’ve added the caption text to your images, you need to tell WordPress where to display them. This is done by adding the following code to your theme’s functions.php file or a plugin that provides customizations for captions:
add_theme_support( ‘post-thumbnails’ );
add_filter( ‘image_default_size’, create_function( ‘$size, $width, $height’ ) {
return ‘custom-size’;
});
add_filter( ‘image_max_width’, create_function( ‘$width’ ) {
return 750;
});
add_filter( ‘image_max_height’, create_function( ‘$height’ ) {
return 500;
});
The code above will tell WordPress to display captions below images that are 750 pixels wide or less and to hide the captions for images that are wider than 750 pixels. You can customize the code to fit your needs. Once you’ve added the code, your image captions will be displayed below your images.
What are other things apart from captions to optimize images?
There are a few more things that you need to optimize to get the most benefits from the images that you’re uploading on WordPress:
Alt-text:
Adding alt-text to your images is a great way to provide additional context for your images and help improve your website’s SEO. When you add alt-text, you’re telling Google what the image is about. This can help with rankings and it can also help people who are using a screen reader to understand what the image is.
Title:
The title of your image is also a factor that Google takes into account when ranking your images. The title should be descriptive and it should help people understand what the image is about.
Filename:
The filename of your image is another factor that Google uses to rank your images. The file name should be descriptive and it should help people understand what the image is about. You can use keywords in the file name to help with rankings.
Size:
Google also takes the size of your image into account when ranking your images. Make sure that you’re uploading images that are the right size for the page where you’re displaying them. Otherwise, they will load slowly and it will negatively impact your website’s SEO. There are several free tools that you can use to optimize the size of your images.
Wrapping up!
Adding captions to your images is a great way to improve your website’s SEO and overall readability. It’s easy to do and even a beginner can get it done without taking the help of anyone. Many people make the mistake of not adding captions to their images, but with this easy guide, you can add them in no time!