How to Add a Google Map to WordPress
Embedding a google map on your WordPress website is always a nice skill to have. It is not only a visual tool, but it is also extremely helpful for your visitors.
Adding a Google Map in WordPress helps any business owner communicate various pieces of information to his target audience. Most importantly, a Google Map on WordPress shows your potential customers where your offices are located.
When people enter on your website, after checking your products, they will also take a look on your contact page. Once they find your contact details, they usually check where you’re located.
They don’t do this to come to your office. Most of them check where your office is on Google Maps to make sure that your business is real. If you don’t know how to add a Google Map to WordPress, keep reading this article to find out.
How to Add a Google Map to WordPress
“Google Maps can add a huge improvement to any website. It becomes interactive, allowing visitors to move on the map to get an idea of where your office is located.
Moreover, a Google Map is extremely helpful when you have multiple locations as you can highlight them. It will become easier for your visitors to switch between street view and Google Map to see more details about your offices”, says Michael Stevens, CEO at Trust My Paper.
Utilizing Google Maps’ Route Planner enhances this functionality by enabling efficient planning for visits to multiple sites, optimizing travel routes and saving valuable time for both businesses and customers alike.
Add Google Maps Feature Manually
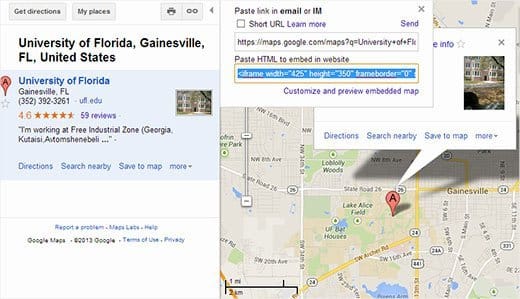
The first step to follow is to go on Google Maps and type in your business’ address. Click on the search button and wait for Google Maps to return the results for your location.
When you find the location, the next step is to click on the link button. You will find it in the right-hand panel. Here you will find the embedded code which you should add on your WordPress website.
Copy the iframe code and paste it on your WordPress page. Furthermore, you can also paste the code in a post where you want to showcase your location. Instead of copying the iframe code, you can also click on “Customize and preview the embedded map”.
It will help you customize the way the map will look on your website. Once you have embedded the link on your WordPress website, don’t forget to save the changes. Your Google Map is ready to help your customers find your business easier and faster.

Add a Google Map Using a Plugin
Adding a Google Map to WordPress is easy. However, there are also other methods which you can use to embed the map even easier.
There are plenty of plugins available online which promise to help you immediately embed a Google Map to your WordPress website.
The method mentioned above allows you to add a map to just one location from your website. But, if you want to add more maps on your posts and you use them as a strong communication tool, then the best option you could choose is using a plugin.
Thus, the first thing you can do is activate the MapPress Easy Google Maps plugin. Once you are ready editing the post or page you want to add your map, go down to the MapPress section and click on the New Map button.
The MapPress editor will open. Here you can add your office location or you can also enable the feature to automatically insert your location. You can take customization even further and you can give your map a name and decide which should be the map size.
Edit the map until you are satisfied with the results and then save the changes. Click on the button named “Insert into Post” and your map will be added to your post.
Preview your post and publish it in case the design is according to your standards. Furthermore, MapPress allows you to add multiple maps on your WordPress website.
You can also change the plugin settings and choose your preferred type of map, border, alignment, or controls.
Using a Widget to Add a Google Map to WordPress
This is another easy method which allows you to add Google Maps to your business website developed on WordPress. You can install Google Maps Widget plugin and let it do most part of the work for you.
The first step you should follow is activating the plugin. You can drag and drop the Google Maps Widget to the sidebar by going to Appearance tab and then clicking on Widgets.
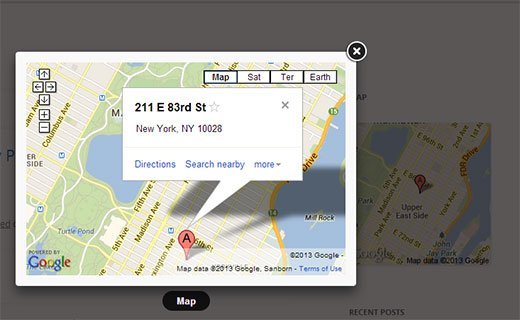
You can find the location by entering the address in Widget settings. This Widget is extremely helpful when you want to customize your map as it allows you to choose its size, zoom level, pin color, and many more.
You can also configure the lightbox settings by clicking on the lightbox tab. Don’t forget to save the changes and the widget settings.
Once you have followed all the steps previously mentioned, you can go to your website and see how the widget looks like. If you feel you need to make adjustments, you can always go to the Widget settings and change the way the map looks.

When business owners create the website for their business, they have to pay attention to a lot of aspects. Therefore, they might oversee this element which is the Google Map.
There are many business owners who choose to include some screenshots taken on the internet. However, if you want to differentiate yourself from the competition, you can embed a Google Map to your WordPress website.
This is a superior option which makes your potential customers trust you and check on which street you are and how they can reach you.
Of course, there are plenty of other map options available online. Still, Google remains the biggest search motor, used worldwide. Thus, adding a Google Map to WordPress will first make your website more accessible.
People are used to checking Google Maps to get directions and find a certain location. In addition, embedding a Google Map will also add reliability as it shows your customers that you keeping the pace with the trends and help your customers to easily reach your location.


