
Best Ways to Start a Print-on-Demand Business With WordPress
Want to start a new business but don’t have much time and money to invest in the inventory and worry about its management? Print on demand (POD) might fit your needs perfectly. With a print-on-demand business model provided by platforms like Printful or Printify, you can quickly start your online business in no time.
WordPress is an excellent website-building option for a new business, as attested by 2022 stats. According to the w3Tech data, WordPress is utilized by 43.2% of all websites online. So why shouldn’t you build your new business on it?
This article will guide you through the best way to start a print on demand business with WordPress using WooCommerce and Printify. Keep reading to learn more!
What Is Print-on-Demand and What Are Its Benefits?
Print-on-demand (POD) refers to working with a third-party vendor to put customized designs on white-labeled goods. You can sell things to customers online and produce them per order with POD.
This means you don’t have to hold an inventory. When a customer orders from your store, your POD supplier fulfills it by printing, shipping, and delivering it straight to your customer.
For businesses looking to streamline operations further, integrating route optimization solutions for efficient logistics can enhance delivery timelines and reduce costs associated with shipping.
The POD business model is becoming increasingly popular in eCommerce because of its significant advantages over other business models. These advantages are listed below:
- No need to pay upfront for buying, holding, and managing an inventory.
- Platforms like Printify make it very convenient to run the business as you don’t have to worry about the production and delivery of the product.
- It frees your time as an entrepreneur to focus on marketing efforts and scaling your business.
- Generates a passive income on the side as the store keeps operating independently.
- Some POD platforms offer a comprehensive catalog of white-label products. Printify offers over 600 products, including custom clothing, accessories, baby products, stationery, and even tech accessories.
What Is WooCommerce?
WooCommerce is a free e-commerce plugin for WordPress websites. It is widely used to develop online stores, and with this plugin, anybody may quickly and easily add e-commerce capabilities to their website. WooCommerce also facilitates simple business administration. Everything from creating product pages and handling customer orders to integrating with various payment processors is possible.
WooCommerce’s user-friendliness is a significant factor. Around 5,106,506 active websites throughout the globe use it. This means you don’t have to be a programmer or a web developer to get started. Get your online shop up and running on the WordPress website with WooCommerce by simply following the instructions below.
How to Start a Print-on-Demand Business With Printify and WordPress
Starting a POD business with Printify is an excellent opportunity for new entrepreneurs to enter the eCommerce market. With Printify, you can launch a profitable company with zero initial outlay.
They manage your inventory, take care of order shipping, and provide you with everything you need to get going.
Follow the steps below to start a print-on-demand business with Printify on WordPress using WooCommerce.
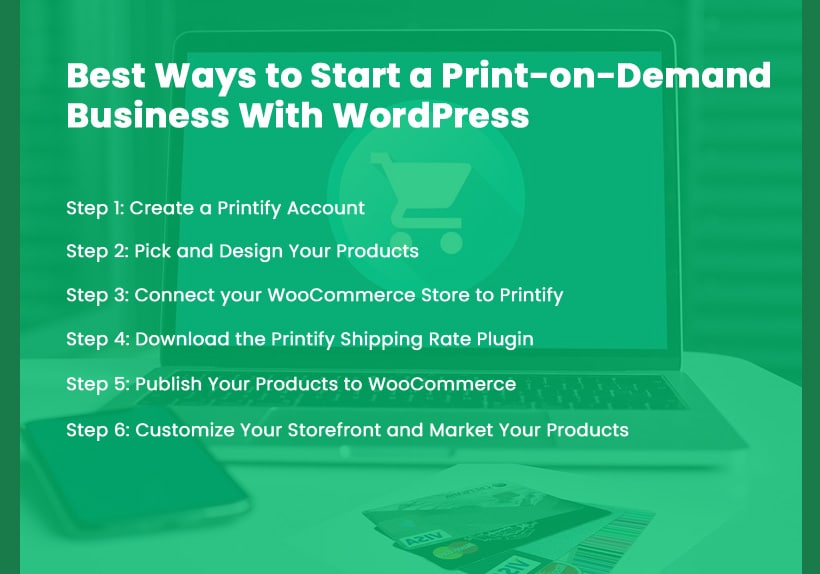
Step 1: Create a Printify Account
Go to the Printify homepage and find the sign-up button in the top-right corner. Click the button, sign up using your email address, and create a unique password. Then, fill up your profile information under “My Account.”
Step 2: Pick and Design Your Products
Browse Printify’s catalog to find the items you want to sell. Once you’ve picked the product, click on Start designing and follow the steps below:
- Upload your design by clicking on Add design from… and selecting one of the options. You can make custom text or add a design from your PC or external storage. If you’re looking to streamline your design process, consider using a bulk mockup generator to create multiple product images at once quickly.
- You can scale, rotate, or reposition your design. Other features include changing fonts and colors, creating patterns, etc.
- Once the design is ready, save your new product. You can then change its title, descriptions, and pricing directly from Printify.
Step 3: Connect your WooCommerce Store to Printify
Once you have customized your print on demand marketplace products with spectacular designs, follow the steps below and connect Printify with WooCommerce.
- Go to your new website powered by WordPress. Go to the admin panel and route to WooCommerce. Go to Settings, navigate to the Advanced tab, and then to Legacy API. Check the Enable the legacy REST API.
- To change your permalink structure, go to Settings and Permalinks in the left sidebar. After that, pick anything other than the default Plain format. Select the Save Changes option.
- Go to your Printify account and navigate Manage My Stores. Click on Add new store and Connect. Fill in your WooCommerce store’s URL, ensuring it’s formatted the same way as it appears in the Settings section of your WordPress dashboard.
That’s it! Your Printify and WooCommerce for WordPress are now connected.
Step 4: Download the Printify Shipping Rate Plugin
To install Printify for WooCommerce plugin on your WordPress website, you need to follow two steps:
- To install Printify, go to your WordPress dashboard in the Plugins, then make Add New section. Look for Printify for WooCommerce and select the Install Now button.
- Once installation finishes, click on Activate.
All done! Now you can publish Printify goods to your WordPress shop, and they will be given the correct shipping cost without you having to lift a finger.
Step 5: Publish Your Products to WooCommerce
Once Printify and WooCommerce are integrated, you can publish the products from Printify’s My Products page to your store catalog.
Pick a product you’ve created and use the Publish button to make your product available on your WooCommerce storefront.
WooCommerce allows you to have complete command over all aspects of your products, from naming and describing them to assigning them categories and tags and customizing their images.
Step 6: Customize Your Storefront and Market Your Products
Each page on your website will adhere to a theme based on your selection. Choose a theme wisely, as a visually pleasing website is not a cosmetic addition.
You want to choose themes that provide the best user-friendly extensions that are easy and fast to load. Paid themes often offer some advanced UI elements.
Check out Grace Themes to get unique and easy set-up themes for WordPress websites. You can filter the themes based on your concept and even check out a live demo.
Conclusions
Setting up a print-on-demand business is an excellent option for new entrepreneurs with minimum risk and investment. With simple steps to set up your online store on WordPress, we hope this guide gives you the right nudge to get going.
With the help of the WooCommerce plugin, integrate top-notch services and options from Printify to make the process of selling customized products online a breeze.