
How to Add Google Analytics to Your WordPress Website with a Plugin?
What is Google Analytics? And Why is it Important?

Google Analytics is a Service designed by Google to give you complete track and order of any website. Using Google Analytics, anyone can track various statistics about the website such as Traffic on the site, Rate of conversion, Bounce rate, Pageviews, Source of Traffic, Generated Leads, the Behavior of users, users Interest, Geolocation etc.
Below mentioned are some points that we can track through Google Analytics:
- Page views: It is the total number of times a particular visitor has clicked on a webpage of a website.
- Sessions: It is the number of visitors a website has which are unique by identity.
- Session duration and Page per session: Session duration is the total surfing time taken by the visitor on site. While Page per session is the number of pages, the visitor visited from the total pages in a particular session.
- Traffic Source: Through Google Analytics we can also find the source of any site visitor. Whether they origin from Organic search, backlinks, paid search, direct traffic or they are from any social media.
- Goals and Conversions: User can set goals in the form of anything and can analyze how many visitors achieved that goal or in simple words click on a particular button.
- Bounce Rate: It is the number of visitors exit the website right after entering.
Apart from these Google Analytics measure every parameter, starting from small to large and make weekly, monthly and annual reports which can help the user identify the website’s strengths and weaknesses.
Anyone can achieve success on various parameters by using the data provided. Google Analytics is critical because it helps us gather information about the website itself as well as the visitor visiting the site.
Adding Google Analytics to the WordPress Website:
Anyone can add Google analytics to their WordPress website by 6 simple steps which are mentioned below:
Step-1: Signing Up in Google Analytics
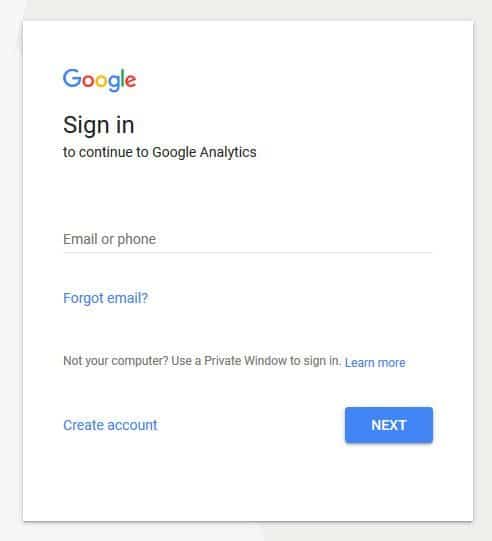
The first step for the people who wish to add Google analytics to the WordPress site is that they should have a Google analytics account.
The user can directly sign in to Google Analytics if he/she has a Google account otherwise the first step would be to set up a Google account and then sign in to Google Analytics.
Step-2: Setup Google Analytics
Now that the user has got a Google Account they can directly click on the Login button and log in to the Google Analytics.
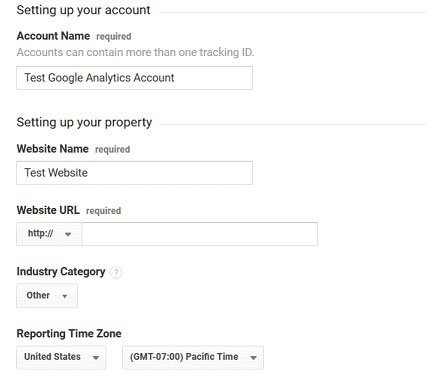
Right after logging in the user will be directed to a page where they ask whether we want to track a website or a Mobile app. If the user clicks on the website option, another page will open where it is asked to enter the details such as Name of an Account, Link of Website URL, Catagory of the industry, Name of Country and respective time zone.
After entering all the information click on the “Get Tracking ID” Button.
Step-3: Get the Tracking ID
![]()
Tracking ID is a code that user need to copy and paste into their Wordpress website depending upon the method chosen. The user has to make sure that they have selected the terms and service agreement. Only then the code could be received.
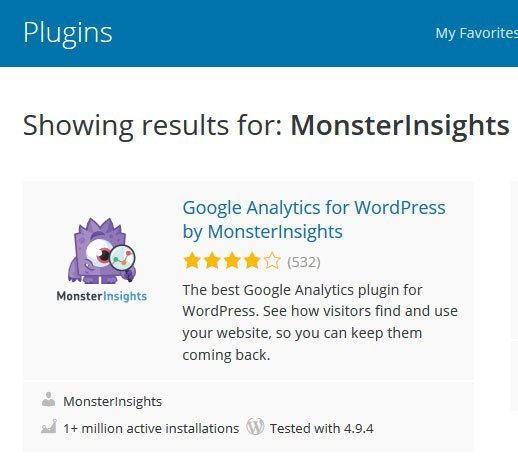
Step-4: Adding Google Analytics to the site
We can Google Analytics to a Wordpress website using third-party plug-ins. One such third-party plug-in is MonsterInsights.
What is Monster Insights?
It is one of the most popular Google analytics plug-ins with more than 1 million daily active users. MonsterInsights is one of the simplest and quickest plug-ins which allows users to see the statistics in the Admin panel of Wordpress dashboard and that too in real-time.
Step-5: Install and Activate
To install and activate MonsterInsights into the website go to Plugins > Add new.
Search for MonsterInsights and click on Install now button and once it installed click on Activate.
Step-6: Configure Monster Insights
Goto Insights > Settings and click on the Authenticate button.
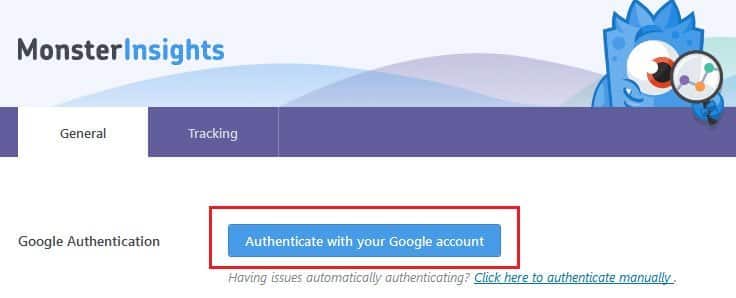
You will see a screen for authentication:

Click Next to continue, then click on Click to Get Google Code.

add the code to the dialog box mentioned.
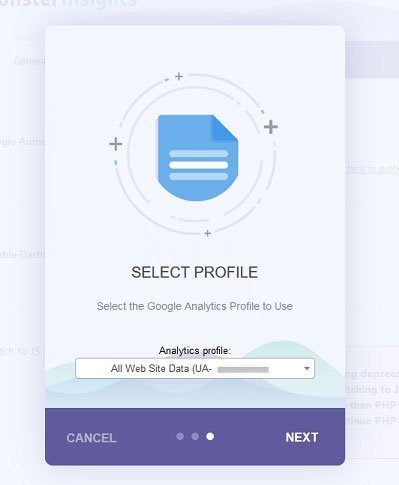
Click Next and select the appropriate Analytics profile and then click on Done.

Google analytics is added to your site and reports can be viewed by clicking on Insights > Reports.
It will look something like this:

Conclusion:
MonsterInsights Plug-in is the highlight of this complete process. Without it, the process would remain incomplete.
Once the MonsterInsights plug-in is added to our Google Analytics account syncing our website with it, every problem is more or less sorted. The main advantage of using this plug-in is that it is free of charge and highly reliable.
Adding Google analytics to the WordPress site is something that no developer or business owner should ignore. Also, it is free of cost so that this small add-on won’t harm smaller enterprises.
We can track the complete behavior of the visitor visiting our website. This step is well capable of identifying that one small change in the website which could help us increase traffic or conversion rate.
The user can also identify the increase or decrease in the overall sales that occurred after the changes made by us on the website.
The best thing about MonsterInsight is its graphical representation. Instead of generating long and unreadable reports, it shows the information in the form of graphs and charts.
Reading graphs and chart is more comfortable compared to written format full of numbers and tables. This is one of the reasons for the popularity of MonsterInsight.