How to Add Buttons in WordPress Posts or Pages (Even if You Don’t Know How to Code)

When it comes to WordPress pages and posts one important aspect that you would like to factor in is the inclusion of buttons.
There are multiple reasons behind this but a big one is to make your links appear more appealing and captivating so that visitors are more likely to click.
However, from the get-go it isn’t that simple to add buttons in WordPress without knowing how to code, so in order to do it more easily you need to look for external ways.
Luckily, there are certain plugins that could take care of this and make it simple for you to add buttons in your WordPress posts or pages.
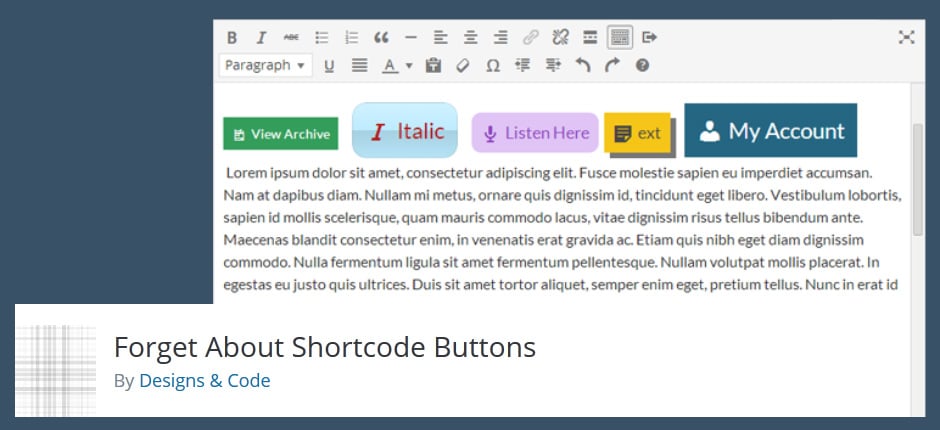
One such plugin is ‘Forget About Shortcode Buttons’ which allows you to do the process in a very convenient way.
The great thing about it is that you get to see actual buttons in the post editor instead of having to use short codes.
Therefore, the preview of visually represented buttons gives you better expectations for the final result which is a great bonus to the main benefit of having a simple way to enhancing your content with buttons.
The way ‘Forget About Shortcode Buttons’ operates is so uncomplicated that anyone could use it with ease. The only thing you need to do is type some text, like let’s say “Buy Here”, select it and then click on the ‘insert button’ option.
After doing this a panel opens up where you get to choose the color, font size and overall look of the button. Of course, you also get to insert the actual URL to which the button would link.
If you wish to do any changes later on, this could be done by simply double clicking on the visually available button in the post editor.
This would open up the panel again where you could alter any options you may please and then end the process by clicking on ‘update’.
For instance, you may change the color but there are some other options as well. Under ‘Type’ you could pick between choices such as: flat, flat rounded, glossy, glossy rounded, pop out, and pop out rounded.
As for the size, you have the regular options of – extra small, small, medium, large, and extra large.
Another property which you may edit in the button panel is that of ‘icon’. When you click on the tab you will be presented with a lot of options.
If you see something that you like and select it, then that icon will appear before the text in the button. What’s awesome about the available icons is that they include ones for popular sites such as Facebook and Twitter.
In other words, if you want your post to include a link to a Facebook page for example, you could create a button that will include the Facebook icon and thus make it more obvious as to what the link is about.
Of course, you could do the same for a Twitter link and this is where the button options come especially in handy, meaning you could select colors similar to the Twitter or Facebook logos and have the button to completely hit the mark.
In addition, the buttons are very easy to use and maneuver for it poses no trouble to copy-paste them or move them around. Finally, by clicking on the preview for the entire post you could see how the buttons appear on the front end.
Another popular plugin that allows you to add buttons to your WordPress posts and pages is ‘MaxButtons’. After downloading and installing it, ‘MaxButtons’ appears in your WordPress dashboard.
From there, what you need to do is click on the ‘Add New’ option which will bring you to the set of available properties for a button.
The next step is to play around with the available options as you find it fit. The basic properties which you may edit are that of the button name, URL and obviously the text and font.
Regarding the font, you may select its size and there are also the typical settings for ‘bold’ and ‘italics’. There are also the ‘padding’ settings, ‘button width’ as well as ‘text color’.
What’s cool is that you get a preview of the button on the right side which makes it convenient to make alterations without too much worry.
In addition, you may mess around with the background of the button, use gradients, change the color and opacity etc.
There are also the ‘Border’ settings where you can alter the radius, style, width, color, as well as the shadow with all of its encompassing elements such as blur, offset and spread.
Other available properties are those for ‘Text Shadow’ and ‘Container’. For the latter, you may choose whether to use one at all, and if you do you may change the width, margin and alignment.
Following this are the ‘Advanced’ and ‘Responsive Settings’. The ‘Advanced’ settings allow some options such as ‘Use !Important’ which is helpful if you want to avoid any hypothetical conflicts with the theme styles, whereas ‘Custom Rel Tag’ is beneficial in case your button is targeting lightbox or popup plugins which use that method.
In regards to the ‘Responsive Settings’, these allow you to choose the behavior of the button when it comes to distinct devices and screens.
To finalize the process, you will need to click on the ‘save’ option and after that you could insert the button by clicking on ‘Add Button’.
With this plugin, you don’t get a visual representation of the button in the WordPress post editor but the button will definitely be there on the front end.
One disclaimer concerning ‘MaxButtons’ is that the plugin operates via short codes so if you ever shut it off – you will be losing all of your buttons alongside with it.
These two plugins are just some of the methods you could utilize in order to manipulate your WordPress content, but keep in mind that there are other tools that allow you to add more than just buttons.
For example, there is this handy page builder called ‘DragDropr’ and as the name suggests, it grants you the option to generate content by simply using its drag & drop function. The tool is perfectly responsive and the alterations to your themes or templates will get stored as a genuine HTML code.

