How to set up WordPress

The most popular way to start with WordPress is to rent a server from a shared hosting provider and call it a day. There’s nothing wrong with this approach – it allows you to focus almost entirely on your website and its content – but there are certain advantages to setting up WordPress yourself.
Setting up WordPress on a server you control allows you to perform more in-depth configuration and typically offers better performance. If you buy a VPS from a provider such as BitLaunch, you also benefit from improved privacy.
Going it alone can be intimidating, but don’t let the length of the guide below and its code put you off. We’ll explain everything you need to do step-by-step. You’ll just have to copy and paste and make minor customization adjustments.
How to set up WordPress on Linux
Setting up WordPress is generally a three-step process:
- Install LEMP (Linux, Nginx, MySQL, PHP)
- Install WordPress
- Secure your WordPress installation
While it’s technically possible to install WordPress on a Windows server, there’s no good reason to do so if you have the choice. Linux is highly compatible with PHP and tends to be more stable and performant. As always, you should perform this installation on a non-root account where possible. You’ll find plenty of resources about setting one up online.
How to install LEMP
Once you have a Linux server or personal computer, installing the rest of the LEMP suite only requires a few commands. We’ll show them using Ubuntu, but you can replace “apt” with the default package manager of whichever distro you’re using:
sudo apt update
sudo apt install nginx -y
sudo apt install mysql-server -y
sudo mysql_secure_installation
sudo apt install php8.1-fpm php-mysql -y
sudo service nginx restart
You’ll want to choose the following options during the MySQL security setup:
– Validate password: Optional, adds more security for users.
– Remove anonymous user: Y
– Disallow remote root login: Y
– Remove test privilege tables: Y
– Reload privilege tables: Y
Next, you’ll want to edit your nginx configuration to ensure your server block can process php scripts correctly. To do so, type:
sudo nano /etc/nginx/sites-available/default
Select the entire section that starts with server { and ends with deny all; } } by placing your cursor at the beginning, pressing Alt + A, and moving the cursor down with arrow keys. Paste (right-click) this in its place:
server {
    listen 80;
    listen [::]:80;
    root /var/www/html;
    index index.php index.html index.htm;
    server_name example.com www.example.com;

    location / {
        try_files $uri $uri/ /index.php?$args;
    }

    location ~ \.php$ {
        include snippets/fastcgi-php.conf;
        fastcgi_pass unix:/var/run/php/php8.1-fpm.sock;
    }

    location ~ /\.ht {
        deny all;
    }
}
You can change example.com to your domain name if you have one. Press Ctrl + O, followed by Ctrl + X to exit.
Test your config file to make sure there are no errors using:
nginx -t
If you get a success message,restart nginx to apply the changes:
systemctl restart nginx
Otherwise, check your config file for syntax errors and make sure you replaced the correct text.
Creating your WordPress database
Before installing WordPress, you need to create a MySQL database that can store all of its data. To do so, run the following commands:
mysql -u root -p
CREATE DATABASE wordpress;
CREATE USER wpadmin@localhost IDENTIFIED BY "securepassword";
GRANT ALL PRIVILEGES ON wordpress.* TO wpadmin@localhost;
exit
Make sure you change “secure password” to a long, complex password that uses a combination of numbers, letters, and symbols. Replace “wpadmin” with your username. You will need this information later, so please note it down somewhere secure.
Installing WordPress
Now, we can finally install WordPress itself. We’ll download and extract our files to the /var/www/ directory where our web server, nginx, searches for files:
cd /var/www/html
wget http://wordpress.org/latest.tar.gz
tar xzvf latest.tar.gz
Navigate to the /wordpress folder and edit the sample wordpress config file:
cd wordpress
sudo nano wp-config-sample.php
Look for the section that begins ** Database settings and enter the database information you noted down earlier in the relevant fields. For example:
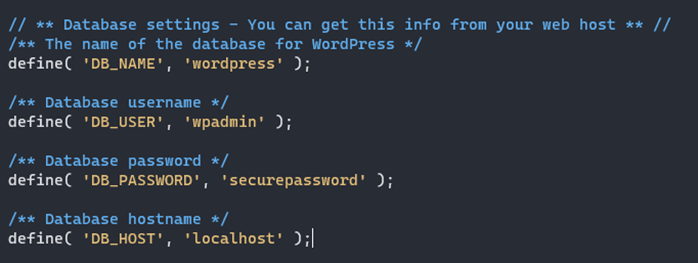
Press Ctrl + O and delete -sample from the file name, then press enter, followed by Ctrl + X.
To complete the setup, go to the browser on your local PC and enter your IP address,, such as:
206.188.196.18/wordpress
Select your language and press next until you reach this screen:
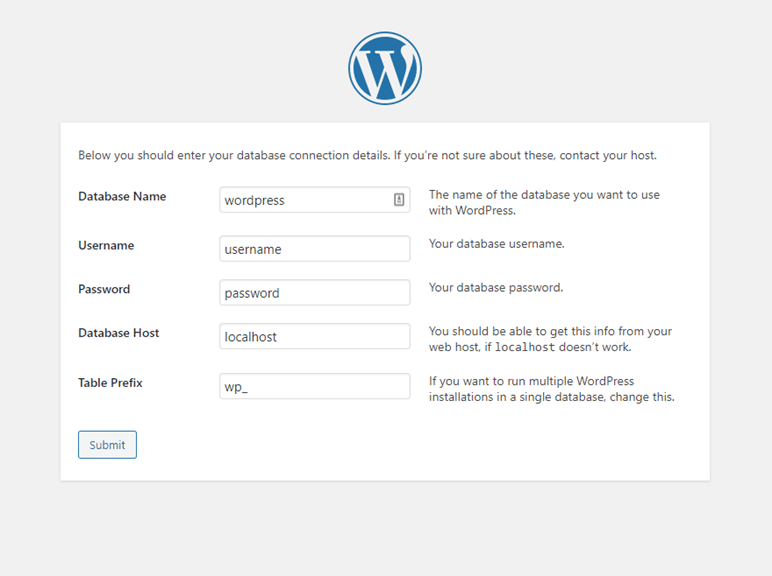
Enter the database information you noted down earlier and press submit. Now all that’s left is to enter your site details and press “Install”. WordPress will install, and you can log in at /wp-admin to get started.
However, before you do so, you may want to consider implementing some additional security measures.
How to secure your WordPress installation
WordPress is a common target for attackers because it is widely used and often utilized by non-developers or IT professionals. Additionally, WordPress sites have commonalities that are easy to automate attacks against. For example, the login page is always at /wp-admin by default, comments on pages are usually open and use the same base WordPress code, etc.
Basic security principles will get you a long way with WordPress:
- Use unique, secure passwords for your account backed by two-factor authentication.
- Make sure the users you give advanced privileges to are trustworthy. For example, new hires can start on a probationary period during which they can’t publish without approval.
- Don’t install plugins and scripts from untrusted sources. Stick to well-known solutions that have been widely used and thoroughly vetted. Check plugins against a WordPress vulnerability database.
- Disable comments or require them to go through an approval process before publication.
- Ensure WordPress itself, as well as plugins, themes, and your underlying server packages, are up to date.
- Regularly back up your database to another location so that you can restore it after any attack.
- Don’t install themes from sketchy “cracked/nulled WordPress theme” sites. Often, the pirate inserts code that will compromize your site and users to distribute malware and more. Stick to reputable providers such as Grace Themes.
You can also make more specific tweaks to improve your WordPress security:
- Install a plugin to limit the number of login attempts. This will help protect against brute-force attacks.
- Change the URL of your login page to reduce automated login attacks. You can do this using a plugin.
- Generate a .htpassword file using Htaccess Tools, upload it to your server, and add a customized version of this code to .htaccess.
-
AuthName "Admins Only"
AuthUserFile /home/public_html/wp-admin/htpasswd/.htpasswd
AuthType basic
Require user Secur3UserName

<Files admin-ajax.php>>
    Order allow,deny
    Allow from all
    Satisfy any
</Files>
Protect your wp-includes folder by adding the following code to .htaccess outside the #BEGIN and #END tags. You can remove this later if needed.
<IfModule mod_rewrite.c>
RewriteEngine On
RewriteBase /
RewriteRule ^wp-admin/includes/ - [F,L]
RewriteRule !^wp-includes/ - [S=3]
RewriteRule ^wp-includes/[^/]+\.php$ - [F,L]
RewriteRule ^wp-includes/js/tinymce/langs/.+\.php - [F,L]
RewriteRule ^wp-includes/theme-compat/ - [F,L]
</IfModule>
Closing words
There’s always more we could say about WordPress customization, configuration, and use, but this guide should be enough to get you started on your journey while giving you a crucial understanding of key WordPress concepts. For more guidance, we recommend you read through the official WordPress Advanced Administration Handbook, which is full of advice on security, management, optimization, and more.